home ➜ Nintendo® ➜ SNES - Super Nintendo® Entertainment System® ➜ Platform ➜ Donkey Kong Country 2: Diddy Kongs Quest ➜ Gloomy Gulch - Walkthrough
Donkey Kong Country 2: Diddy Kongs Quest #26 - Gloomy Gulch
Gloomy Gulch - Walkthrough
Donkey Kong Country 2: Diddy Kongs Quest #26
Gloomy Gulch
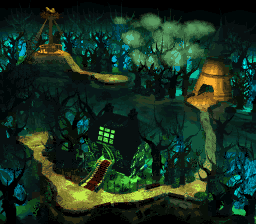 Gloomy Gulch is the fifth world featured in Donkey Kong Country 2: Diddy's Kong Quest and the fourth of Donkey Kong Land 2. It offers a spooky-like appearance and has plenty of fog surrounding it is location. This world consists of three spooky woods levels, a haunted library level, and a beehive level. The boss in this world is Kreepy Krow. This world is also filled with ghosts, and spooky Kremlings.
In Donkey Kong Land 2, the world has changed a little bit, due to the level Haunted Hall being replaced by Krazy Koaster and when Diddy Kong and Dixie Kong complete this world, they can see a Klubba's Kiosk on the left side of Gloomy Gulch.
1. Ghostly Grove, Gloomy Gulch
Enemies: Klomp, Kloak, Spiny, Klampon, Klobber, Kruncha, Kaboom
"K": To safely get the "K", stomp Klampon first, then Cartwheel or Spin into the Spiny. Go get your prize!
"O": After bashing the first two Blue Krunchas, take out Spiny and use the Ghost Rope to reach the letter "O."
"N": Annihilate the Yellow Zinger with the level's first TNT Barrel (make sure the Kaboom inside is inactive first) before crossing the gap with the four Ghost Ropes beyond. Once across, switch to Diddy (it is harder to use Dixie for this) and slowly walk toward the Barrel ahead. When the Green Klobber activates and blitzes toward you, jump straight up without moving forward to land on his head and stun him without waking up Kaboom at the same time. Pick up the neutralized Kremling and use him as a shield to immobilize Kaboom by letting him charge into Klobber's Barrel (with Dixie, you will have to throw the Green Klobber directly at Kaboom just as he starts charging at you to avoid being obliterated). Now, be quick to hit Kaboom with the Chest, which contains the letter "N". If you were too slow and Kaboom is only stunned by the Chest, just grab him and move forward until you can see a pair of Klampons below the two rapidly disappearing Ghost Ropes. Hurl Kaboom directly at the first Klampon when you can see both the shark-jawed monsters on-screen at once. This will ensure that the second Kremling foolishly walks into the fatal explosion and gets blown away along with his comrade. When the Klampons are cleared out by whatever means you choose to use, climb the Ghost Ropes to the second Bonus Barrel as quickly as possible. Try to grab the first rope just as it appears. However, this is easier said than done.
"G": Whack away the Spinys under a circle of Bananas high above you, then toss your primate pal up to this formation to snare the invisible "G."
DK COIN: Right below the plain where you find the "O". Deal with the Klobber ahead before doing anything else. Now go left and Helicopter Spin under the road beneath the "O" until you land in an Auto-Fire Barrel which will get you your Hero Coin and, with the help of a second Barrel Cannon, shoot you back into the action again.
BONUS AREA 1: Once you've hurtled the first Zinger, disable the Klobber, without breaking the empty Barrel nearby, and throw him up and to the right so he rolls through the two Krunchas ahead and splinters open the Bonus Area entrance. You could also smash open the entrance with a normal throw, but that is much harder to pull off. TO COMPLETE: Keep smashing the Red Zinger with the Chest until the Kremkoin pops out. Use the Up button as you throw to hit the Zinger.
BONUS AREA 2: See "N." TO COMPLETE: Using the Ghost Ropes, get to the other side of the expanse to find your Kremkoin.
Enemies: Kackle, Zinger
"K": An easy but well-timed leap is the key here while Kackle 1 is pursuing you relentlessly.
"O": Can you grab this while frantically smashing Plus Barrels to add time to the second Kackle's timer?
"N": Are you skilled enough to snag it on Kackle Number Three's road without shattering a Minus Barrel by mistake?
"G": When the last Kackle is chasing you, snatch the letter "G" carefully so you avoid the Minus Barrel strategically planted nearby.
DK COIN: At the Exit Target, scurry straight left, underneath the boardwalk, to claim your Coin.
BONUS AREA 1: After successfully evading the first Kackle (he wears a blue bandanna on his skull and hoards the letter "K"), jump onto the upper track ahead, then on top of the wooden shack above that to get where you need to go. Be quick or you will enter Bonus Area 2 too soon! TO COMPLETE: Hit the Plus Barrel at the top of the track to charge backward, then spring onto the upper track. Use careful jumps to stay on these higher rails, or you will fail to get the Kremkoin. You need only use the B button in this bonus stage, even when your car is screaming in the opposite direction.
BONUS AREA 2: Upon exiting Bonus Area 1, just let your car wheel into Bonus Area 2 on its own! is not it beautiful when all we have to do to get somewhere is by sitting back and not doing anything? do not get lost in this positive feeling, or your accuracy and agility will get hampered to a degree later on... TO COMPLETE: Not a single gap in the track can be found here, so keep leaping for Stars, without using any buttons other than B if you want, until you earn your Kremkoin at the far end of the rails.
BONUS AREA 3: Talk about hard to get! Moments after escaping the yellow-bandanna-toting Kackle 3, you will see an upper and a lower track. You need to get to the lower track (which has a line of Bananas on it) without unintentionally landing on the Zinger-infested upper track, by either two methods. Method One calls for a strategic small hop just when you are about to tumble off the main track and into the abyss below. Method Two is a short hop from a little farther back, but not too far back, or you will either land back on the track you jumped from or plunge to your doom. If your timing is right either way, you will get to the level's final Bonus Area. TO COMPLETE: Now it really gets difficult. With strategically-placed leaps, ride the rapid rails to the Kremkoin, but do not fall into the chasm through the gaps in the track!
3. Gusty Glade, Gloomy Gulch
Enemies: Klampon, Click-Clack, Spiny, Kutlass, Neek, Kannon, Zinger
"K": Crush the first pair of Spinys, then get off Rattly and bash the Chest open on the Kutlass below to find your golden treasure.
"O": do not fall!
"N": Past the first Kannon, you will see three Kutlasses in sequence -- first a single one below a Hook, then a pair on the other side of a tall, unevenly-stepped hill with a DK Barrel on its summit. Ignore the lone Kutlass for now and whack away the bottom Kutlass with the special Barrel when he is far enough away from you for you to attack him without getting minced. With the Chest he guarded, crumple the upper Kutlass and snatch up his Chest upon collecting the "N" from the Chest you just broke open. Use this second Chest to defeat the Kutlass on the left side of the hill and snag the Kannonball, which you must take to the Bonus Kannon beyond. To get back on track, throw the metal ball up onto the top of the hill and get on the Hook without losing sight of the black orb once it leaves the screen. To do this successfully, make sure the Kannonball is on the high left edge of the stepped hill before leaping to the Hook, and do not TOUCH THE GIANT, CREEPY, PURPLE TREE MONSTER THING AT ALL!!! Once on the other side of the hill, use caution when hauling the Kannonball to its destination, as you have to use the wind to help you vault over a pair of moving Yellow Zingers!
"G": After the first series of Normal Barrel Cannons, slide down the high hill and smoosh the final Kannon who is parked at its base. When the wind stops, execute a jumping Team Toss to land back on the summit. Once here, have Dixie jump and Helicopter Spin right until you see the Hero Coin. Slice through it with your ponytail and land on the small ledge below, where the "G" is waiting to your right. With a Spin Jump, snare the letter and soar to the other side of the chasm.
DK COIN: See "G".
RATTLY CRATE: Jump and Team Throw above and to the left of the start to find Rattly. Get him to the "No Rattly" Sign, and you will receive a 3-Up! WOW!
BONUS AREA 1: Just before the "No Rattly" Sign, use Rattly or a jumping Team Throw to land in this Bonus Barrel. TO COMPLETE: Go forward with the wind to the Kremkoin, but do not crash into any Flitters! You need only bounce from one of these bugs to reach the other side.
BONUS AREA 2: See "N". TO COMPLETE: With the moving Arrow Barrel Cannon, capture all of the Stars before you run out of time.
4. Parrot Chute Panic, Gloomy Gulch
Enemies: Zinger, Klampon, Spiny, Click-Clack
SHORTCUT!: Take the first Crate when the first Purple Squawks drops you and smash the right wall guarded by a Klampon. Once you collect the "Rare" logo made out of Bananas, you can find the letter "K" when you go through the doorway to the sneaky side passage on the other side.
"K": If you missed the Shortcut, you will have to avoid touching any Zingers when swooping in to get this dangerously-placed letter.
"O": To the right of the first two Spinys, this token will cost you your only chance to enter Bonus Area 1.
"N": you will find it immediately after exiting Bonus Area 2.
"G": Evade the nasty rotating Zinger whilst trying to bag the last letter.
DK COIN: With Dixie at the helm, jump from the start and Helicopter Spin to the left until you land in the Hero Coin's alcove.
SQUAWKS (GREEN): In the Bonus Areas.
SQUAWKS (PURPLE): There are nine of these avian assistants placed throughout the whole level, but Dixie can do better, thanks to her superior maneuverability.
BONUS AREA 1: After you enter a giant chamber with the third Purple Squawks, quickly flap to the left to the Bonus Area doorway before your birdie buddy releases you. it is easier to find this alcove with Dixie's trusty Helicopter Spin, on the other hand. You cannot get the letter "O" if you go into the Bonus chamber. TO COMPLETE: Using Green Squawks, fly up to the top of the passage to win your Kremkoin prize!
BONUS AREA 2: When the second Purple Squawks from the Continue Barrel (sixth parrot of nine total) sets you down, wipe out the Spiny immediately. As you head left, you will see two Zingers lurking at the base of the level's only honey patched wall. Without hitting either bee, use the honey patches to access the second Bonus Area. To land on the first patch, use a careful Cartwheel Jump or Helicopter Spin from higher ground (where you defeated the Spiny). TO COMPLETE: Do whatever it takes to destroy every Zinger in the chamber! GET 'EM!!!
5. Web Woods, Gloomy Gulch
Enemies: Neek, Kutlass, Kruncha, Zinger, Kaboom, Kaboing, Krook, Mini-Necky, Kannon
"K": Jump and toss your partner up to the upper passage when you start the level. Ignoring the Crate, use a Team Throw Attack on the Kruncha instead. Once the big bad baddie is beaten, snatch up the Crate and bash the upcoming Kutlass with it. Go get your letter.
"O": On the main midair route. Make a sure path for your eight feet or you will be sure to fall.
"N": you will see part of it when you land on the second Kannon's perch (be sure to defeat him first!). Spring to the lower platform and web whack the Mini-Necky quickly. When your avian enemy is downed, turn left, press Down on the Control Pad, and make a diagonally-launched web platform directly underneath the "N." Now, just leap to it very carefully.
"G": Given to you by Squitter at the end of the level.
DK COIN: A prize on the Exit Target. As the Banana appears, prepare to fire your Barrel Cannon with excellent timing! Misfire, and you will have to play the whole level over again for another chance.
SQUITTER BARREL: No problem finding this.
BONUS AREA 1: Cross the first pit of Mini-Neckys and wait for Kannon to shoot a slow-moving Kannonball. With assistance from platform webs, carefully turn left and backtrack to the mound and allow the Kannonball to crack open the Bonus Area doorway. Once the Kannonball falls off the screen, enter the Bonus Area. TO COMPLETE: Slowly move right and use connective platform webs to keep from spiking your shoe soles on the thorns below. Since the Zingers are in your way, knock them off the screen without falling off your platform webs. The Kremkoin is on the boardwalk on the right.
BONUS AREA 2: If you manage to escape the level's last swarm of Zingers (the only one with both Yellow and Red Zingers together), slowly land on and slide down the hill you come to and get into attack position, as there are two lofty pairs of Green Kaboings each lurking on two tall hills. Move slowly and dispose of these Kremlings from outside their attack range with pinpoint diagonal attack webs while the enemies are still off-screen (or, if you are not a sure shot, the instant you start to see their fingers). Upon taking care of the fourth and last Kaboing, hold down the Y Button to cease fire and still be able to run fast. Why? The Kannon ahead is your only ticket to entering the last Bonus Area, that is why, and you need to be able to outrun his projectiles! Wait for this final Kannon ahead to fire a Kannonball at you, then scurry underneath the first hill you see and hide there until the Kannonball passes over you. When it is safe, chase the projectile back to the left until it blows open the Bonus Area for you. TO COMPLETE: With Squitter's platform webs, bag every single Star, and victory is yours!
6. Gloomy-Gulch, Gloomy Gulch
Enemie: Kreepy Krow
Kreepy Krow (a.k.a. the ghost of Krow): Krow's back for revenge, backed up by an entire armada of Mini-Neckys to stomp on (even the ghostly bluish ones)! You must basically hit Krow with three Barrels, found by stomping the only non-ghostly Mini-Neckys in the Mini-Necky Air Force that comes at you. The Mini-Neckys attack faster with each hit, and more Mini-Neckys appear as well to make it harder to keep your Barrels. Try not to pick up the Barrels until the last of the Mini-Neckys are gone. In the first phase, there are four Mini-Neckys, including the solid one. Six Mini-Neckys total will threaten you in the second phase, and the last phase has EIGHT nasty Mini-Neckys to fend off! it is best to defeat them by trying to stay in place at the start of each phase and leaping straight up as each Mini-Necky prepares to dive (they're fast).
The first two hits are followed by scrambling up a series of Hooks and ropes and dodging giant eggs. Listen for their falling sound to get an advanced warning as to when and where the eggs will be launched from. In the first climbing section, climb to the left of the first Auto-Fire Barrel for a DK Barrel, but be sure to watch out for eggs when trying to get this! In the second shaft, jump over the horizontally-flying eggs and dodge the vertically-falling ones as you climb to the second Auto-Fire Barrel. Three total Barrels will destroy Krow forever!