The SNES game based on the film Jurassic Park is an action title that combines top-down and first-person perspectives.
Playing as Dr. Alan Grant, the player's ultimate goal is to escape the Jurassic Park island. To reach that goal, several other tasks must be completed, including restoring power to the park and destroying a Velociraptor nest.
The large game world is seen from a top-down view and can be freely explored. Some areas are not accessible from the beginning, however. To enter them, keycards must be found or some special goal be completed, like rebooting the computer system and using it to open certain gates. Dr. Grant can defend himself against the many free-roaming dinosaurs with a variety of weapons, including an electroshock gun, a shotgun, rocket launcher, gas grenade launcher and bola gun. All weapons except the electro gun require ammo to work. A radar at the bottom of the screen helps in detecting approaching dinosaurs, but only works once the park's motion detectors have been activated.
Upon entering one of the park's buildings, the game view switches to a scrolling first person perspective, reminiscent of early first person shooters like Wolfenstein 3D. Just like outside, dinosaurs lurk in the corridors, and the same guns as in the overworld map can be used to destroy them. Many buildings consist of several floors, with elevators connecting them. Some rooms are pitch black and can only be entered when in possession of night vision goggles.
The game supports the SNES mouse for the first-person sections and the computer system interface.
The dinosaurs are loose in Jurassic Park. Take the role of Dr. Grant as you try to escape from the roaming monsters. Ocean's exclusive technology allows all of the action to be rendered in 3D. You get so close to the action that you swear that you can feel the breath of the dinosaurs on the back of your neck. If you can avoid the razor sharp claws of the raptors, you just might be able to escape Jurassic Park.
Features:
Based on the film, but the action follows the book more closely
Multiple levels
Variety of dinosaurs
Take the role of Dr. Grant
3D graphics
Controls
Outside
Start
pause the game
Select
toggle between your cattle prod and heavy weapon
L and R
cancel "tips" from your friends (when they pop up, hit L or R right away to keep your screen clear)
Directional Pad
move around
A
fire selected weapon
B
jump
X
pick up item (outside only; inside, just walk over items to pick them up)
Y
use alternate weapon
Inside
NOTE: Inside buildings, the game switches to FPS view, and the controls change slightly.
Up
forward
Down
backward
Left, Right
turn left, right (no strafing, unfortunately)
X
nothing
B
nothing
All other controls are the same.
Objectives
Complete a series of objectives to secure the park and get a ride home.
Turn on the Generator
You start in the center of the map. Walk left to pick up some bolas, then head south through the gates. There are some raptors (use the bolas), but you should be able to make it to the southern area.
Go to the right until you come to the canal. Jump it (you can walk all the way up to the water's edge, and you need to in order to make the jump), then head to the upper right of this area. You will find a triceratops corridor; stay to the right and take it down a little. You will be able to move through the trees into a secret area with an egg. Take it, then go back over the canal.
There is an egg on the southern edge, below the gallimimus herd. It is in a little forest area over some vines. Now go up to the mountain, Nublar Mont. There is an egg up here as well.
When you have these three eggs, head to the Nublar Utility Shed (the one nearby). Get the batteries, then go into the back to turn on the generator. Make sure to collect some missiles while you are in here. Make your way back to the entrance gates.
Nedry's ID Card
To open the electrified gate, use a rocket on the little gear-mechanism (you can use your cattle prod, but it is slow and you have to stand there the whole time). Head west past the gallimimus and enter the western forest. There are many dinos in here and they are agressive, so be careful.
Collect the two eggs in the northwest and southwest corners of the forest, then head to the eastern edge to find a third egg. The corridor to the right is a triceratops corridor, but you can outrun it. Go down through it, then carefully make your way past the velociraptors to the Beach Utility Shed.
Get Nedry's ID from the shed, grab some missiles, and head for the Visitors Center (remember to use the alcoves in the triceratops corrider to avoid getting squashed).
Reboot the Computer System
Inside the Visitors Center, go to the second floor. You will be able to get to the computer room with Nedry's ID. Use the computer there to reboot the park system by clicking on the boot. Now use the menu to turn on the motion detectors.
Now go to the roof, grab the egg and Hammond's ID (watch out for the raptor). With Hammond's ID, you can get to the basement and find the batteries. With the nightvision goggles, you can go in the dark area on the first floor and take Alan Grant's ID.
Now go out and to the right until you come to the bridge. Use a rocket on the gears to extend the bridge. Head north to the mountain and grab the egg on top of it. Then head south back to the Raptor Pen.
Stop the Raptors from entering the Visitors Center
Enter the Raptor Pen through the door along the top. Shoot the raptor to your left and then use the elevator to go down two floors to the Ground Floor. There will be jungle showing through some windows.
Make your way through the first few rooms to find the batteries. Now backtrack to the elevator, go up one floor, and enter the dark room to find Ian Malcolm's ID card. Proceed back to the Ground Floor.
Shoot your way through the dinos to Sublevel 1. Find Muldoon's ID on Sublevel 1 and then use the second elevator to enter Sublevel 2. Make your way to the door locked by Alan Grant's ID, enter the room and defeat the two raptors. Push the crate towards that door to stop raptors from using it (if you go in there, you will find a zillion raptors in a sort of cave and a 1-up at the end).
Use the elevator in this room to enter the basement of the Visitors Center (this is how the raptors got in). Blast your way outside.
Acquire Rockets
Go to Nublar Utility Shed and use Ian Malcolm's ID in the basement to find Gennaro's ID. Then make your way to the Beach Utility Shed, use Genarro's ID to open the elevator to the basement, and find Ray Arnold's ID. In the process, you should acquire lots of rockets.
The East Mountains and the Ship
Head to the East Mountains, but collect the egg south of the entrance path first. Now navigate the mountains, grab the egg on the top, and head down to the southern exit path (two raptors hiding on the way).
Once off the mountain, head north along the cliff's edge to collect an egg and a 1-up. Head back along the base of the mountain to its southwestern edge, walk a little south and collect that egg. Now find the bridge on the cliff, shoot the gears above it and collect the egg on top of the ship.
Enter the ship and clear the first level of dinos. Also find the batteries. Go down to Sublevel 1, clear out the dinos and grab Dr. Wu's ID card. Now exit the ship and head back to the Visitors Center. Go to the computer room, and continue through this secure area to find a second computer. You can request Security Level 1 from this computer.
Exit the Visitors Center and enter the Raptor Pen. On the Ground Level, there is a room that you can only enter with Security Level 1; you have that so go in and use the computer there to call the ship. The ship will receive a satellite order to remain in dock, completing that objective. Head back to the ship.
Head to Sublevel 2 and clear out the dinos (you need Arnold's ID to get through the doors here). Make sure to find the computer in one of the middle rooms and request Security Level 2. Also use this computer to switch the gate control to Gate 1. You will be going there after the ship. With Security Level 2 you can enter the elevator in the dark room.
On Sublevel 3, clear out the dinos and make note of the dark bunk room with the computer in it (you will use it to call the mainland). Go back to the elevator and go down to the final level of the ship.
Sublevel 4 is actually a little hazardous because there are many dinos packed into small rooms. There is a health pack very near the elevator on Sublevel 3, so do not be afraid to backtrack for it. After you clear out all the dinos, exit the ship and head west.
Destroy the Raptor Nest
If you forgot to use the ship computer to open Gate 1, do it in the Raptor Pen. Head to the west of the Visitors Center to find the bridge and shoot the gears to extend it. Head through the forest to its northwest corner to find an egg. Now go to the electrified gate, which you should be able to open. Head right and south to find the egg near to edge of the Visitors Center, then head to the back of the Utility Shed to find another egg.
Enter the Utility Shed, head to the basement, use Muldoon's ID to open the large room and grab the Nerve Gas Canister. Exit the shed and head all the way back to the Raptor Pen. Use the computer inside to switch the gate control to Gate 2.
Go through Gate 2 and head to the southeast corner where the southern entrance to the Raptor Nest is located, then take the egg. Go north, but always stay to the east edge of the forest to avoid the T-Rex. Along the north edge of the map, you will find the last egg and the north entrance to the Raptor Nest. Go inside.
Once you enter the nest, just follow the left wall. When you come to a choice of turn, take the left one. If you come to a dead-end then turn around and continue to take all left turns. You will find the egg room before long. Be a little careful because there are zillions of raptors.
Walk into the middle of the room to drop the canister of nerve gas. A message tells you to get out immediately, but there is no timer. To get out easily, use the Right Hand Rule (opposite of Left Hand Rule). It will take you back out the way you came (assuming you do this right).
Ending the Game
Once outside, go back to the ship. On Sublevel 3, use the computer in the dark bunk room to call the mainland for a chopper to pick you up AND use the gate controls to open Gate 3 so you can get to the helipad.
Make the long walk to the Helipad, and approach the big H. If you picked up all of the eggs, you will get choppered off the island. You cannot win without picking them up.
Step by Step
Egg #1 - You start at the Jurassic Park Gate. Pick up some weapons that you see lying around on the ground, then head south, where you will find the Nublar Utility Shed. Collect Egg #1 just south of this shed.
Egg #2 - To the west of the shed is a small mountain called Nublar Mont. Egg #2 can be gotten here.
Egg #3 - Now, go east of the shed and jump over the small river. Walk east past the helipad until you reach a vertical row of trees and appear to be unable to move any farther. (You are in the right area if a Triceratops comes charging down the path, but just be sure not to get run over, as they cause instant death!) Try pressing into the wall of trees at the right side of the screen in this area, and you should find a hidden passage that leads to Egg #3. There is also another hidden passage, slightly south of this one, that leads to a 1-Up, if you wish to get it, too.
The Generator - Go back across the river and enter the Nublar Utility Shed. Find the battery on the first floor and get it. Then look around for a panel on the wall that looks like a bunch of yellow lights. Walk up to it, and you will automatically turn on the power generator.
Stock up - This step is optional! At this point of the game, I like to leave and re-enter the Nublar Shed several times, collecting Rockets (the weapon that looks like a beehive) and bolas (the silver balls) each time. These are, hands down, the two best weapons in the game, and I like to get a good supply. You can also get more of these weapons on the second floor of the Nublar Shed, even though I did not direct you to go there yet in the previous step. The number of times you do this is up to you, but I recommend 5 times.
Egg #4 - Leave the Nublar Utiliy Shed and head north, back to the gate where you started the game. Shoot the gate lock to open the door that blocks your way farther north. Go through the open gate and walk around the east side of it then south, where you will find some Dilophosaurs (the green spitters). you will find Egg #4 in this area.
Egg #5 - Go west past the Visitor's Center, then start heading in a southwest direction through the forest maze. You should look for a small clearing with a Motion Sensor stationed in it. Egg #5 is somewhere west of this Motion Sensor.
Egg #6 - Farther west in this area should be a place where you find more Dilophosaurs. (If you find a Medikit partially hidden under a tree, you are in the right place.) Egg #6 is hidden in a clearing somewhere around here.
Egg #7 - When you get the message from Tim Murphy about the Triceratops, you will soon be in a location where the Triceratops stampedes. Egg #7 is right above where the Triceratops comes out.
Dennis Nedry's ID Card - Once you have all the eggs, keep heading southwest through the forest maze until you reach an area with another shed. This is the Beach Utility Shed. Enter the shed and find Dennis Nedry's ID Card on the first floor. Then leave the shed.
NOTE: In the area around the Beach Shed, you will notice the music changes to a strange-sounding song with lots of drums. This indicates that the T-Rex is somewhere in the nearby area. Stay close to the shed, and you will not encounter him, but if you do venture out, be aware that the T-Rex cannot be destroyed! You can only slow it down with the Tranquilizer Darts. The T-Rex will defeat you instantly if it grabs you in its huge jaws.
Activate Motion Sensors - After leaving the shed, head back the way you came and enter the Visitor's Center. Take the elevator to Floor 1 and find a computer terminal on the wall. Walk up to it and you will be sent to the "Computer Screen." Click on the option to reboot the computer. Then click on the option to activate the motion sensors.
John Hammond's ID Card - Leave the computer terminal and take the elevator to Floor 2 (which is the roof level) and leave through the exit. You are now on the roof of the Visitor's Center. Find John Hammond's ID card up there and pick it up.
Egg #8 - Egg #8 is also on the roof of the Visitor's Center. Get it before you leave.
Alan Grant's ID Card - Go back into the Visitor's Center and take the elevator down to the Sub Level. Find the battery and pick it up. Then take the elevator back up to the Ground Level. With the battery, you can now enter the room that requires night vision, and get Alan Grant's ID card in there. (You can, if you want, return to Floor 1 and find a 1-Up in a dark room, too.) After you have done what you need to do, leave the Visitor's Center.
The Raptor's Pen - Go east of the Visitor's Center until you find a platform with a lock similar to the one you shot earlier to open the gate. Shoot the lock and the bridge will slide over the aqueduct. Go north until you find a brown building. This is the Raptor's Pen.
Robert Muldoon's ID Card - Enter the Raptor's Pen and take the elevator down to the ground level. Find the battery and pick it up. Then take the elevator down to Sub Level 1 and find Robert Muldoon's ID Card on this floor. (You can also find a 1-Up on this floor, too, if you want to look for it.)
The Crate - Take the elevator down to Sub Level 2 and look for a room with a huge wooden crate near a door. If you want to get an extra 1-Up, then do NOT get too close to the crate just yet! Instead, approach the door from the opposite side of the crate and enter. you will be in a huge dark room full of Raptors and at the end is a 1-Up. Leave that room and walk over to the crate. When you get close enough, it should automatically slide in front of the door, and you will get a message saying that Raptors can no longer get into the Visitor's Center. You have now completed Major Goal #2. (NOTE: After the crate has been moved, you can NOT get back into that room again.)
Ian Malcolm's ID Card - Return to the upper level of the Raptor Pen and find Ian Malcolm's ID card on this floor. Leave the Raptor Pen after you get it.
Egg #9 - there is a small mountain slightly northwest of the Raptor Pen where you can find Egg #9.
Donald Gennaro's ID Card - Head south, back through the main gate, and return to the Nublar Utility Shed (the first building you entered at the beginning of the game.) Take the elevator to the second floor, and find Donald Gennaro's ID Card. Then leave the Nublar Shed.
Ray Arnold's ID Card - Now, you are going to have to go ALL the way back to the Beach Utility Shed, again. (Remember, west past the Visitor's Center, then southwest through the forest maze.) Once you get to the Beach Shed, take the elevator down to the sub level and find the battery. Once you have it, look for Ray Arnold's ID card. Pick it up, then leave the building.
Egg #10, Egg #11, Egg #12 - Earlier, you may have noticed a huge mountain range just to the east of the main park gate. This is where you will need to go, next. Work your way through these mountains and head in a general southeast direction. There are three eggs hidden in this area. One is on top of the mountains. One is just to the east of the mountains (along with a 1-Up) and the other is near trees just south of the mountains (after you have crossed over them).
Egg #13 - After crossing the mountains, you should come to an area near the ocean, and you will see a ship docked at a harbor at the right of the screen. Shoot the lock to make the bridge move over to the ship, just as before. Cross the bridge to the ship, and get the egg on top of the ship.
Ship Part 1 - Enter the ship and note the number of Dinos remaining that appears on your screen. You will have to wipe out all dinosaurs on each floor of the ship to complete the next major goal. Destroy all dinosaurs on this level and find the battery.
The Ship Part 2/Dr. Wu's ID Card - Take the elevator down to the next level of the Ship and destroy all the dinosaurs. Also, find and pick up Dr. Wu's ID card on this level. When you have done this, take the elevator back up to the entry level and leave the ship (for now).
Level 1 Clearance - Now that you have Dr. Wu's ID Card, return to the Visitor's Center and take the elevator to Floor 1. Find the second computer terminal and request Level 1 Security Clearance. (Note that there are TWO computer terminals on this level. you have probably used the first one, before, but you need to find the one that is hidden farther in the back of the building for this task.)
Radio the Ship - Leave the Visitor's Center and return to the Raptor Pen. Take the elevator down to the ground level and find the computer terminal. Choose the option to radio the ship. This will stop the ship from sailing. Then leave the Raptor Pen.
Level 2 Clearance - Return to the ship and go back down to the third level. Find the computer terminal and request Level 2 Security Clearance. If you missed any dinosaurs on the first three levels, clear them out, now.
Ellie Sattler's ID Card - When you are done clearing out the dinosaurs, find the elevator and go down to the fourth level (Sub Level 3) of the ship. Destroy all the dinosaurs on this level, as well, and find Ellie Sattler's ID Card. Also, you should find a Computer Terminal on this floor in a dark room. You do not need to do anything with it, now, but remember it! It will be important later on.
Final Ship Level - Take the elevator to the final level of the ship and clear out all the dinosaurs. When you have destroyed all the dinos on all levels of the ship, you will get a message congratulating you. You have now completed Major Goal #3. Now, it is time to leave the ship.
Open the West Gate - Go back to the Visitor's Center and find a computer terminal. Choose Park Control and open Gate 1 (the westmost gate). This will cause Gates 2 and 3 to lock, so you will not be able to open them right now, but you will not need to. Leave the Visitor's Center.
Egg #14, #15, & #16 - West of the Visitor's Center there should be another one of those bridge things that you can shoot to cross north, over the acqueduct. This will put you in the area of Gate 1 and the North Utility Shed. In this area, you will find three eggs. One is just to the north of the area where the Triceratops stampedes. Another is just to the east of Gate 1. The other one is behind the Utility Shed.
Nerve Gas Bomb - Enter the North Utility Shed. Find the Battery on the Ground Level. (There is also a 1-Up here if you want to search for it.) Take the elevator down to the Sub Level, and find the Nerve Gas Bomb. Take it and leave the shed.
The Raptor's Nest - Go back to the Visitor's Center and open Gate 2 at the computer terminal. Leave the Visitor's Center and head northeast. You should find Gate 2 somewhere north of the mountain range that is near the ship. Be careful when you hear the music change in this area, because the T-Rex is lurking around! In this area there are several cave-like entrances amongst the trees. These lead to where the Raptor's Nest is.
Detonating the Bomb - IMO, this is the most irritating part of the whole game! The maze of tunnels that eventually lead to the Raptor's Nest is huge and confusing, and all the walls look alike, so it is practically impossible to give you exact directions as to where to go. Since enemies do not respawn, one suggestion I have is to only defeat raptors in the direction you are going. That way, if you cannot find the nest, you will know which areas to search by looking for raptors. you will know when you have found the nest, because there will be a bunch of blue eggs all over the floor. Walk into the middle of this area, and you will automatically drop the bomb.
Escaping the Nest - When you drop the Nerve Gas Bomb, you will get a message saying to get out as quickly as possible. do not let this panic you! As far as I can tell, you have an unlimited amount of time to escape. Of course, it is going to be just as difficult finding your way back out as it was finding the nest in the first place. If you only defeated Raptors in the directions you went, you could try finding your way back out by only taking paths where there are not any Raptors. It may take awhile, but eventually you will find the way out, so do not give up! When you finally escape, you will have completed Major Goal #4.
Egg #17 & #18 - The final two eggs can be found in the area outside the Raptor's Nest. They're both very close to cave entrances, so they should not be too hard to find. This completes Major Goal #5.
Radio the Mainland - Leave the Raptor's Nest area and return to the ship. Go back down to Sub Level 3. Remember that computer terminal in the dark room I mentioned earlier? Well, find it, and use it to radio the mainland for help. For some reason, that can only be done at this terminal. Now, unlock Park Gate 3 and leave the ship. It is possible to unlock the the gates with the ship terminal, but if you have a problem, return to the Visitor's Center and do it there.
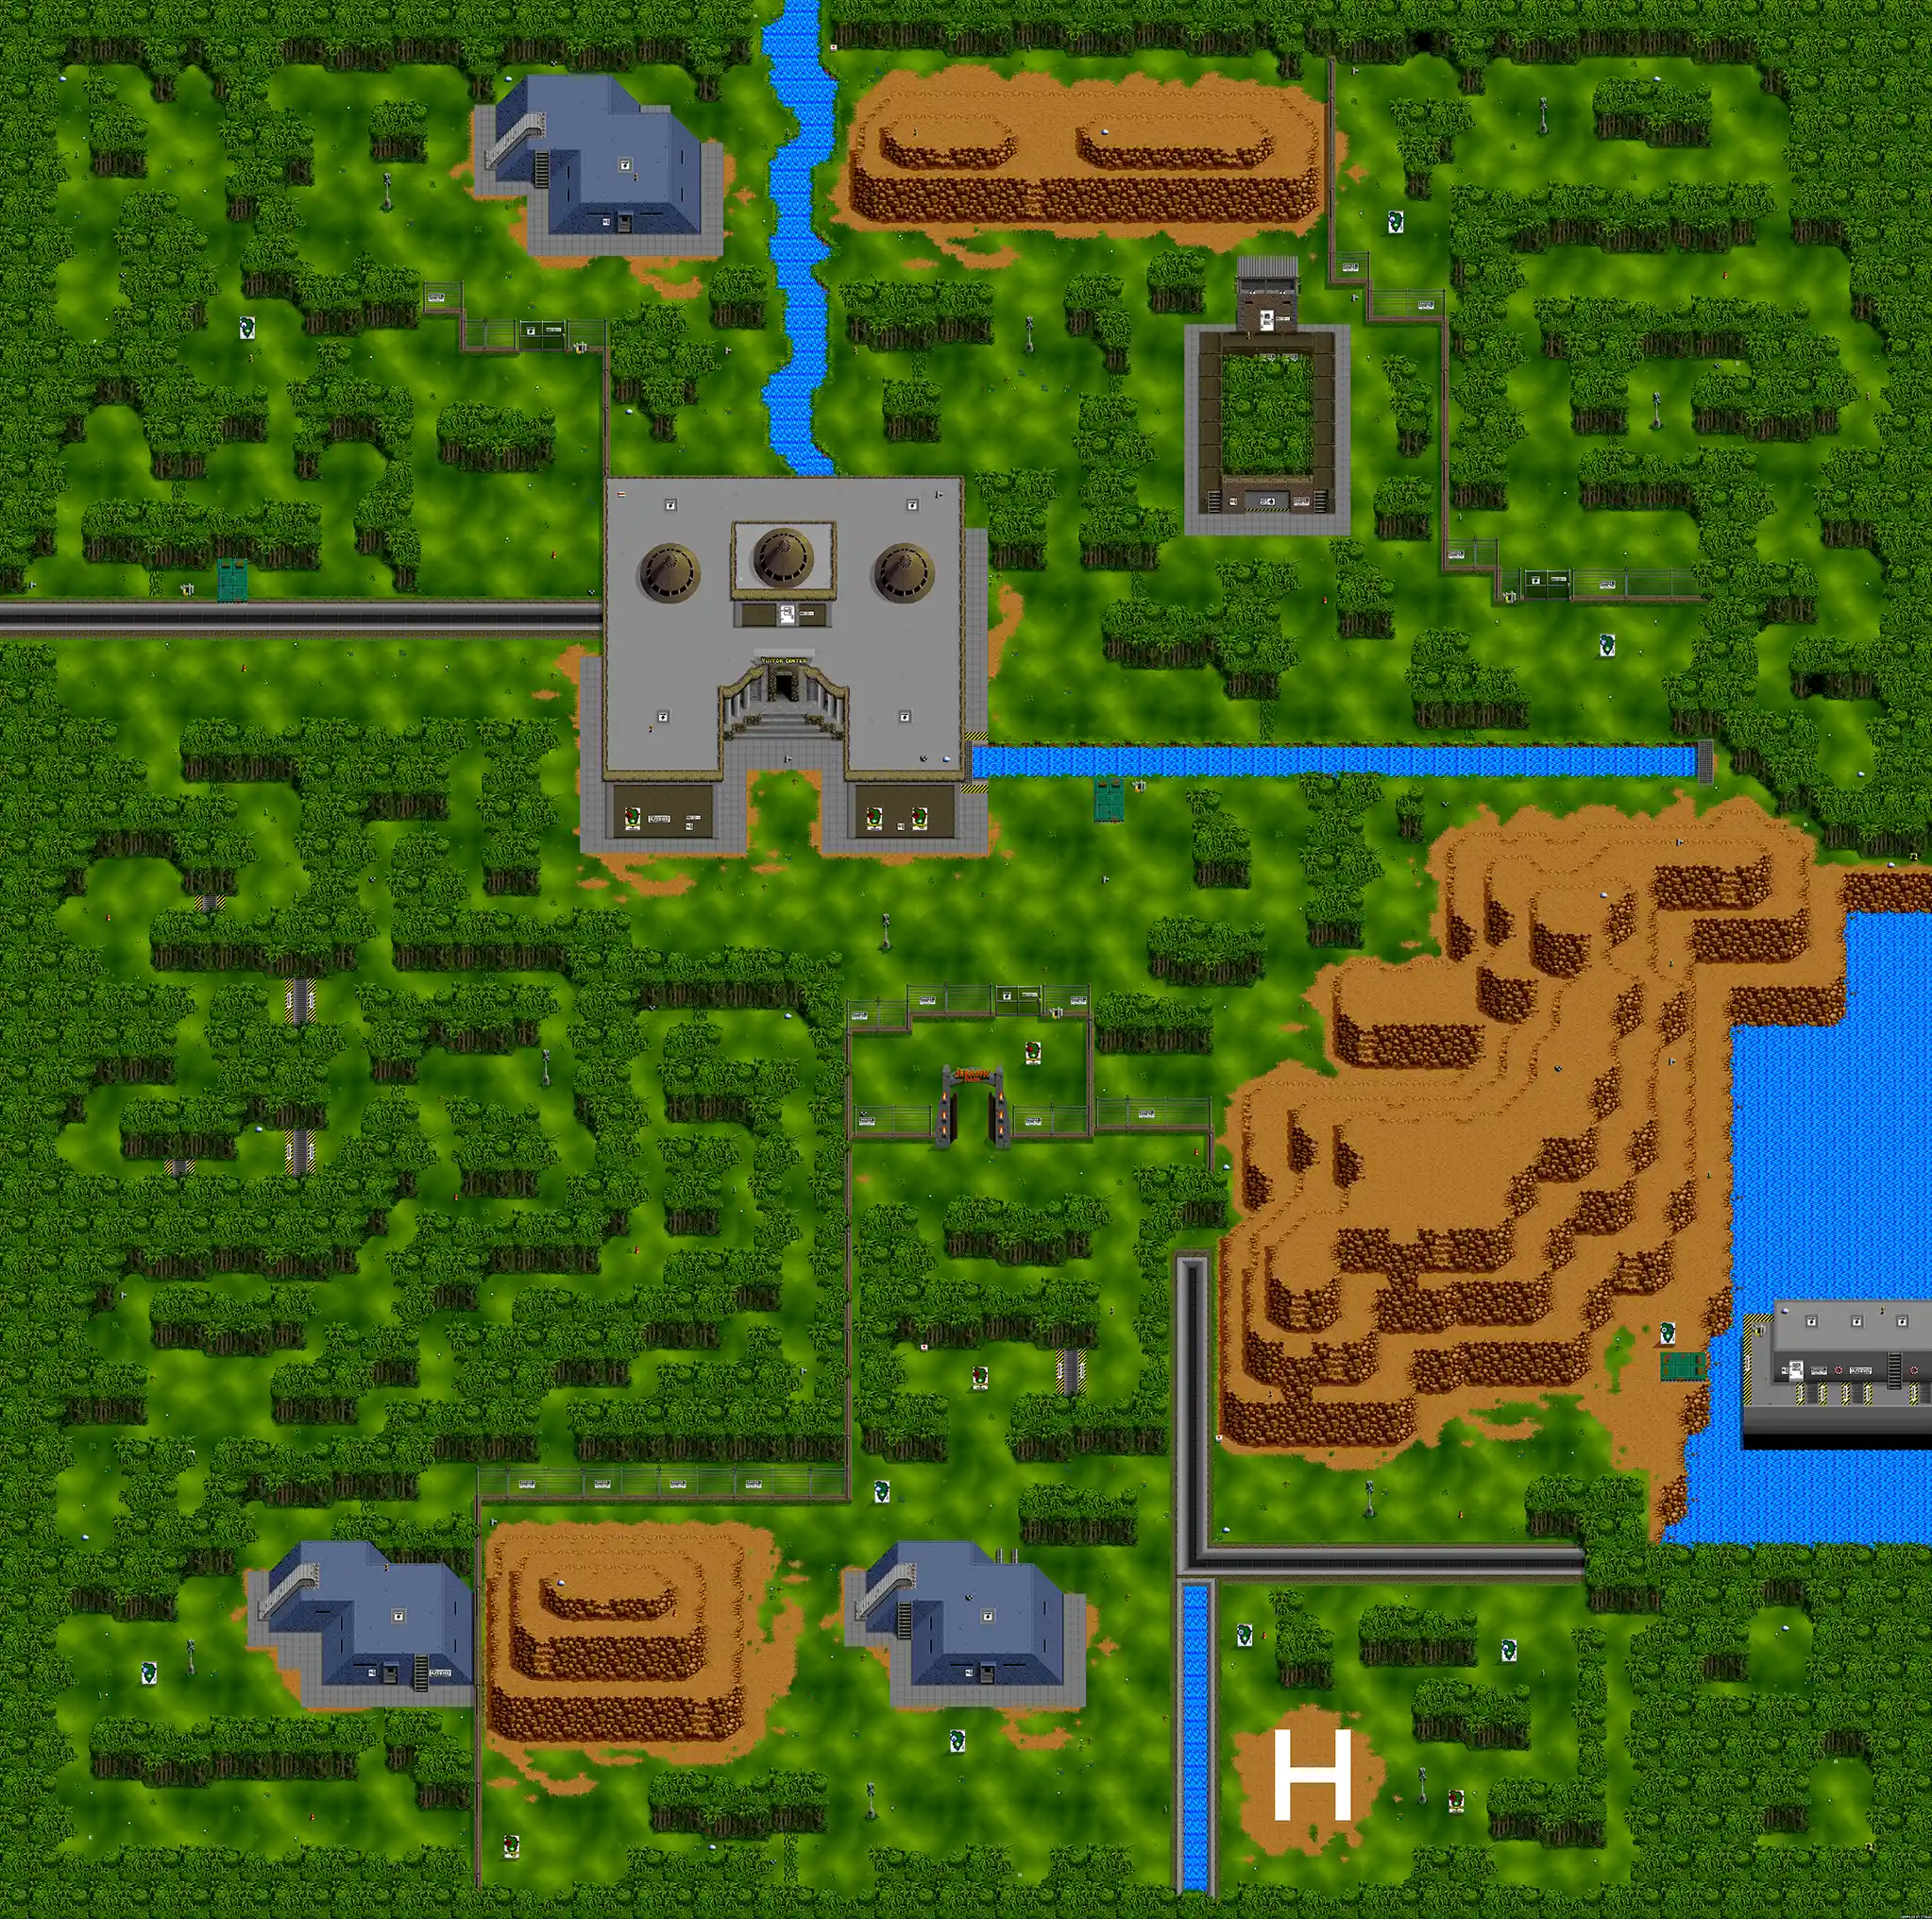
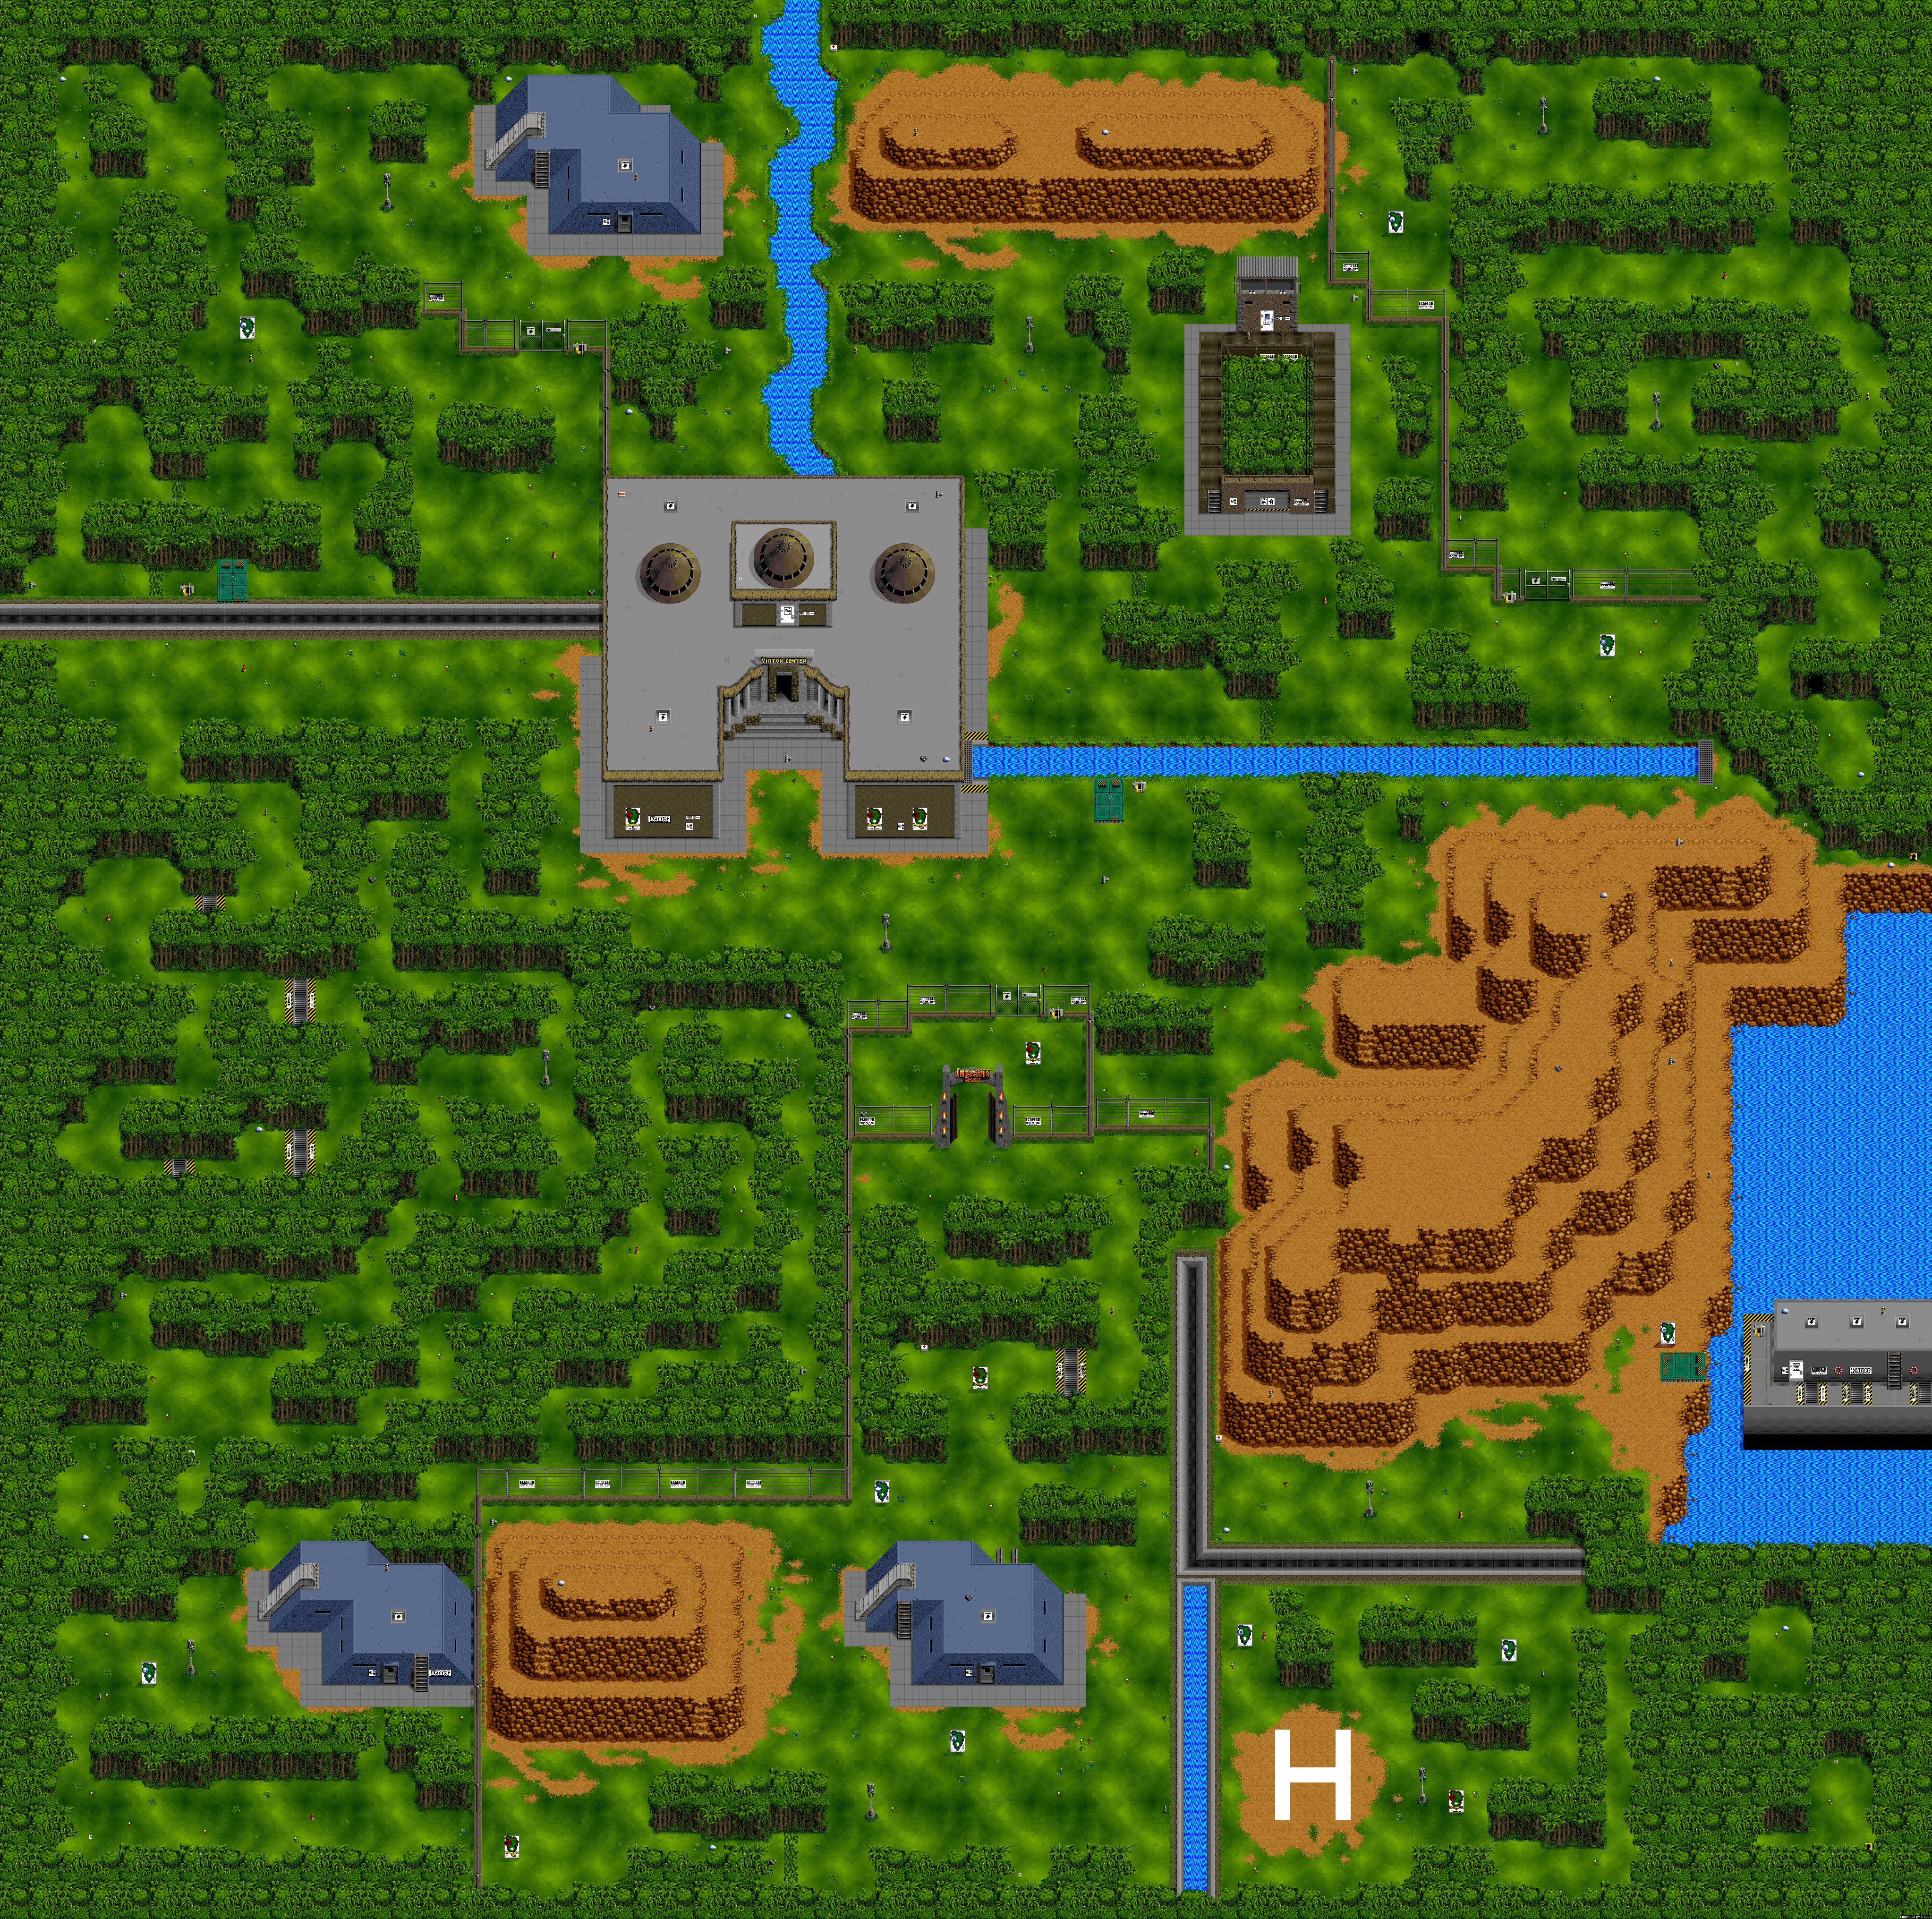
The Helipad - Now, your only goal is to get to the Helipad. If you do not remember where it was, return to the Visitor's Center, then go south through the main park gates. Keep going south until you get to the Nublar Utility Shed, then go east. Leap over the river and you should see a huge letter "H" on the ground. Stand on it, and you have completed Major Goal #6.
Maps
Items
Food
This is only found in buildings, and it restores health.
Health
These look like first aid kits, and they restore health.
ID Cards
There are many ID Cards in the game, and you need all of them except Ellie Satler's
Nedry's ID is in the Beach Utility Shed (southwest area)
John Hammond's ID is on top of the Visitors Center
Alan Grant's ID is in a dark area on the 1st floor of the Visitors Center
Ian Malcolm's ID is in a dark room on the Upper Level of the Raptor Pen
Donald Gennaro's ID is in the basement of the Nublar Utility Shed
Ray Arnold's ID is in the basement of the Beach Utility Shed
Dr. Wu's ID is on the second sublevel of the ship
Robert Muldoon's ID is on sublevel 1 of the Raptor Pen
Ellie Satler's (worthless) ID is on the 3rd sublevel of the ship
Eggs
Pick them up when you see them, there are eighteen:
southern edge of map near Nublar Utility shed in some trees
in the northern secret area near the helipad
on Nublar Mont
northwest corner of western forest
southwestern corner of western forest
eastern edge of western forest at the top of triceratops corridor
between the starting area and the east mountain range
on east mountain range
on north mountain range
eastern edge of map along eastern edge of east mountains (walk up along the sea cliffs)
near the southwestern base of the eastern mountains
on top of the ship
northwestern corner of northwest forest
south of North Utility shed right above Visitors Center
on top of Visitors Center
north of North Utility shed
southeastern edge of northeast forest, in front of raptor nest hole
northern edge of northeast forest, near raptor nest hole
Nerve Gas Canister
Needed to destroy the Raptor Nest, found in the North Utility Shed.
Batteries
One found in each building; you need to find them before you can power the night-vision goggles for dark areas in each building.
Cattle Prod
Default weapon; it works against everything except the T-Rex, but a raptor will definitely defeat you before you take it down with this.
1-Ups
Gain an extra life (they look just like the symbols in your life counter)
Heavy Weapons
Shotgun
red bullets; takes two or three hits to take down large dinos.
Tranquilizer
little needles; dinos go to sleep, AND this is the only weapon that is effective against the T-Rex. It will make him back up a little, but he will come for you again.
Rocket
black-orange rockets; one-hit defeat on all dinos, but useless
against T-Rex.
Alternate Weapons
Bolas
three metal balls; defeats any enemies in its path until it hits a wall or goes off screen.
Gas Grenade
grey canisters; knocks out dinos.
Dangers
The dinosaurs do not respawn, so when you clear an area of dinosaurs you will not have to worry about them anymore. However, sometimes dinosaurs that you have not defeated in an area get "warped" to an area you have cleared out already. This only happens locally, like a dilophosaurus on a mountain might warp to a part of the mountain you already cleared.
The only exception to this is the raptors; they will respawn on the park map and they will respawn in the Raptor Nest if you go in before the egg room opens. Also, since you can not defeat the T-Rex or triceratops, they are always to be found in their areas.
Collect a lot of rocket ammo and never use anything else but that and bolas. Using the Cattle Prod on the Compys because they are easy to keep track of and there are so many. Rockets will defeat anything in one hit and bolas will do the same but go through multiple enemies.
Vines and Electrified Grates
Do not step on these, they will hurt you. Also, do not walk into the water because you will die.
Giant Fly
The giant flies move about very fast, then pause. Hit them when they pause.
Procompsognathids ("compys")
The little yellow dinosaurs are very easy to defeat unless they hide in the treeline or against a rock wall. In some spots your cattle prod's electric arc will disappear against the trees or rock walls, and the compy will then run at you. They do little damage, so just be patient. If you do not move, they will approach you, so that way you can lure them in for a defeat.
Gallimimus
There are three herds of these running about. Little Tim Murphy will tell you NOT to shoot the Gallimimus or they will stampede; do not listen to that brat. Shoot them with bolas and they will disappear like popcorn at the movies.
Pachycephalosaurs (little head-butters)
These little jerks have blue stripes and try to ram you all the time. Try and shoot them from a distance to make it an easy defeat.
Dilophosaurs (spitters)
Their spit will make you move randomly or "backward" if you try to hit any buttons. Sometimes they spit at an angle that will surprise you if you are not careful. They are also found in buildings. Inside, they are much easier because they do not move and only spit when you are close. If you see spit coming, just back up and it will fall short of you.
Velociraptors (raptors)
Raptors hide all over the place, and they usually appear in groups of two or three. A rocket will take them out though, and their hiding places are the same, so you can learn where to strike. Inside buildings, they will run at you if you get close, and they also stalk around (just back and forth). You will get good at shooting them pretty quickly.
Triceratops
In a few vertical corridors on the park map, a triceratops will start running after you and squash you. You must run down until you find a path to take away from the triceratops because the triceratops is invincible.
To get back UP such a path, you need to find little alcoves. Walk up slowly, then duck into one as the triceratops blasts past you, then continue up the corridor.
Tyrannosaurus Rex
You can not defeat or even injure the T-Rex. Tranquilizer darts will make him pause a little, but in general you do not want to even get near the T-Rex. It is cool to get eaten once, though.
Secrets
The items inside buildings respawn, but the dinos do not. Go in and out of them to rack up ammo. This even works between floors. In general, just stock up on rockets and bolas. If you pick up some other ammo by mistake, just run back over your old ammo to switch back (you will still have your super- stockpile).
Touch the motion sensors often; they act as respawn points if you die.
If Nedry gives you advice, read it; he gives you strange advice like "Raptors only attack if you move" or "The T-Rex will give you a 1-Up if you approach him." He wants you to get in trouble. And then sometimes he calls you a sucker. He gives you bogus advice.
Use bolas on the gallimimus herds, especially near the Visitors Center. This will remove a very annoying aspect of the game early on.
if you are unable to do something (like lay down the nerve gas or call the mainland), think about whether or not you completed earlier objectives. I was very frustrated by this the first few tries through the game.