home ➜ Original Xbox Game Console ➜ Grand Theft Auto III
Grand Theft Auto III - Betrayed and left for dead
Information
Grand Theft Auto III

- Developer: Rockstar North, DMA Design, War Drum Studios, Rockstar Vienna
- Publisher: Rockstar Games
- Game Rating: M (Mature) [Blood, Strong Language, Violence]
- Release Date:October 21, 2001
- $39.99 (double box set with Vice City) / $7.99
- Players: 1 - 4
- Memory Card, Custom Soundtrack, Vibration, DualShock, Dolby Digital, 16:9, 480p, EAX, Playable on Xbox 360

Description
Grand Theft Auto III (also shortened into GTA III or GTA 3) is a 2001 action-adventure videogame developed by Rockstar North (then known as DMA Design) and published by Rockstar Games. It was originally released for the PlayStation 2 console, but also saw ports for the PC and Xbox.
Set in the fictional Liberty City in 2001, Grand Theft Auto III begins a new continuity separated from its predecessors. The game's narrative follows the adventures of Claude, a silent criminal who was betrayed by his girlfriend Catalina during a bank heist. Claude begins to work for different factions in the crime-riddled Liberty City, including the Mafia, Yakuza and corrupted figures.
Set in an open-world environment, Grand Theft Auto III is the first game in the series to be presented in a fully 3D world, shifting away from the top-down perspective that characterized previous games in the franchise. Development was handled by DMA Design, and it was the final game developed by the company before its rename into Rockstar North.
Grand Theft Auto III was universally acclaimed upon its release in October 2001. Critics praised the game for its presentation, game design, freedom, sound design and ambition, though it was a subject of controversy due to its violent nature. Multiple publications deemed it a revolutionary title for its advancements in game design and open-ended gameplay, and it was awarded a variety of end-year accolades. A commercial success, GTA 3 sold over 14 million copies.
Introduction
You have never played anything like Grand Theft Auto 3... after picking it up, you may never play anything again. Grand Theft Auto3 is all about possibility. At any given point in the game, you can do one of a million things. Listen to the radio. Car jack someone. Double-cross the mob. Give someone an illegal taxicab ride. Or just beat on him with a bat. If you can think it, you can pretty much do it. that is the beauty of the game.
Set in Liberty City, Grand Theft Auto 3 is seemingly alive, teeming with hundreds of city dwellers, all of which are fully interactive. Each one has his own agenda. Businessmen hurry to work, bums get in your way, hookers hustle for the almighty dollar, and gang members conduct their surly business all over Liberty City. If you interrupt their lives, they let you know about it. Some chase you. Others run in fear. Some call their buddies to bust your chops.
Your goal is to work your way up the corrupt chain of command of Liberty City's gangs. Along the way, you have to lie, cheat and steal, and even kill to claw your way to the top. You are helped by many implements of destruction: Uzi's, baseball bats, assault rifles, rocket launchers, grenades, Molotov cocktails, flame throwers and more.
Of course, there could be no robbers without cops. Liberty City is protected by a bevy of law enforcement: from the petty beat cop to high ranking FBI officials and even the Army. Conduct your shady deals out of sight, or suffer the consequences. The police are always on the lookout for criminal behavior, and put you down if you are not careful.
Luckily, there are a lot of places to run and hide. Liberty City boasts three separate districts: Portland, Staunton Island and Shoreside Vale. Each is unique in its architecture, inhabitants and automobiles. But each also has plenty of places to get into trouble.
Since GTA3 is so non-linear and missions can be completed in orders other than listed, we suggest sticking to one boss at a time until all his jobs are exhausted or you no longer can take the job without completing another (like Toni and Salvatore in Portland). We have provided optional tips on missions that have unlimited solutions, which is true for most since there are numerous ways to off someone or destroy something.
- Non-stop intense action.
- Both narrative-driven and nonlinear gameplay.
- A fully realized 3-D city.
- Hundreds of characters and 50-plus vehicles.
Game Basics
Controls
You can also find the controls listed in the Pause screen that can be found any time during gameplay. The game also allows you to change your control configuration from this screen.
On Foot
- Move
- Move Camera
- Run
- Jump
- Enter Vehicle
- Attack
- Action
- Aim Weapon
- / Change Weapon
- Crouch
- Look Behind
- Change Camera View
- Pause/Unpause
In a Vehicle
- left/ Steer Left
- right/ Steer Right
- /: Lean Forward/Back
- Accelerate
- Brake/Reverse
- Fire Weapon
- Exit Vehicle
- Emergency brake
- Change radio station
- Horn
- left/right look left/right
- Turret control (sub-missions)
- Change camera view
- Pause/Unpause
The Radar
The radar in the lower left corner of the screen will quickly become your best friend. You will never be left in the dark as long as you keep an eye on this devise. It will always direct you to savehouses, more work and targets within missions. The bosses are displayed on the radar by icons of their first initial and remain on the radar until all work from that boss is exhausted.
Savehouses
Portland, Staunton Island and Shoreside Vale all contain one area where you can go to hideout and save your game progress, these are the ‘Savehouses.’ These savehouses appear on the radar as a small house icon and only the closest one appearw on the radar. To save your progress and the vehicle you drove up in, place one vehicle in the garage (1 in Portland, but 2 possible in Shoreside and Shoreside) and enter the savehouse and save your game. Each time you save the game 6 hours passes in Liberty City and any damaged cars parked in the garage are repaired. The 100 hidden package prizes (weapons and other power-ups) appear at each savehouse as they are unlocked by finding packages in increments of 10. You cannot save your progress if you are currently in a mission –only before or after.
Liberty City Police Stations
When you get ‘Busted’ you end up at the closest police station where they take all your weapons and four hundred dollars in bribery money. When you are busted, whatever mission you were working on ends in failure. The only time you can be arrested is when you are pulled out of a vehicle by the authorities. If you are not in a vehicle and you have a Wanted Level, they just shoot to kill (or waste) and then you end up in the hospital where the bill is larger than a bribe.
Understanding Wanted Levels
Looking in the top right corner of the in-game screen you find a strip of six stars, this is your wanted level and it depicts just how bad you have been. The level increases from right to left as the stars light up to show your level of trouble. Doing nothing to relax the wanted level and continuing to add trouble on top of your existing wanted level increases the level and with that comes greater forces of good to rain down on you.
Wanted Levels
- Lvl 1 LC Police Department
- Lvl 2 LC Police Department
- Lvl 3 SWAT and 1 Helicopter
- Lvl 4 SWAT
- Lvl 5 FBI
- Lvl 6 Army and 2nd Helicopter
things that raise your wanted level
- Stealing Police Car w/cop inside
- Targeting police (even without pulling trigger)
- Fighting or Carjacking in cop’s sight
- Running into a cop car w/cop inside
- Fighting cops
Reducing Wanted Levels
- Stay out of sight for a while
- Become Wasted (not a good choice)
- Complete the current mission
- Painting your (non-law enforcement) car at Pay ‘n’ Spray
- Running through Police Bribe power-ups
Rampages
There are 20 Rampage pickups hidden across the three islands of Liberty City. These are blue rotating circles with a skull icon, and touching one will trigger a mini-mission where you have 2 minutes to kill a certain number of people or vehicles with a specific infinite-ammo weapon.
Portland has 6 Rampages and the other two islands have 7 each. Unlike later games, the Rampage icons will toggle between two locations each time you fail.
Some Rampages become much harder later in the game if they are found in areas where local gang members have become hostile to the player, as they attack you regardless of the Rampage requirements. Gaining a wanted level can cause those hostile gang members to lose interest which can help.
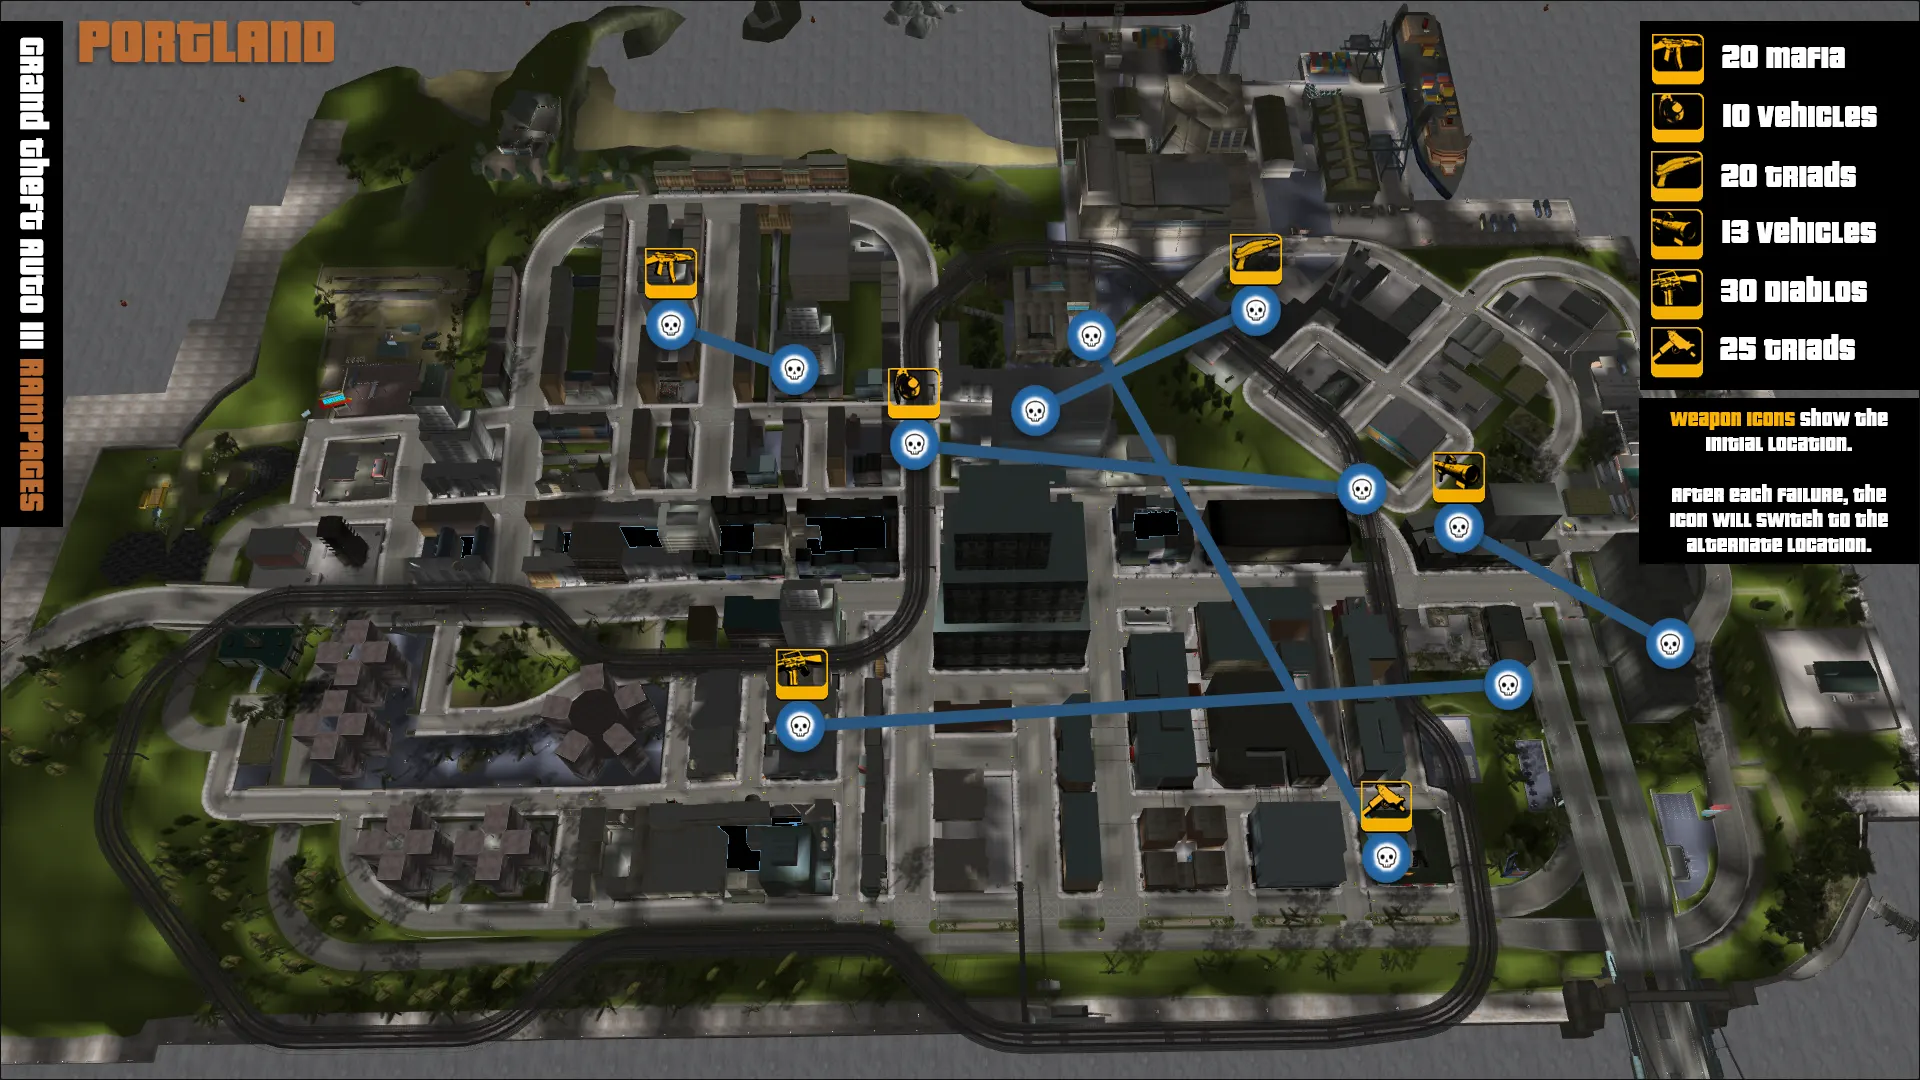
Portland Rampages
Execute 30 Diablos using an M16
Locations: Red Light District, behind Woody's or Trenton, outside the basketball courts
Waste 25 Triads using an Uzi
Locations: Chinatown, across from the old school hall near Rockstar Billboard or Portland View, near Supa Save
Blow 20 Triads away with a shotgun
Locations: Portland View, alleyway near Mean Street Taxi or Portland View, behind the hospital
Gun down 20 Mafia men using an AK-47
Locations: Saint Marks, near Salvatore's residence or Saint Marks, south of Cipriani restaurant in alleyway
Total 10 vehicles using grenades
Locations: L-Train station tracks near St. Marks or Trenton.
Take out 13 vehicles using the rocket launcher
Locations: Trenton, across from the old school hall near the basketball courts or Callahan Point near Greasy Joe's Diner.

Staunton Island Rampages
Kill 25 Yardies using grenades
Locations: Belleville Park, behind fire station or alley south of liberty campus.
Assassinate 17 Yardies with the sniper rifle (head shots only)
Locations: Torrington, on top of the AMco building or Torrington, on the catwalks of the casino.
Blast 20 Yardies with the rocket launcher.
Locations: Bedford Point, the cemetery behind the church or Bedford Point, the parking lot surrounded by buildings.
Toast 16 Yakuza using Molotov cocktails
Locations: Newport, in front of a doorway near the freeway or Newport, behind the multilevel parking lot.
Incinerate 25 Yakuza using the flamethrower
Locations: Bedford Point, expansive parking lot near Donald Love's HQ or Bedford Point, behind the church.
Destroy eight vehicles using the shotgun
Locations:Belleville Park, northeast corner or Belleville Park, southwest corner.
Destroy 15 vehicles with the M16
Locations:Liberty Campus, south side or Fort Staunton, near the green building in the construction zone.
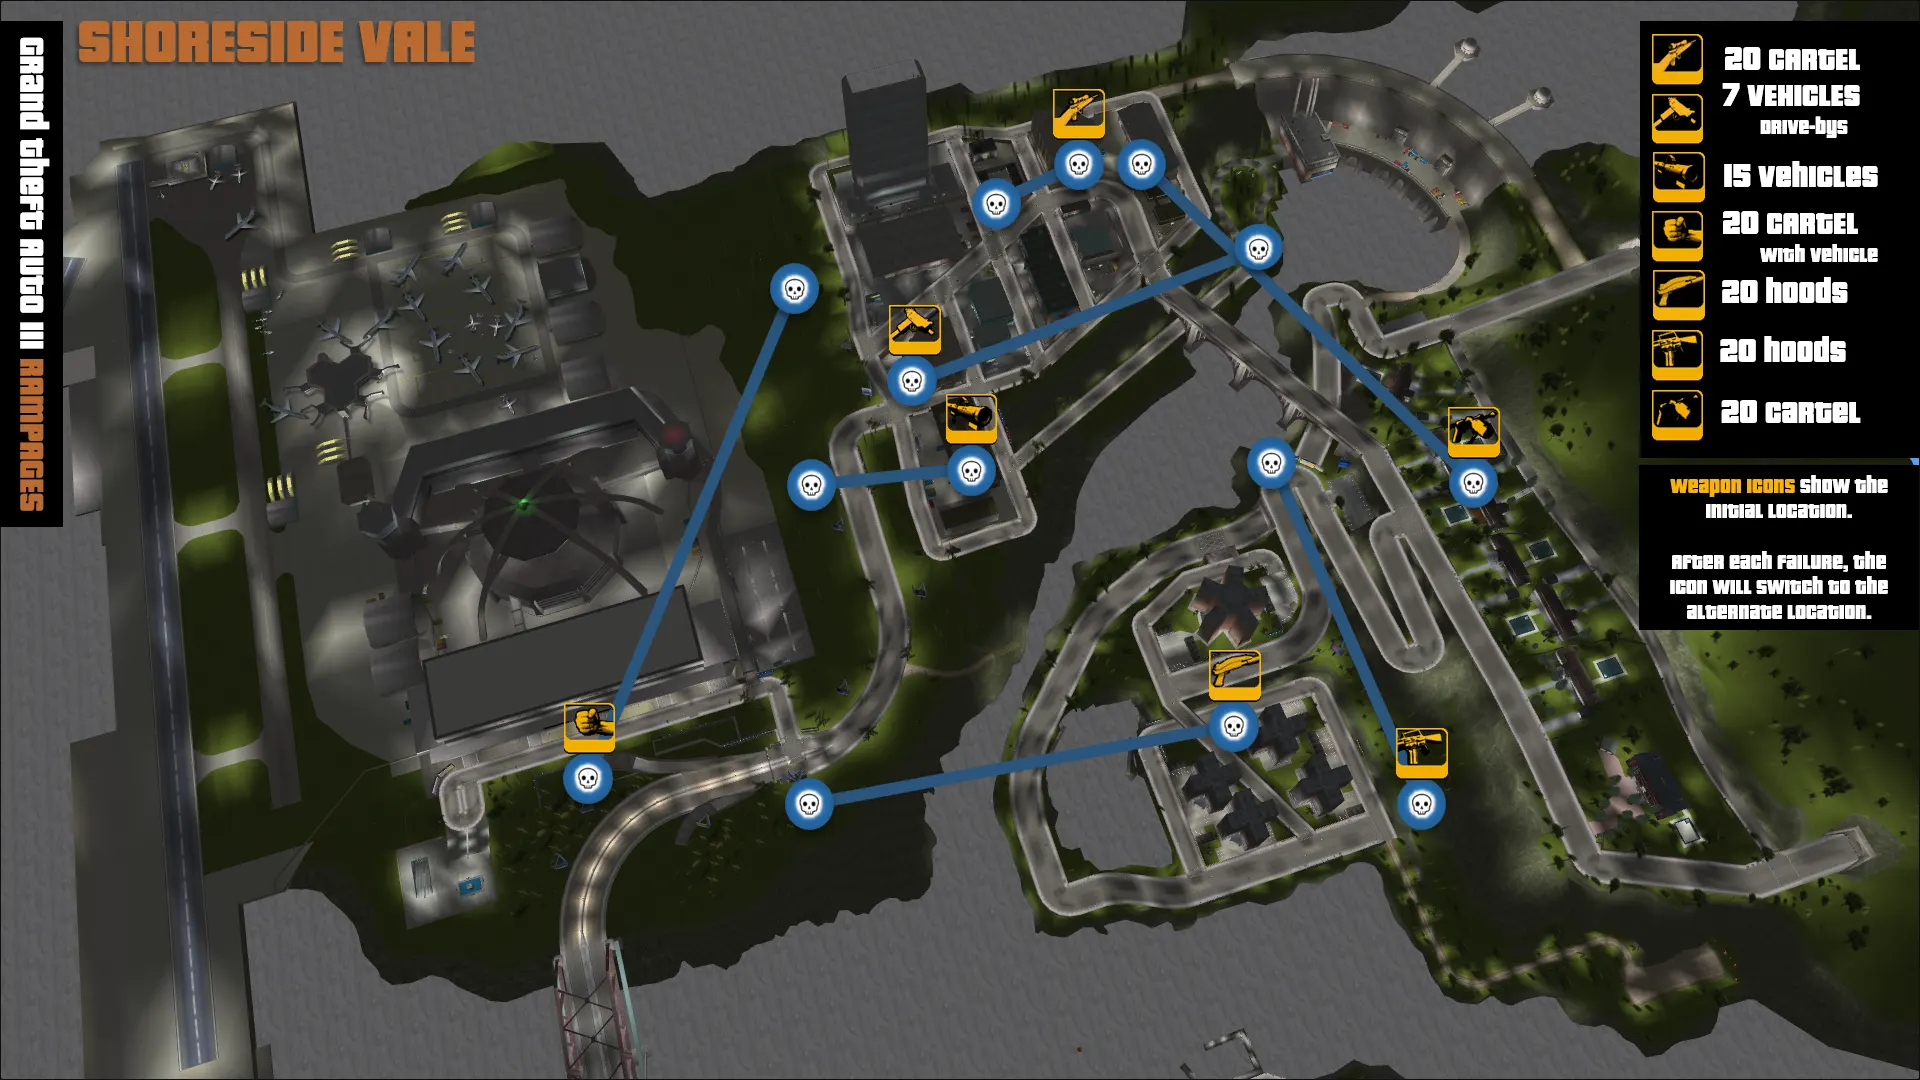
Shoreside Vale Rampages
Slay 20 Southside Hoods with the shotgun
Locations:Wichita Gardens, on a rooftop under the bridge near the hideout or Francis International Airport, behind a billboard near the airport exit.
Head-shot 20 Southside hoods using an M16
Locations:Wichita Gardens, behind a squid sign in the apartment area or Cedar Grove, the parking lot behind a gasoline sign.
Toast 20 Cartel members with the flamethrower
Locations: Cedar Grove, behind civilian garage with Landstalker or Cochrane Dam, garage area.
Assassinate 20 Cartel members with the sniper rifle
Locations:Pike Creek, the ramp in the parking lot near Cochrane Dam or Pike Creek, behind the police station on top of a garage.
Flatten 20 Cartel members with the vehicle of your choice
Locations: Francis International Airport, near the airport entrance behind a sign or Pike Creek, the grassy area near the shipping company
Light up seven vehicles via drive-by with the Uzi
Locations: Pike Creek, past the gate to the Punk Noodles building or Cochrane Dam, behind the boulder where the road meets the mountain.
Blow up 15 vehicles with the rocket launcher
Locations:Pike Creek, on the roof of a warehouse or Francis International Airport, behind a billboard near the Pike Creek entrance.
Off-Road Missions
Certain missions are triggered when you hop into particular vehicles. Competing only against the hostile terrain, you take the wheel and try to make it through a series of checkpoints within the time limit. Each checkpoint you hit gets you 20 seconds to get to the next checkpoint. The time can be banked, and you can clear the checkpoints in any order. Because of the rough terrain involved, these missions can be quite challenging.
Off-road mission tips
- Keep the handling and capabilities of the three vehicles in mind. The Patriot has incredible traction and four-wheel drive, which allow it to climb steep inclines. The Landstalker is prone to flipping over on flat pavement, so be especially careful how you treat it.
- Because the checkpoints can be cleared in any order, try to plan a route beforehand. It can be very difficult to make it from point A to point B in some cases, so taking care of out-of-the-way checkpoints first could save you time.
- A timer starts once you get in.
- Collect all checkpoints in the allotted time.
- Exiting your car ends the mission.
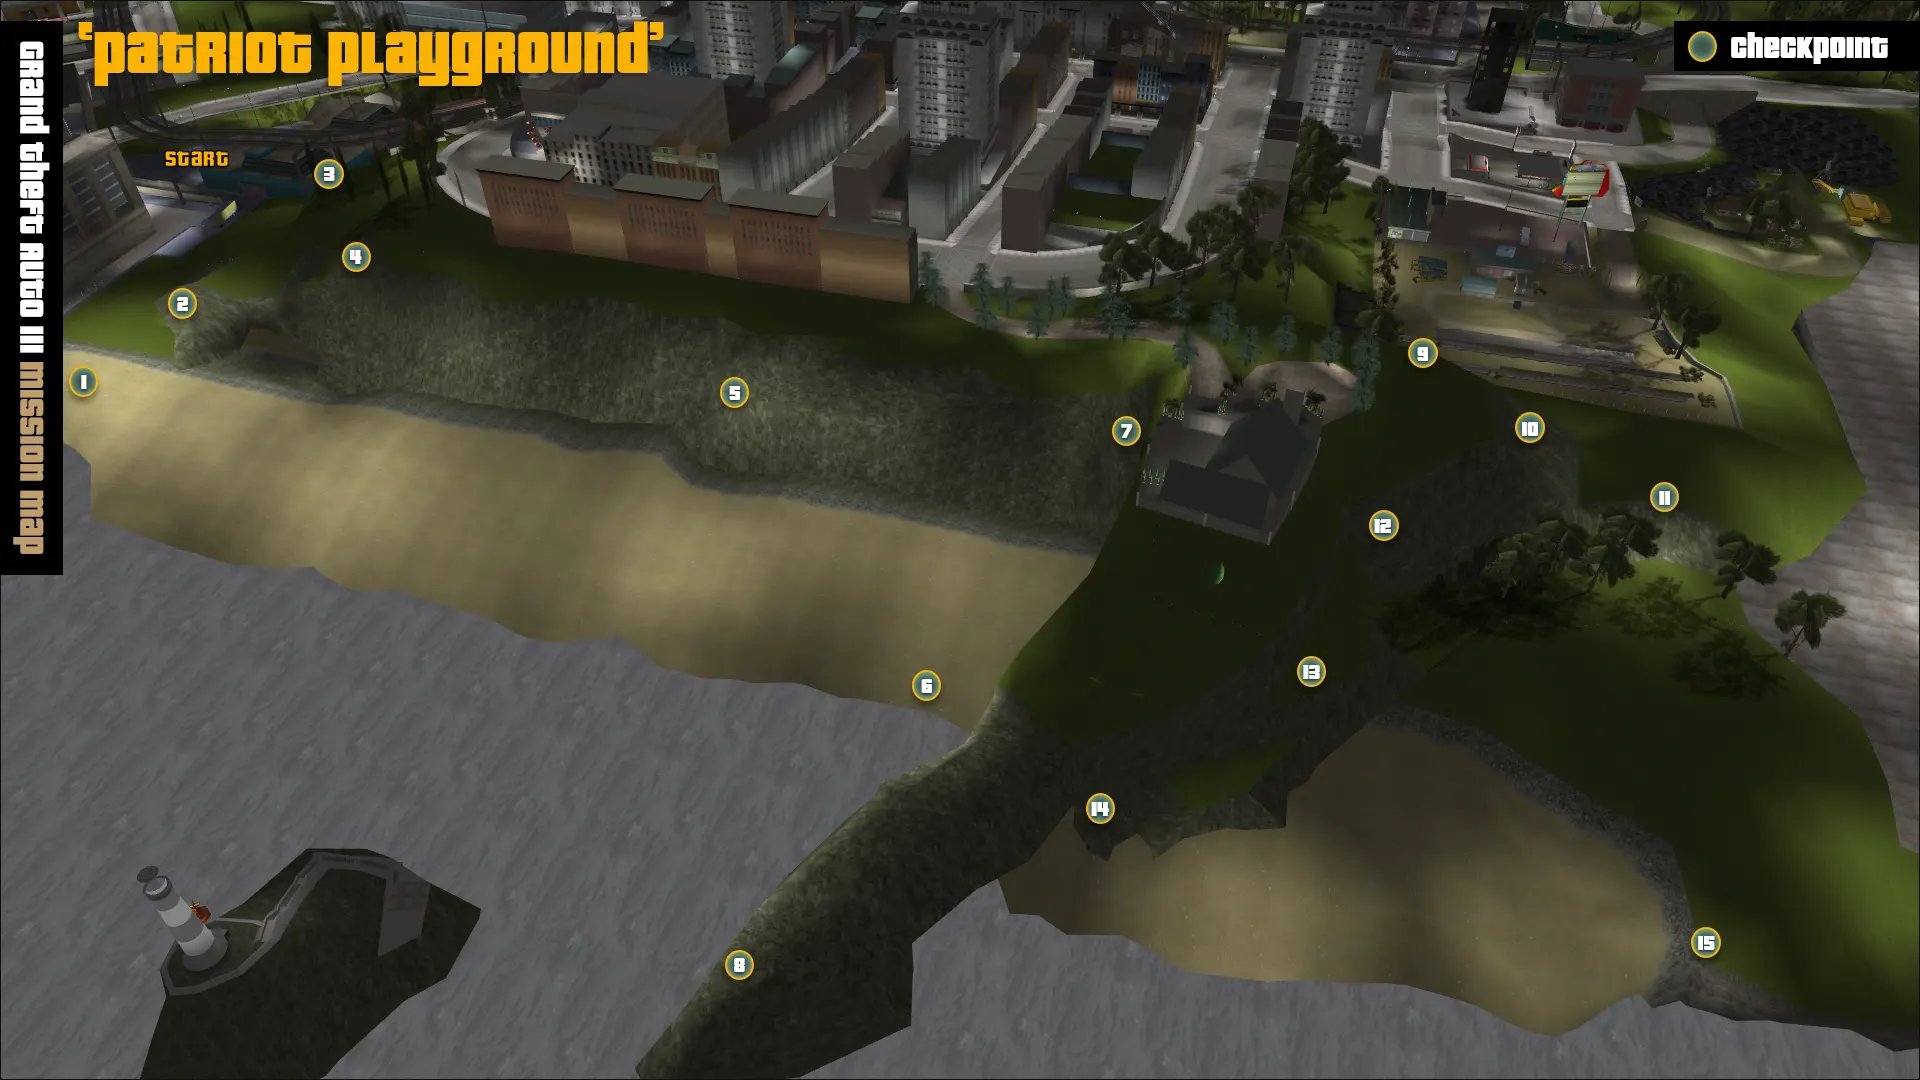
Patriot Playground: A Patriot sits in the parking lot of the Supa Save. Each checkpoint gives you 20 additional seconds. Reward: $20,000
Multistory Mayhem: Staunton Island, Newport. Unlike the other offroad missions, there is no specific parked car to trigger this mission. Instead, you have to provide one yourself. Park a Stallion at the entrance to the car park, just outside the red and white gate, and get out and back in. This triggers the mission. You can often find Stallions parked inside.
Each of the five levels of the car park has four checkpoints in it. Mind the final jump off the top. Each one only grants you 5 seconds. Reward: $30,000
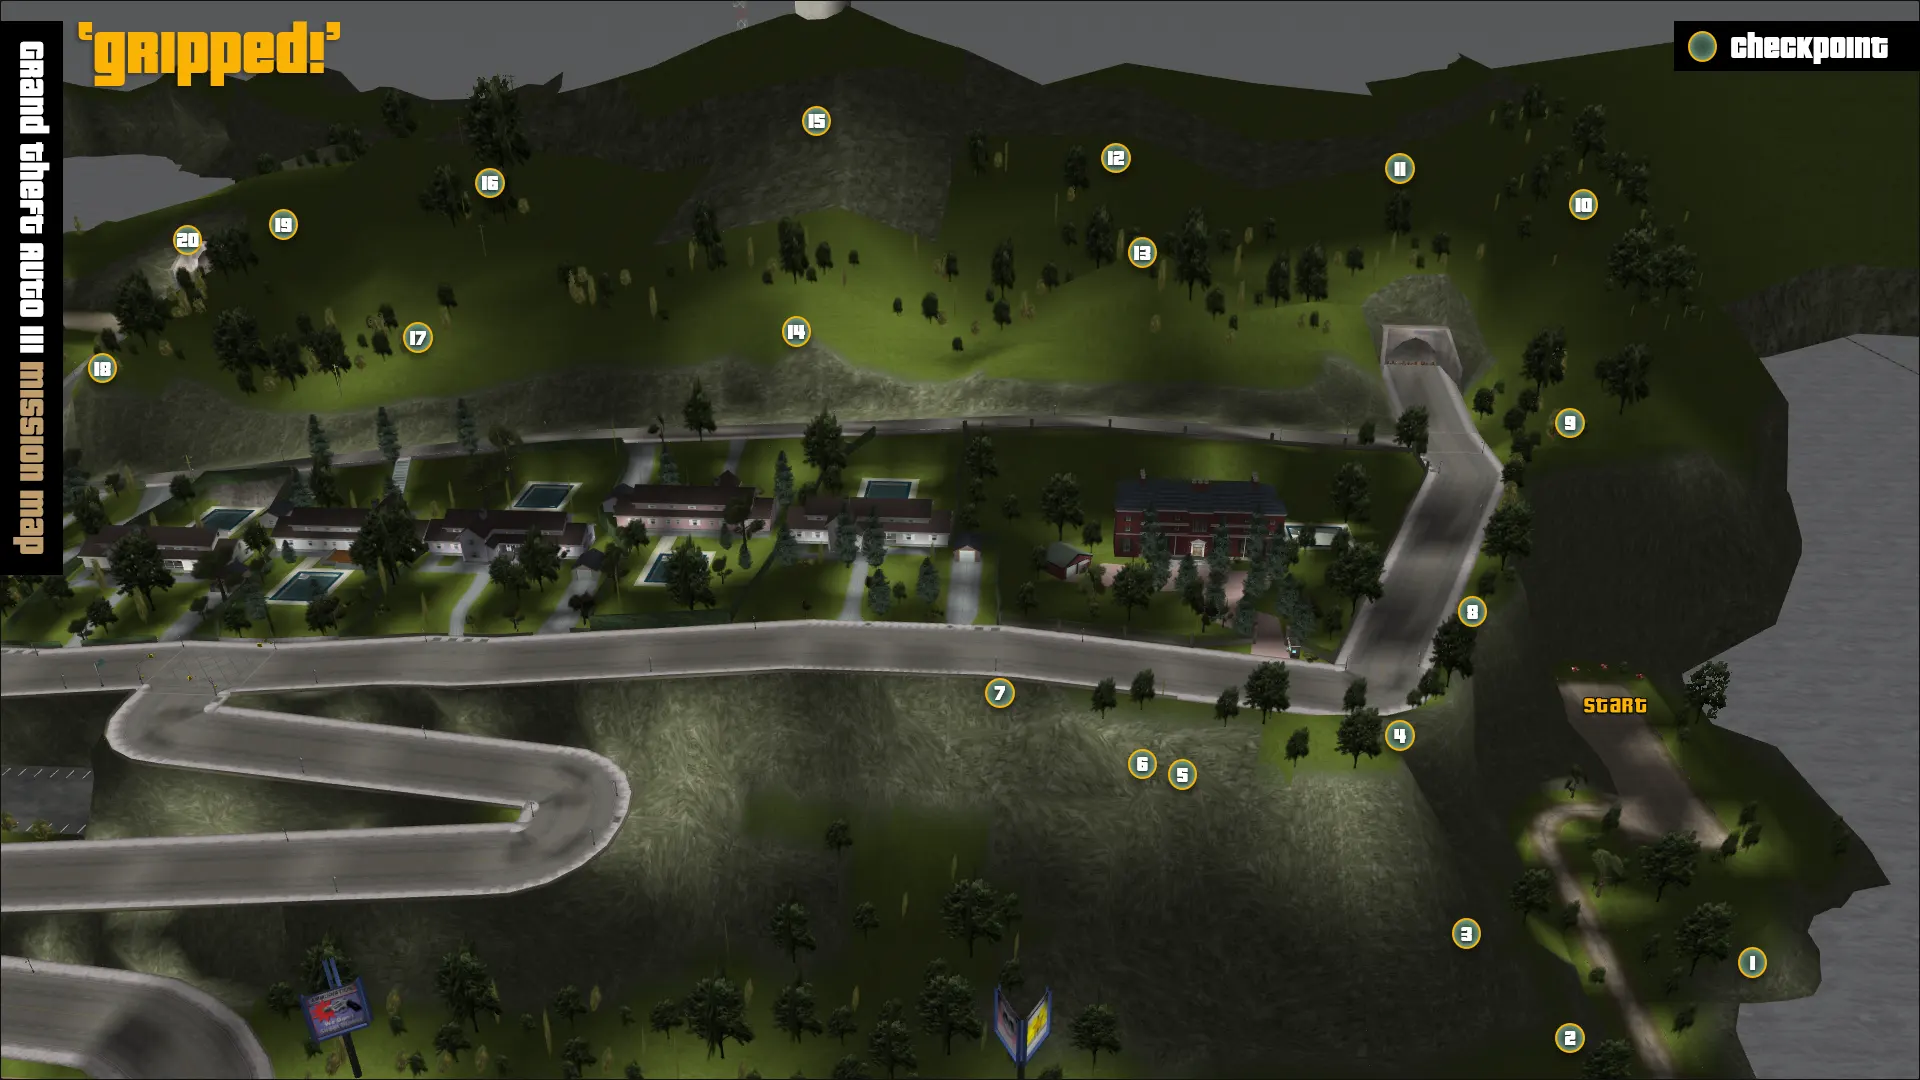
A Ride in the Park. Staunton Island. A Patriot sits near the basketball court in the Belleville Park, Landstalker in front of a small house. Each checkpoint gives you 10 additional seconds. Reward: $30,000 Gripped!: Shoreside Vale, Cedar Gardens. A Patriot sits in the park below Cedar Grove. Each checkpoint gives you 15 additional seconds. This is the final offroad mission and appropriately difficult. You will not always be able to drive straight up the slope faces, you may need to go around. Particularly on the peaks and cliff edges, go very slowly and inch the car forward ready to reverse. You have plenty of time to be careful, if the first few checkpoints go well. Things get somewhat easier once you are up the bluff past Cedar Grove. Reward: $40,000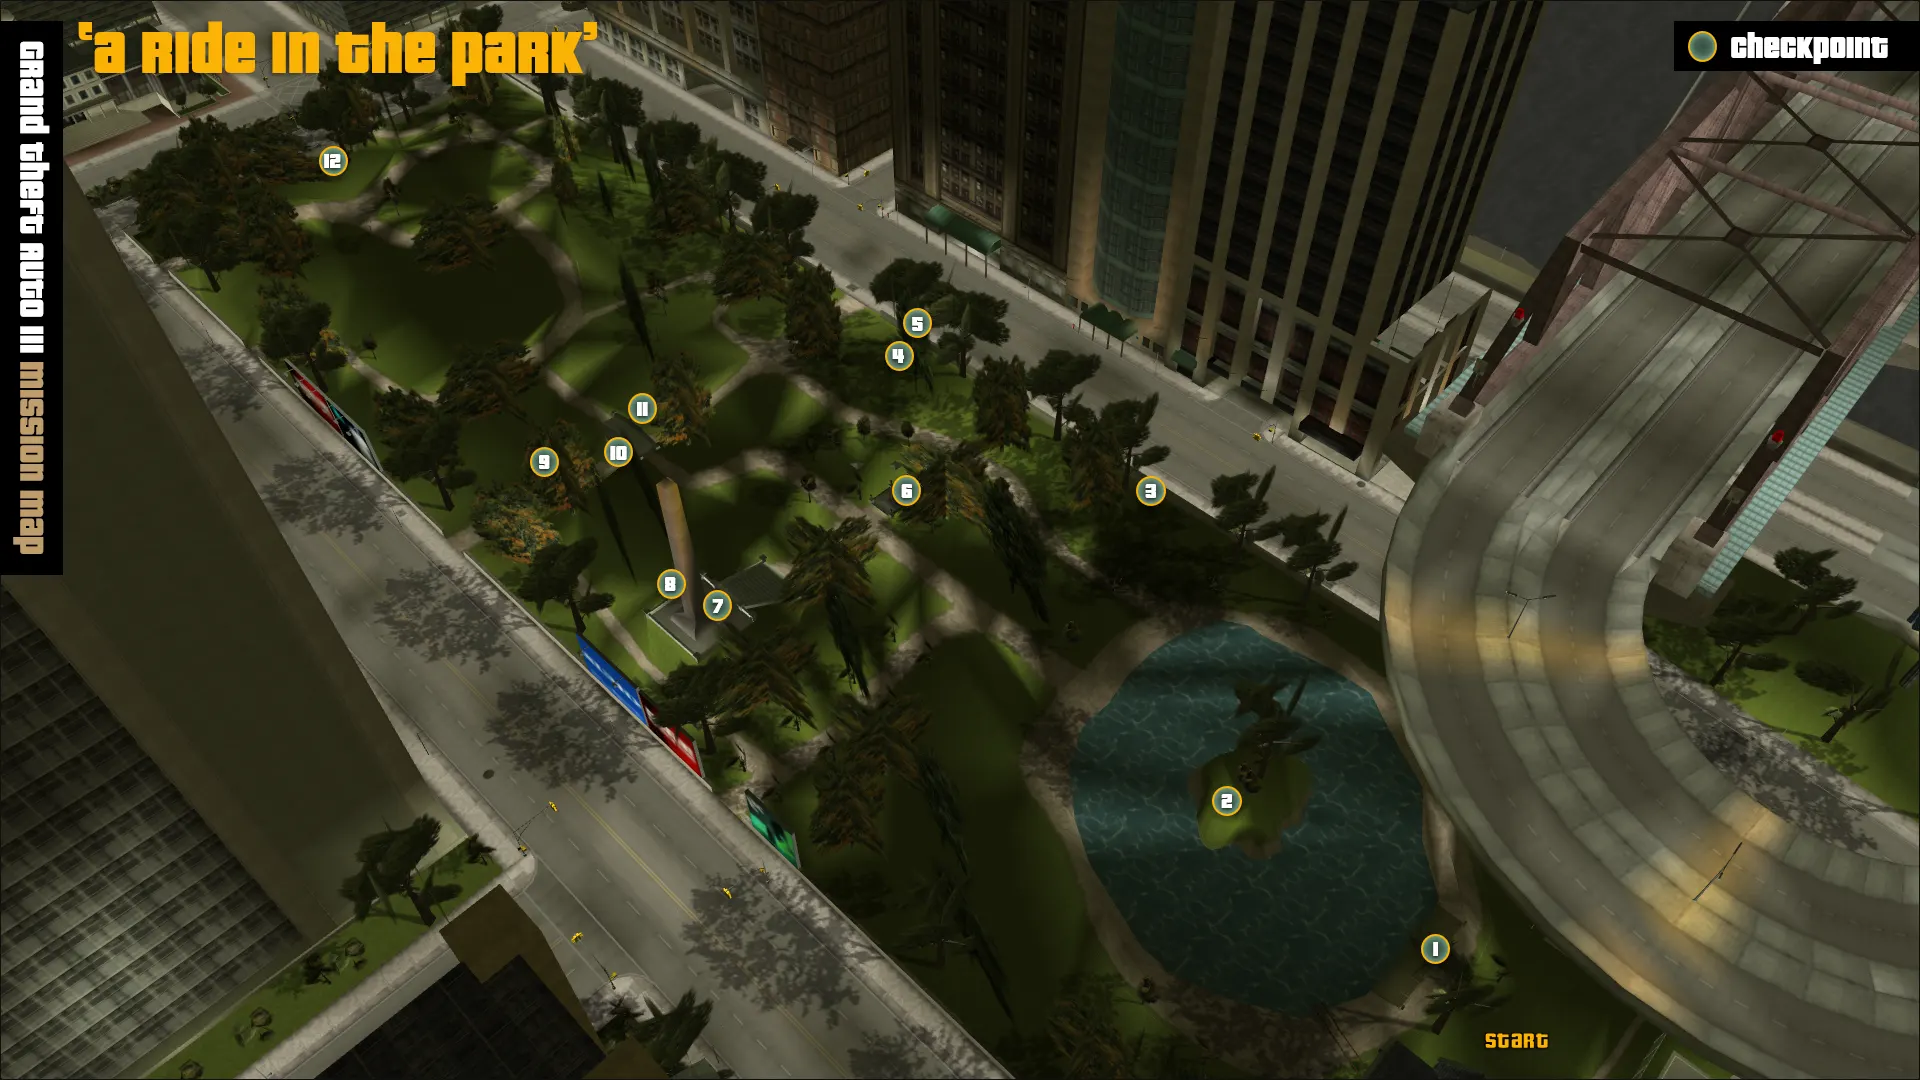
Hidden Extras
Hidden Packages
Hidden Packages are white duct-taped drug packages seen floating around the city. They can be collected at any time. Each one found rewards the player $1,000 and new weapons start to spawn at hideouts for every 10 packages. Finding every package also comes with a $1 million dollar payout.
- 10/100 packages- Handgun
- 20/100 packages- Uzi
- 30/100 packages- Grenades
- 40/100 packages- Shotgun
- 50/100 packages- Armor
- 60/100 packages- Molotov Cocktails
- 70/100 packages- AK-47
- 80/100 packages- Sniper Rifle
- 90/100 packages- M16
- 100/100 packages- Rocket Launcher
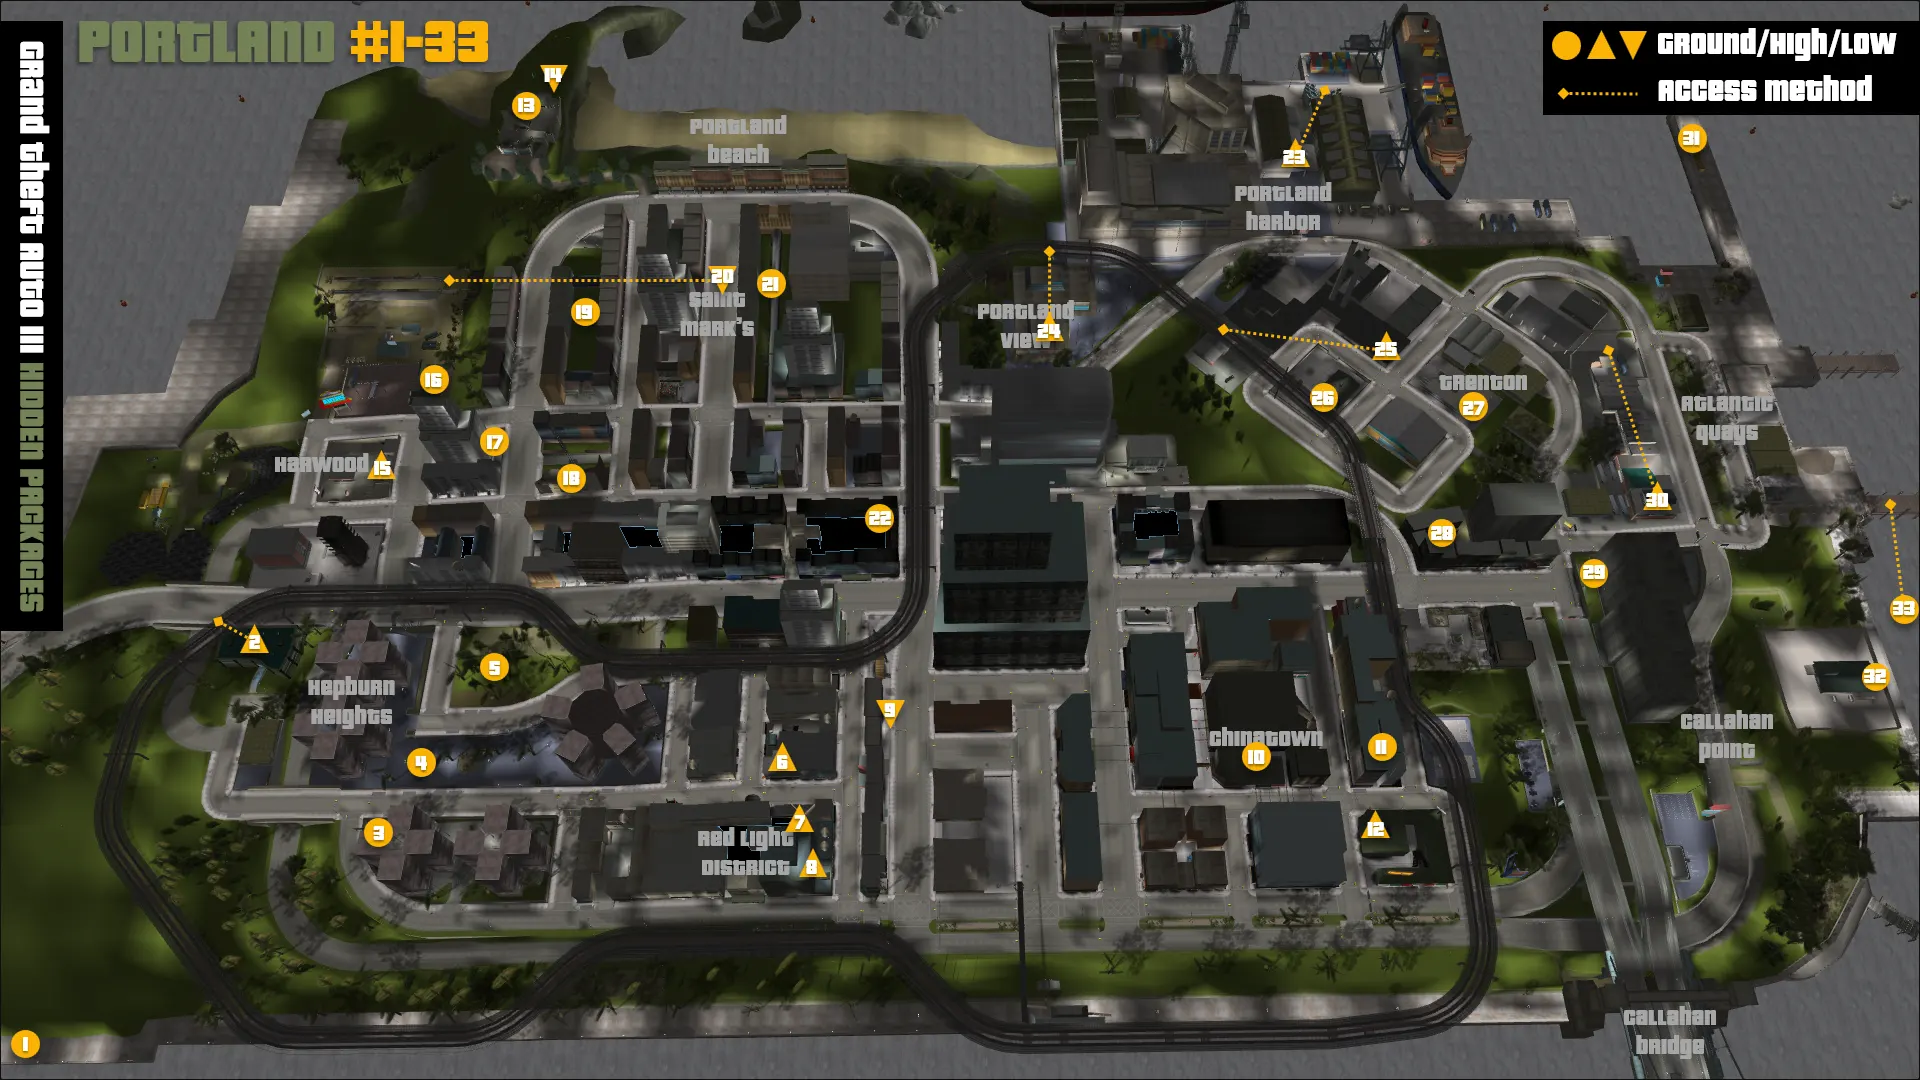
Red Light District / Hepburn Heights / Chinatown
- End of the pier
- Jump from the el train tracks to the radio station roof
- Apartment building corner
- Lot near El Burro's payphone
- Trees near El Burro's payphone
- Climb the alley stairs to the roof across from Luigi's
- Climb the alley stairs to Luigi's roof
- Following #7, jump across a gap to the neighboring roof
- In the subway restroom below the street entrance
- Alley in Chinatown
- Alley in Chinatown
- Rooftop reachable from alley stairs
Harwood / Saint Mark's / Portland Beach
- Inside Salvatore's house
- On the beach down below the house
- Roof of gas pumps reachable from above
- Inside the car showroom
- Corner of lot
- In ruined building
- Grassy alley between roof ramps
- Midway through the underground tunnel behind 8-Ball's shop
- In yard near pathway
- Inside the building
Trenton / Harbor / Bridge
- Awning on the harbor, reached by jumping from a nearby warehouse roof with access stairs
- Roof of Supa Save store, reached by jumping from the el train tracks
- Roof of Trenton building, reached by jumping from the el train tracks
- Near Marty Chonks' phone in the dog food compound
- Lot in Trenton
- Alley in Trenton
- Walled-in grassy yard in Trenton
- Rooftop near skylights reached by a series of ramps
- End of the pier
- Behind the Triad factory (use a Triad Fish Van to open the gate)
- On a rock at sea, only reachable using a boat
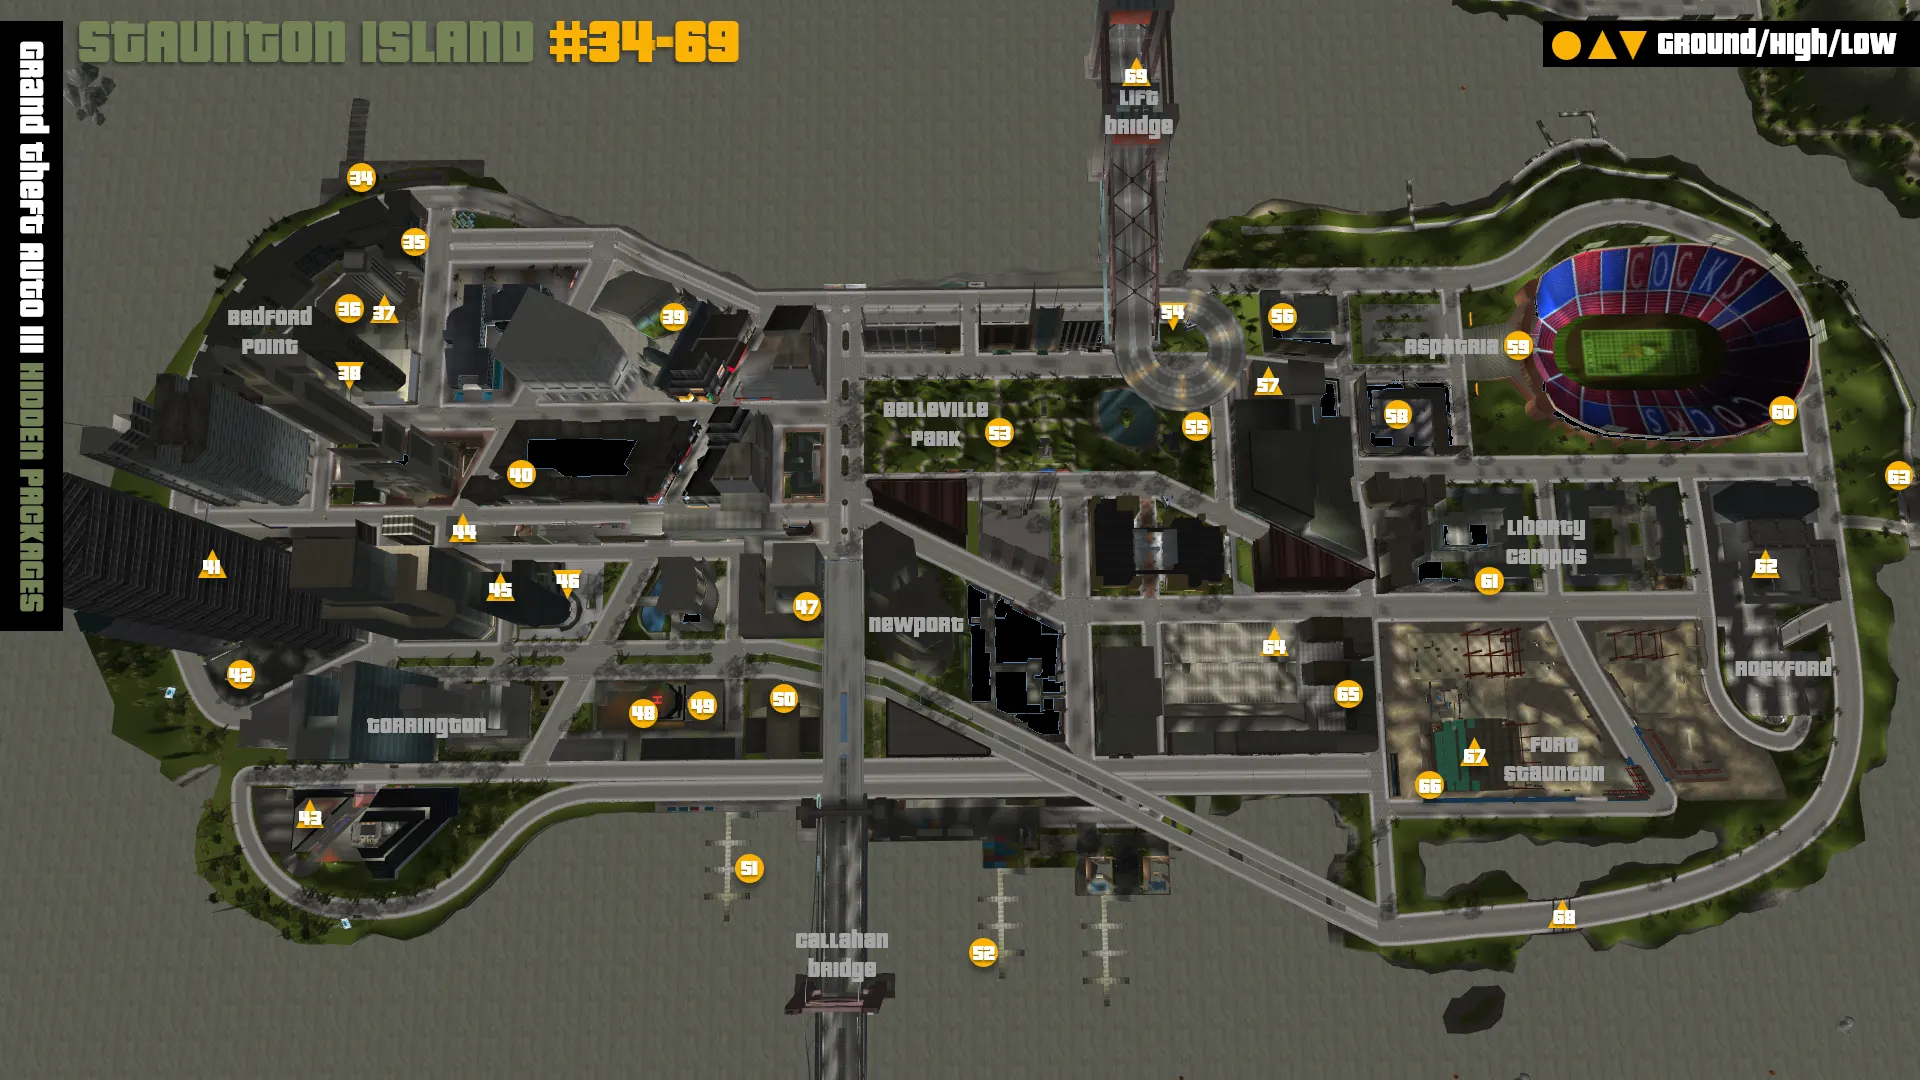
North Staunton
- On the pier
- In a doorway niche
- Corner of the large walled lot
- Rooftop above the walled lot
- Parking garage underneath the building
- Church backyard
- Alley in Bedford Point
- Pedestrian walkway above the road
- Center of the sculpture
- Roof of Kenji's casino
- 2nd floor of building interior
- Rooftop accessible from ground-level door
- Underground parking lot
- Alley near the bridge
- Police station parking lot
- Police station parking lot
- Top of building entrance stairs
- On the dock.
South Staunton
- On the dock
- Under a bridge in the park
- Under the lift bridge on-ramp
- Basketball court
- Alley in Aspatria
- Rooftop reachable from the bridge on-ramp
- Colombian compound (accessible when driving a Cartel Cruiser)
- Stadium entrance
- Behind a stadium billboard
- Near the campus
- Awning of the hospital reachable from the planter
- Near the pier
- 2nd story of the car park
- In an open garage
- Corner of the construction site
- 2nd floor of the construction site
- Girder of the bridge structure
- Ride the lift bridge to the top and jump on the median to reach
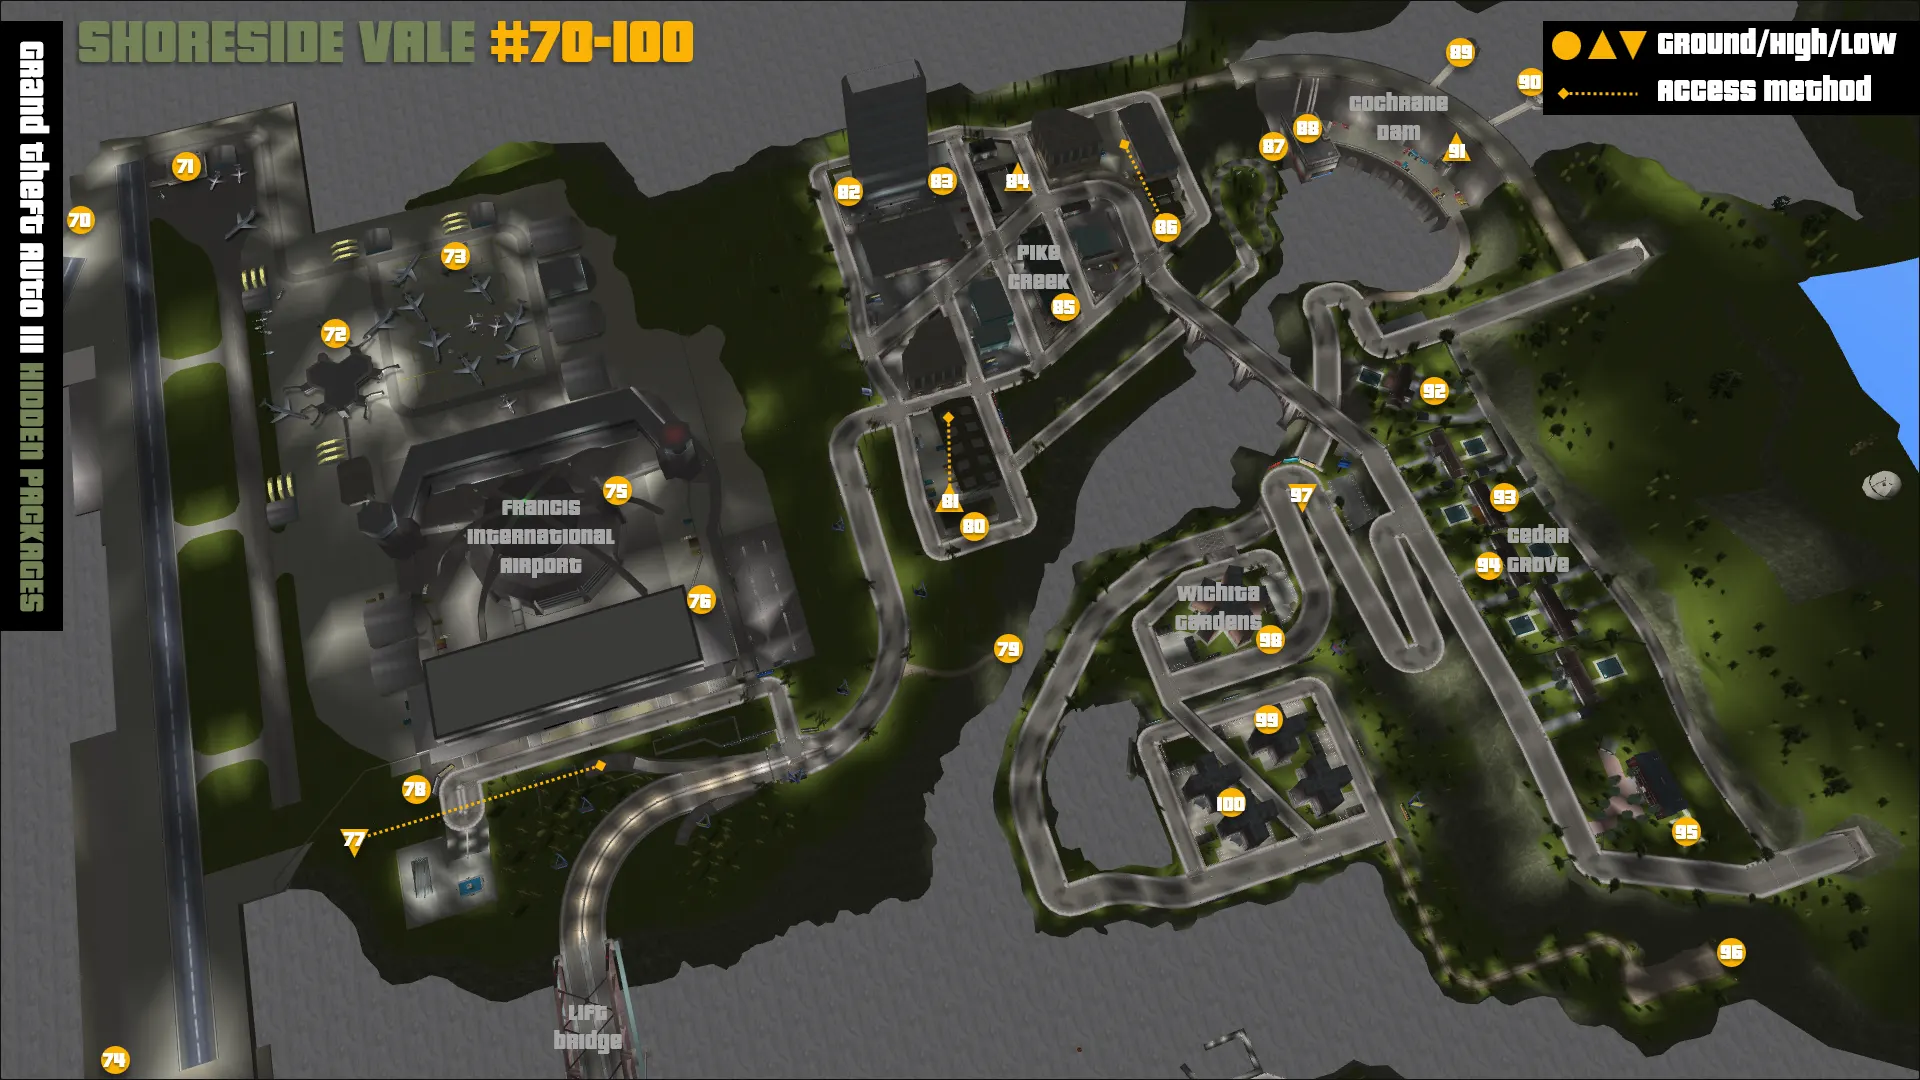
Francis International Airport
- Lower platform off the runway
- Helipad
- Under the plane
- Under the plane wing
- Far end of the runway
- Corner of the storage lot
- Fire department near the airport
- Tunnel underground
- Behind the airport billboards
- Under the wooden bridge jump
Francis International Airport
- Alongside building
- Awning accessed by jumping from the neighboring roof
- Hospital lot
- Hospital lot
- Roof of one row of garages
- Alongside building
- Fenced-in lot with ramp accessible from upper ramp
- Rock below the dam
- Dam helipad featured in final mission
- Observation deck on dam
- Observation deck on dam
- Raised doorway on dam face
Cedar Grove / Wichita Gardens
- Backyard of house
- Backyard doorway of house
- Front yard doorway of house
- Swimming pool behind Cartel mansion (drive a Cartel Cruiser to access)
- Park below Cedar Grove
- Underneath the winding road overhang
- Next to TOYZ RC Van
- Doorway of apartment building
- Between apartment buildings
Items
While you make things easier on yourself by adding pickups to your hideout, Liberty City does contain a natural bounty of weapons and power-ups. Certain items are crucial to survival, and this section will detail where you can get your hands on those that are most useful. it is also helpful to remember that taking a bat to a gang member early in the game can get you access to an Uzi or shotgun before they are available in stores.
Portland
Weapons
- Handgun: South side of Callahan Bridge, on a ledge
- Shotgun: Saint Marks, on top of a small garage & Hepburn Heights, in a corner near apartment buildings
- Uzi: Trenton, on the roof of Liberty City Sawmills & Saint Marks, at the end of a lengthy alleyway
- AK-47: Saint Marks, ramp behind a tall building with a Mafia Sentinel
- Flamethrower: Harwood, on top of Head Radio Building
- Molotov Cocktail: Behind 8-Ball's shop is a tunnel. You can kill the homeless gathered there to pick up a few Mollys.
Survival
- Health
- Hepburn Heights, park area
- Portland Harbor, dock area
- Portland View, hospital
- Trenton, Liberty Pharmaceutical rooftop
- Trenton, near Liberty Pharmaceutical
- Torrington, near AMco billboard
- Body Armor
- Atlantic Quays, at the end of wooden pier
- Portland Harbor, near a ship
- Trenton, Liberty City Sawmills rooftop
- Trenton, Liberty City Pharmaceutical rooftop
- Trenton, near AM Petroleum building
- Adrenaline Pill
- Chinatown, near train station
- Harwood, nestled between garages
- Portland Harbor, near docks
- Portland View, hospital
- Trenton, Liberty Pharmaceutical rooftop
- Police Bribe
- Callahan Point, Greasy Joe's Diner rooftop
- Chinatown, basketball court
- Chinatown, large alley
- Chinatown, train station
- Portland Harbor, near crane
- Saint Marks, end of an alley
- Trenton, near a ramp next to the old school hall
Staunton Island
Weapons
- Shotgun
- Bedford Point, end of a pier under bridge
- Belleville Park, park monument
- AK-47
- Fort Staunton, beneath red building ledge in construction site
- Sniper Rifle
- Aspatria, on a rooftop near fire station
- Molotov Cocktails
- Liberty Campus, around campus
Survival
- Health
- Bedford Point, 20th Century building
- Bedford Point, church
- Bedford Point, wooden pier
- Belleville Park, USA/France building
- Fort Staunton, construction site
- Newport, Asuka's condo
- Newport, museum
- Rockford, hospital
- Shoreside Bridge, behind billboard
- Torrington, AMco building
- Body Armor
- Aspatria, fire station rooftop
- Fort Staunton, construction area
- Liberty Campus, building ledge
- Newport, in loading area near Asuka's condo
- Adrenaline Pill
- Bedford Point, second floor of Internet café (glass walls)
- Belleville Park, bushes near road
- Liberty Campus, north of hideout
- Newport, building to the right of Callahan Bridge
- Police Bribe
- Aspatria, fire station
- Bedford Point, near Love Media
- Liberty Campus, south
- Newport, City Hall
- Newport, alley north of City Hall
- Newport, dirt road north of museum
- Rockford, near stadium billboards
- Torrington, Kenji's Casino
- Torrington, police station
- Torrington, near shore south of casino
Shoreside Vale
Weapons
- Shotgun
- Cochrane Dam. Near the base of the dam is a small ledge. Follow the ledge to the right to find the shotgun.
- AK-47
- Pike Creek, Punk Noodles building
- Cochrane Dam, take stairs to second watchtower
- Sniper Rifle
- Cochrane Dam, near trees in the northern curve on top of the dam
- M16
- Cedar Grove, front porch or an upscale house
Survival
- Health
- Cochrane Dam, lower level near first watchtower
- Cochrane Dam, lower level near second watchtower
- Cochrane Dam, balcony of large building
- Francis International Airport, near helipads
- Pike Creek, hospital
- Pike Creek, large multigarage compound
- Adrenaline Pill
- Cedar Grove, parking rest area
- Francis International Airport, near helipads
- Pike Creek, Liberty Pharmaceuticals
- Wichita Gardens, near D-Ice pay phone
- Body Armor
- Cedar Grove, garage outside large mansion
- Pike Creek, large multigarage compound
- Pike Creek, fenced-in area near Pay 'n' Spray
- Police Bribe
- Cochrane Dam, near UnderRoof Storage Company
- Francis International Airport, near hangar containing Dodo
- Francis International Airport, by water fountain at subway entrance
- Pike Creek, behind AMco building on stairs
- Pike Creek, grassy area near Turtle Head Fish Company.
Stunt Jumps
There are 20 unique jumps in the game. Like with other bonuses in the game, there is a geometrically increasing pay scale. you add $5000 to your bank account for the first jump, and every subsequent jump will double your amount. When the last jump is completed, you are given a hearty bonus of one million dollars. A jump counts only if you clear a predetermined distance or land in a specified area, so some may take a few attempts to clear. The fastest cars are always recommended.
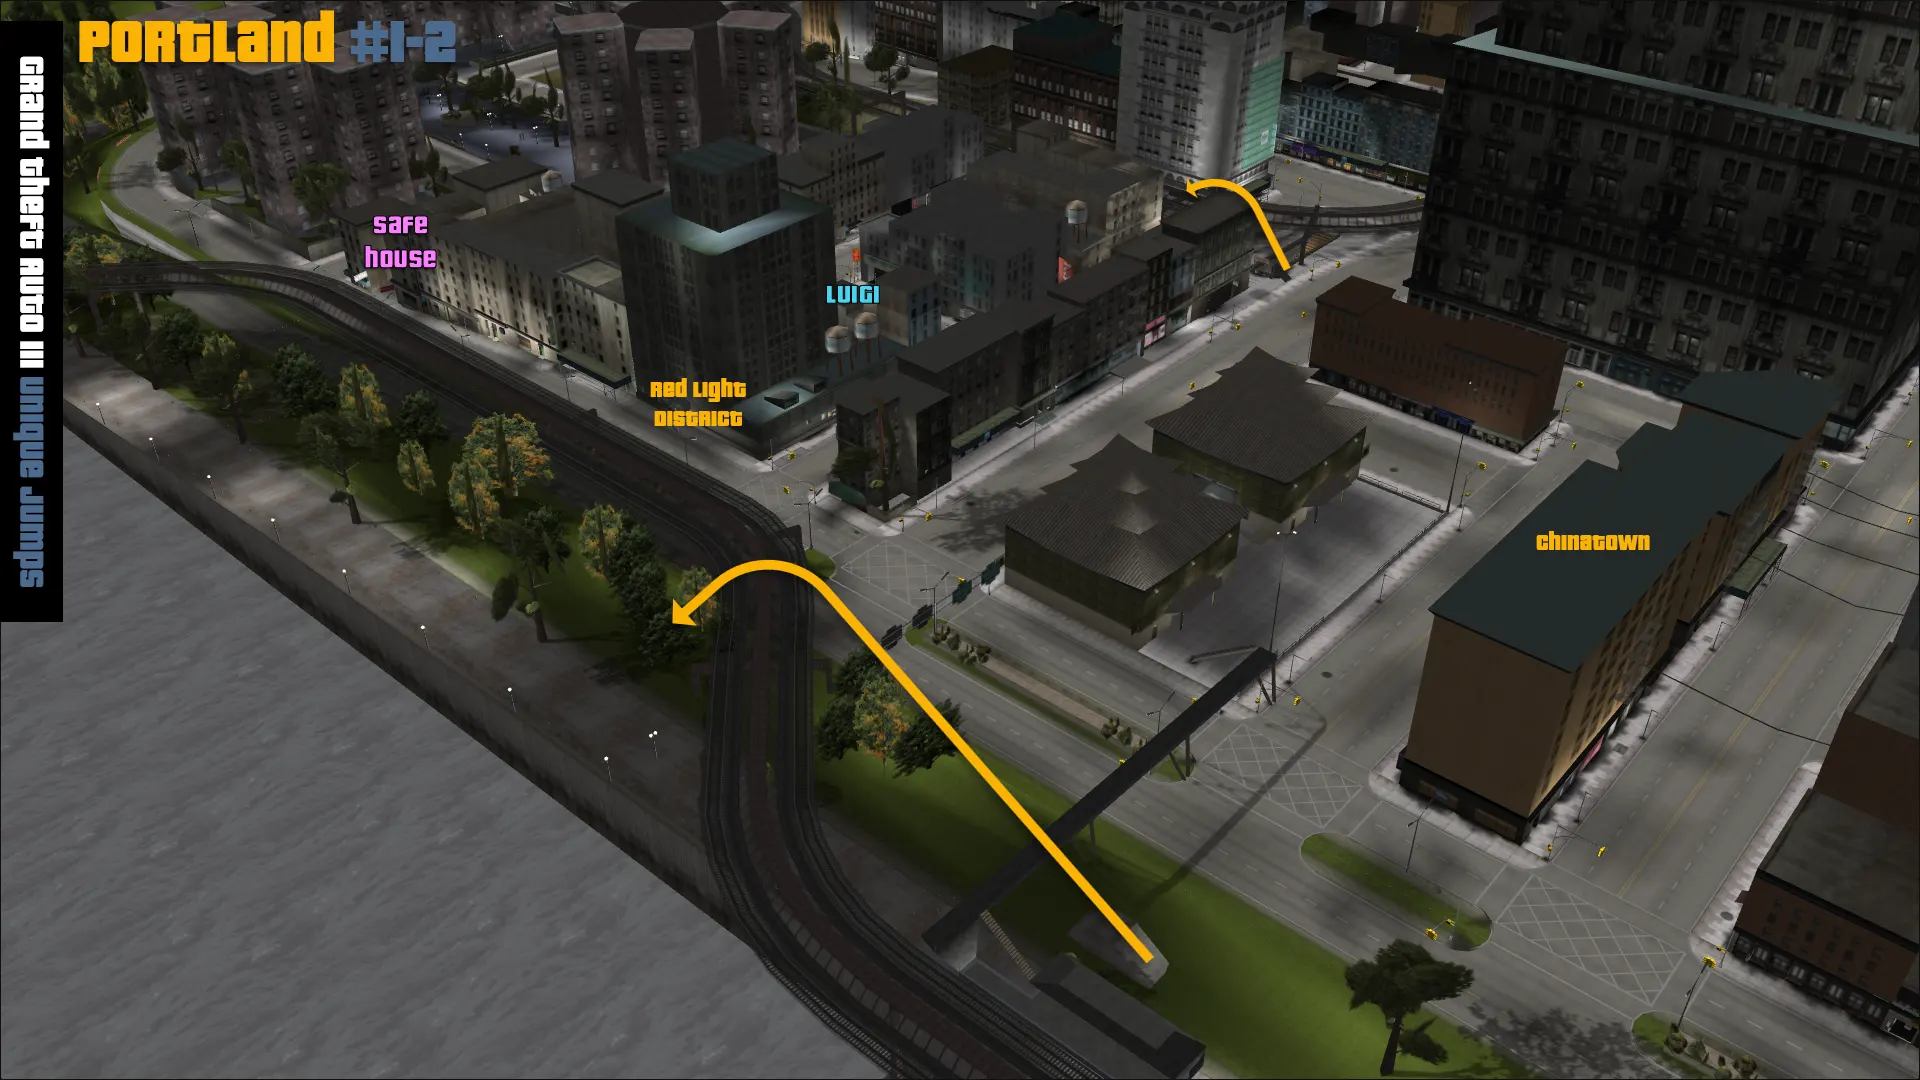
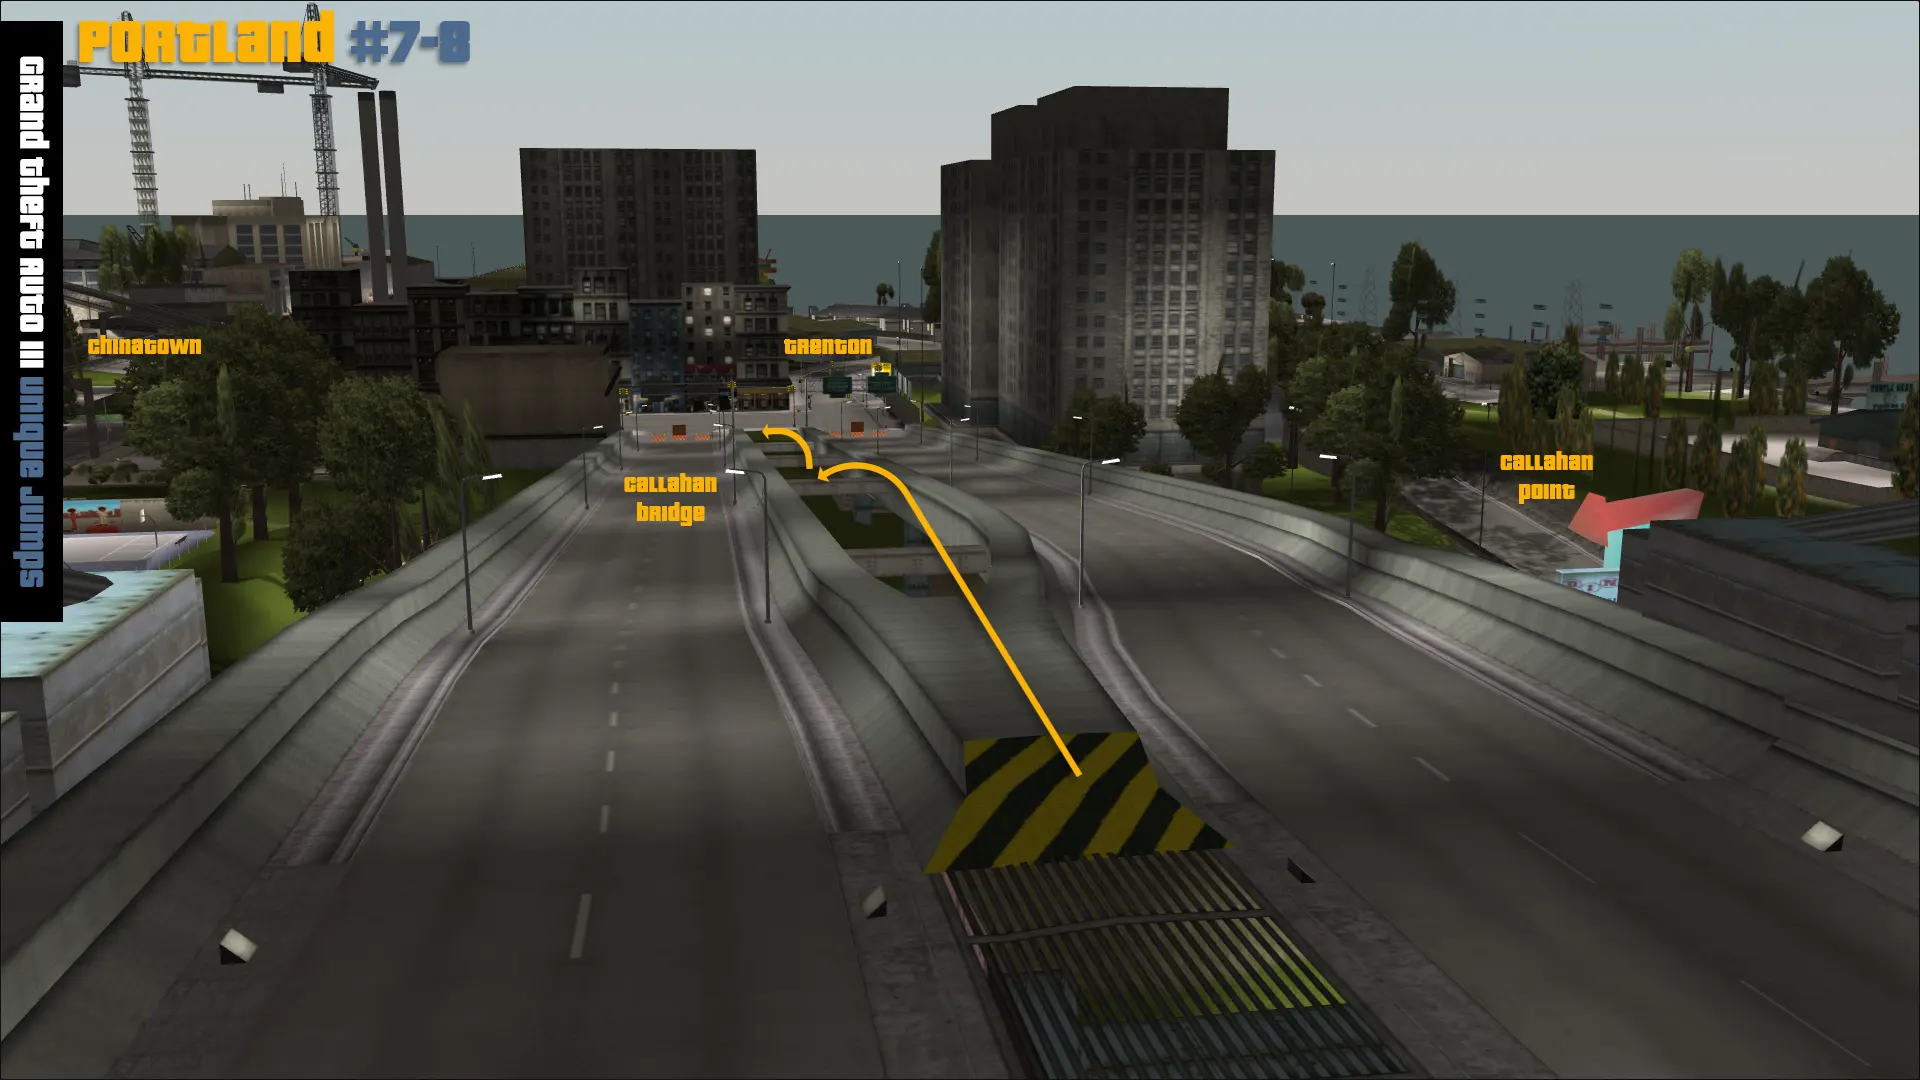
Portland (8 jumps)
- On Callahan Bridge (from Staunton to Portland) there is a yellow and black divider. Hit the divider at a sufficient velocity to clear the width of the bridge.
- In Chinatown, propel your car over the subway entrance for an easy unique jump.
- Look for a ramp near the river adjacent to your hideout's location. Hop a concrete walkway to complete the jump.
- Launch yourself off a mound of dirt found underneath the Callahan Bridge. you will want to be coming from the Chinatown area and clear two rails.
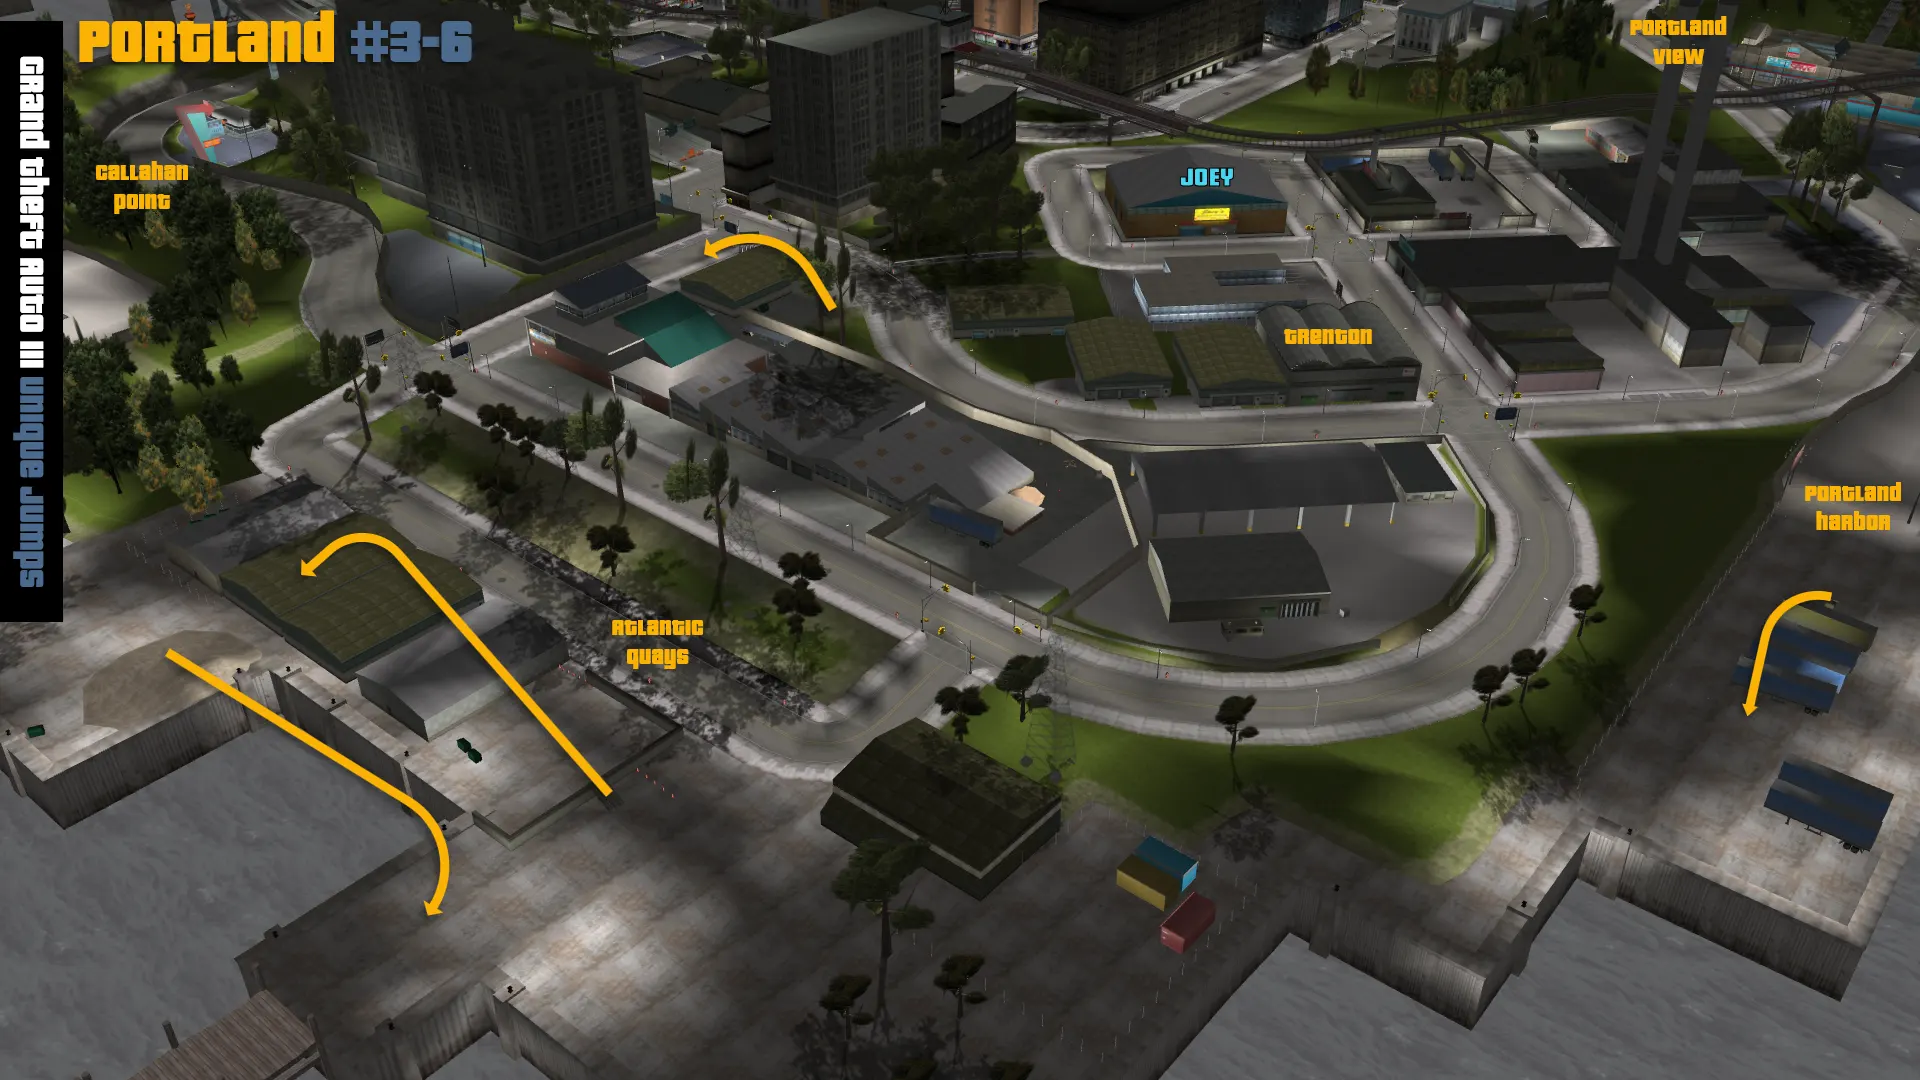
- Inside the Portland Docks, immediately right of where you enter is a ramp that can launch you over four trailers.
- In Atlantic Quays, there is a huge mound of gravel by the ocean. Coming from Callahan Point, hit the bump at a high speed to make it across the gap to a dock.
- After completing the previous jump, you should land right by this next location. There is a ramp pointed at two buildings.
- Also at Callahan Point, near the coach bus station is a ramp in the direction of a small building.
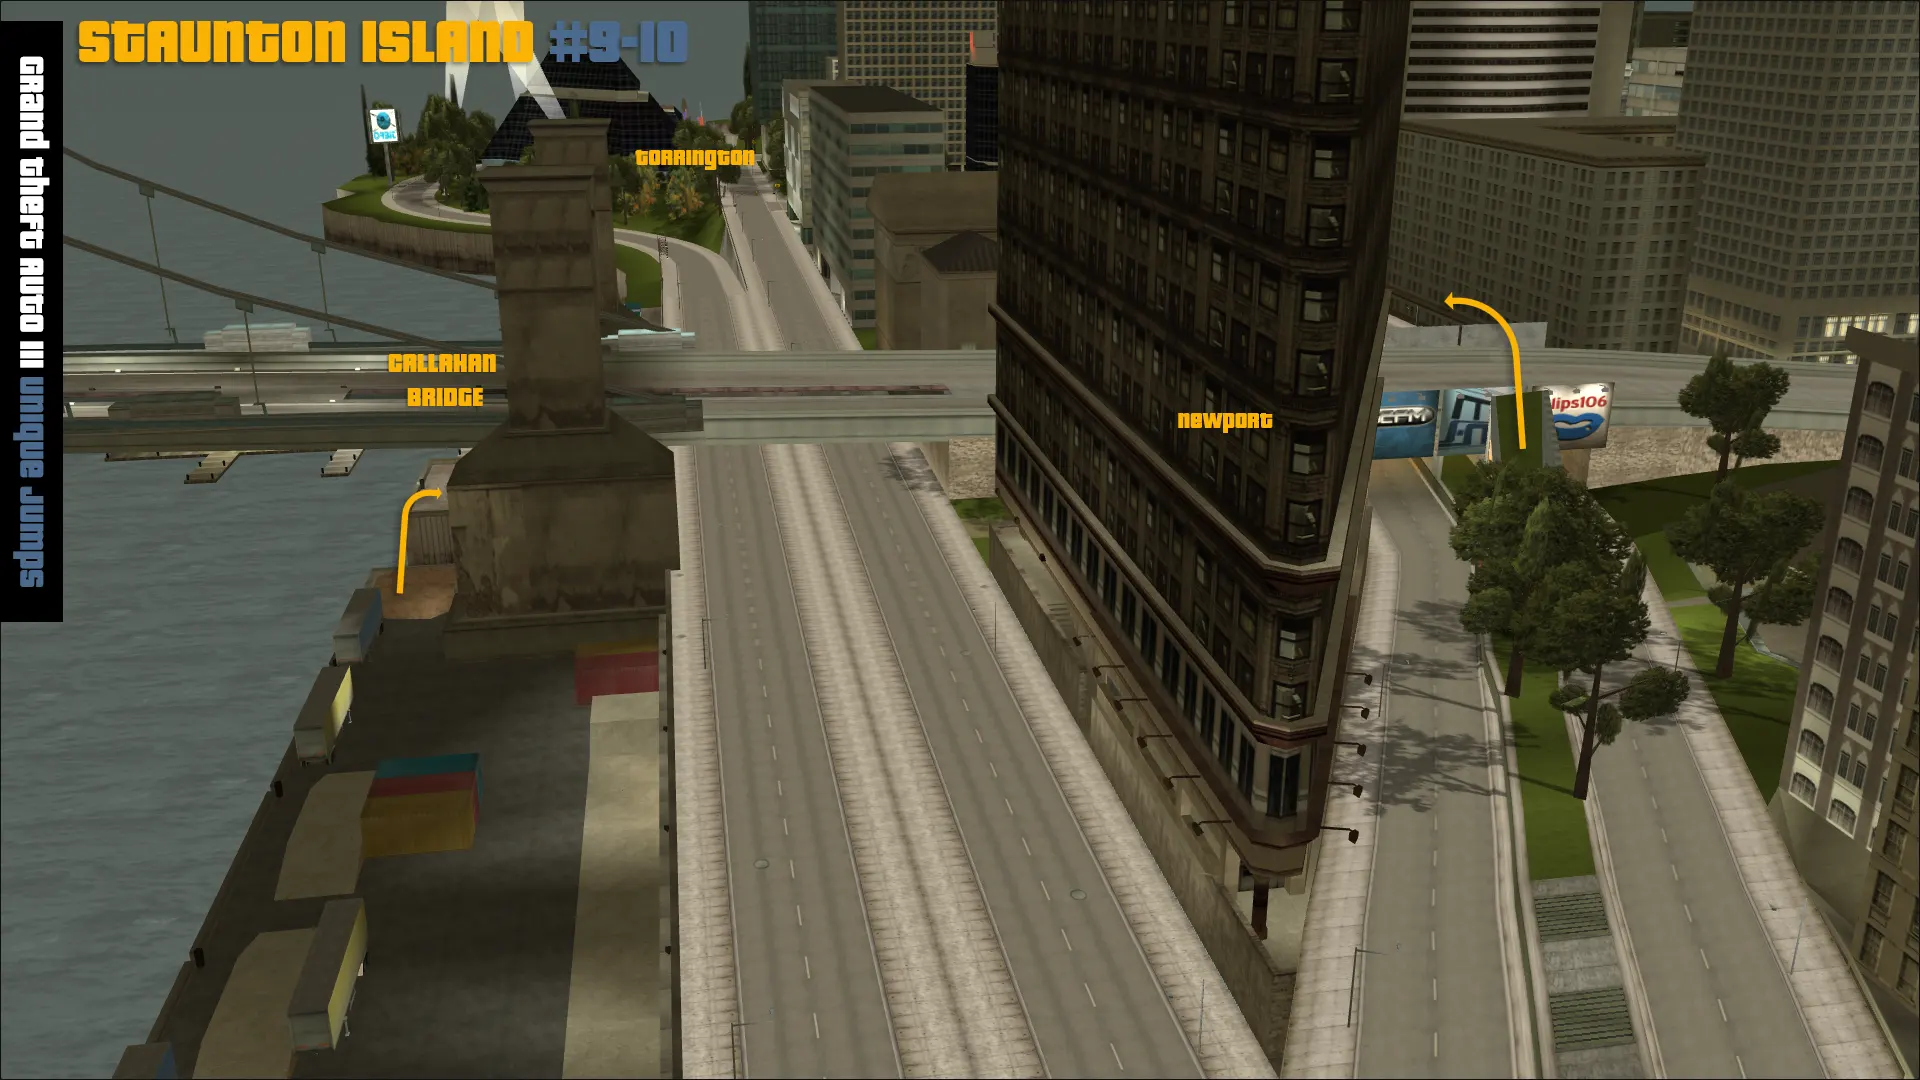
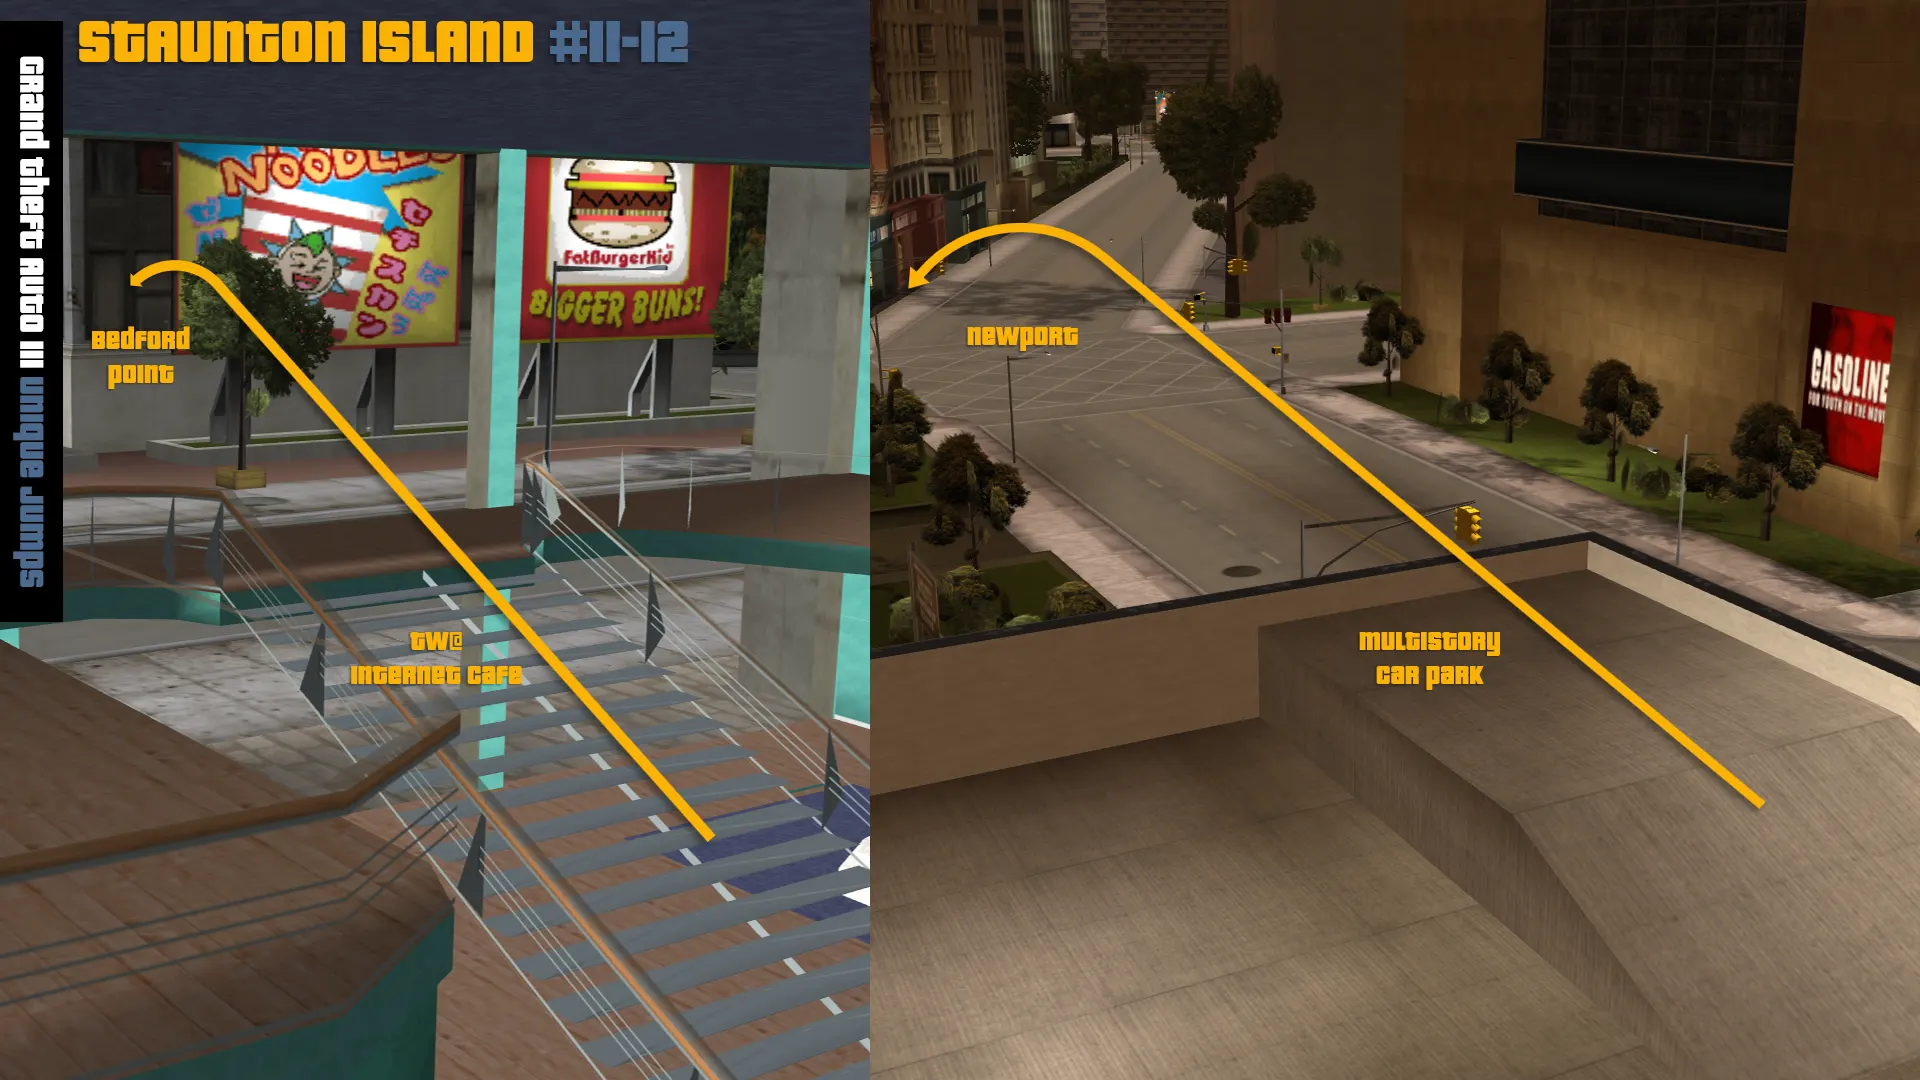
Staunton Island (4 jumps)
- In Newport, make your way to the top of the multilevel parking garage. Try not to bear too far to the right for the jump to count.
- From Asuka's condo in Newport, drive south. At the southernmost point of the area are two dual-sided inclines and a large pile of debris acting as the unique jump. You need to jump across the watery gap for the jump to count, but it is easy to overshoot. Even if you only touch the ground for a second, you still get credit.
- Again, in Newport head south on the overpass. In the middle is a ramp connecting the two roads. Hop your car up to the narrow ramp and try to keep going straight until you hit a small tunnel where you are launched for a unique jump.
- Find the glass-walled Internet café in Bedford Point. you need to break through the glass, hit the stairs, and fly through to the other side of the building.
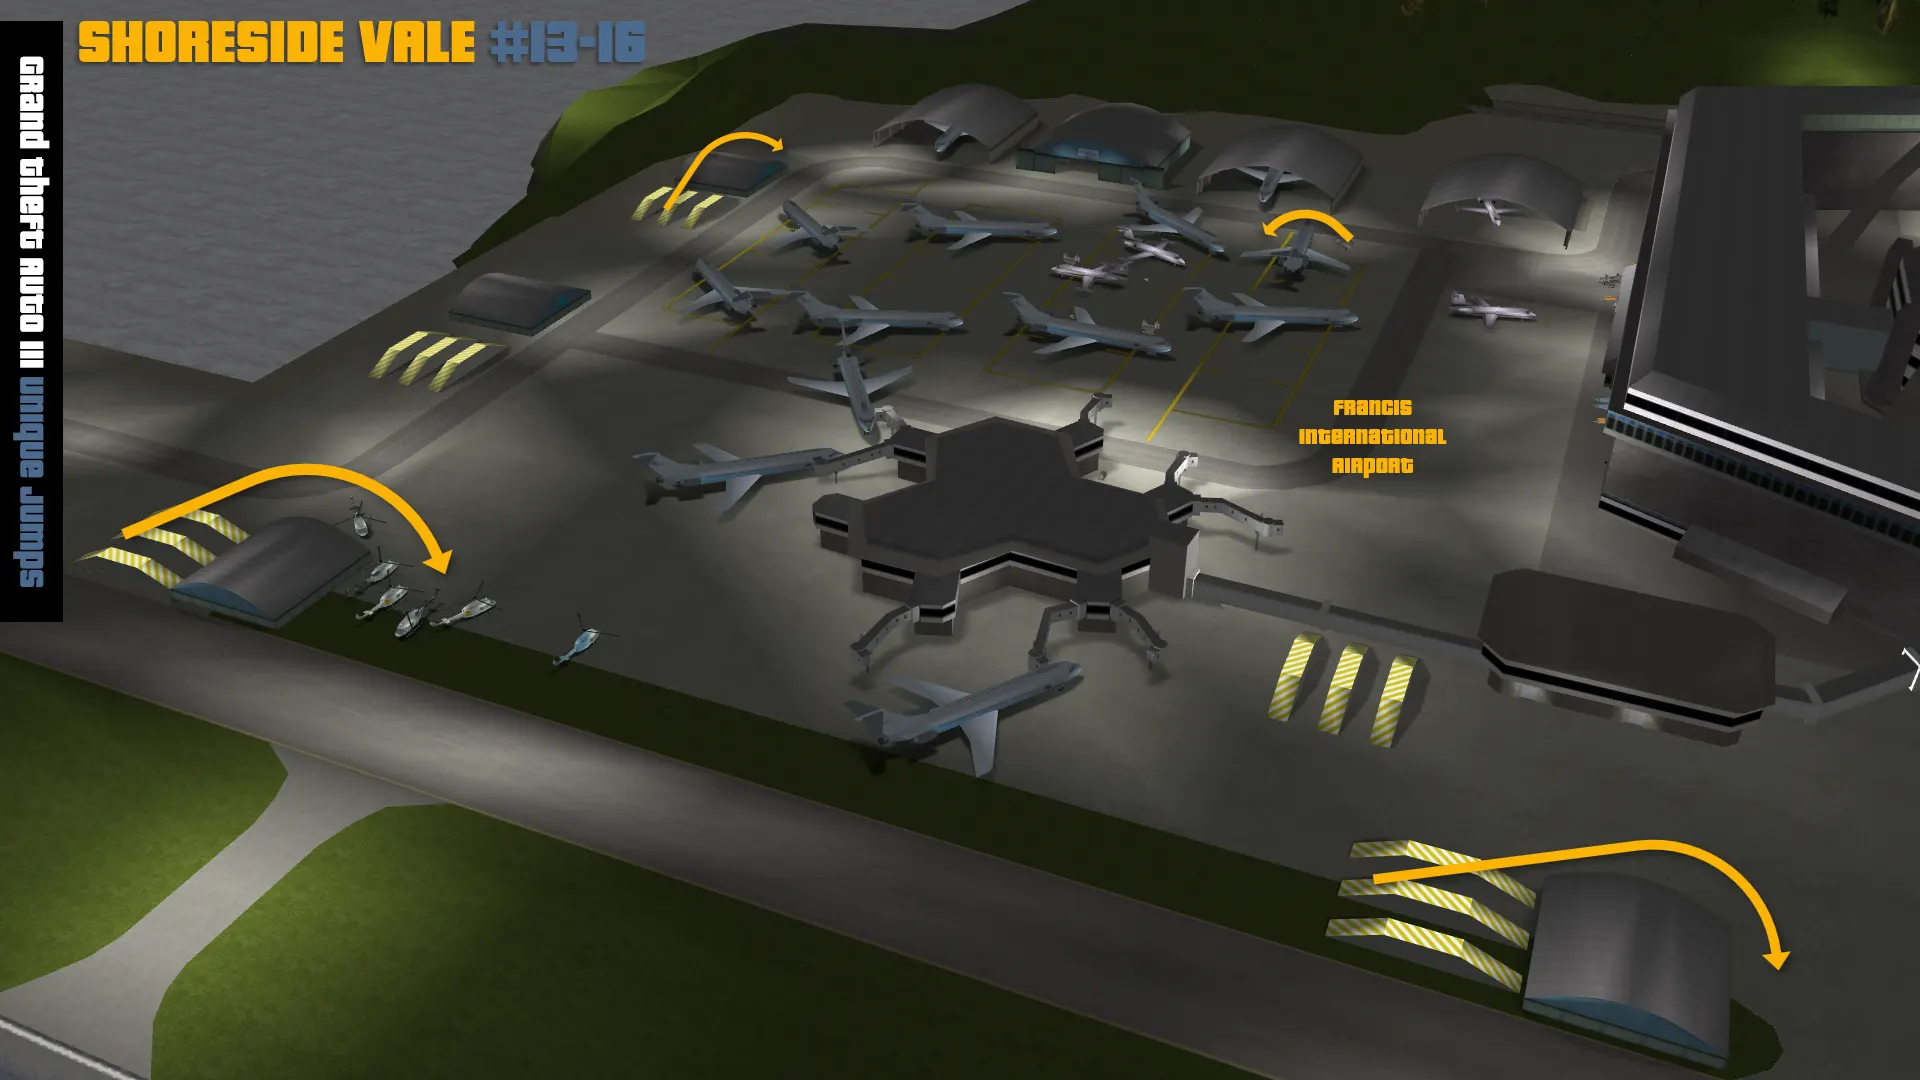
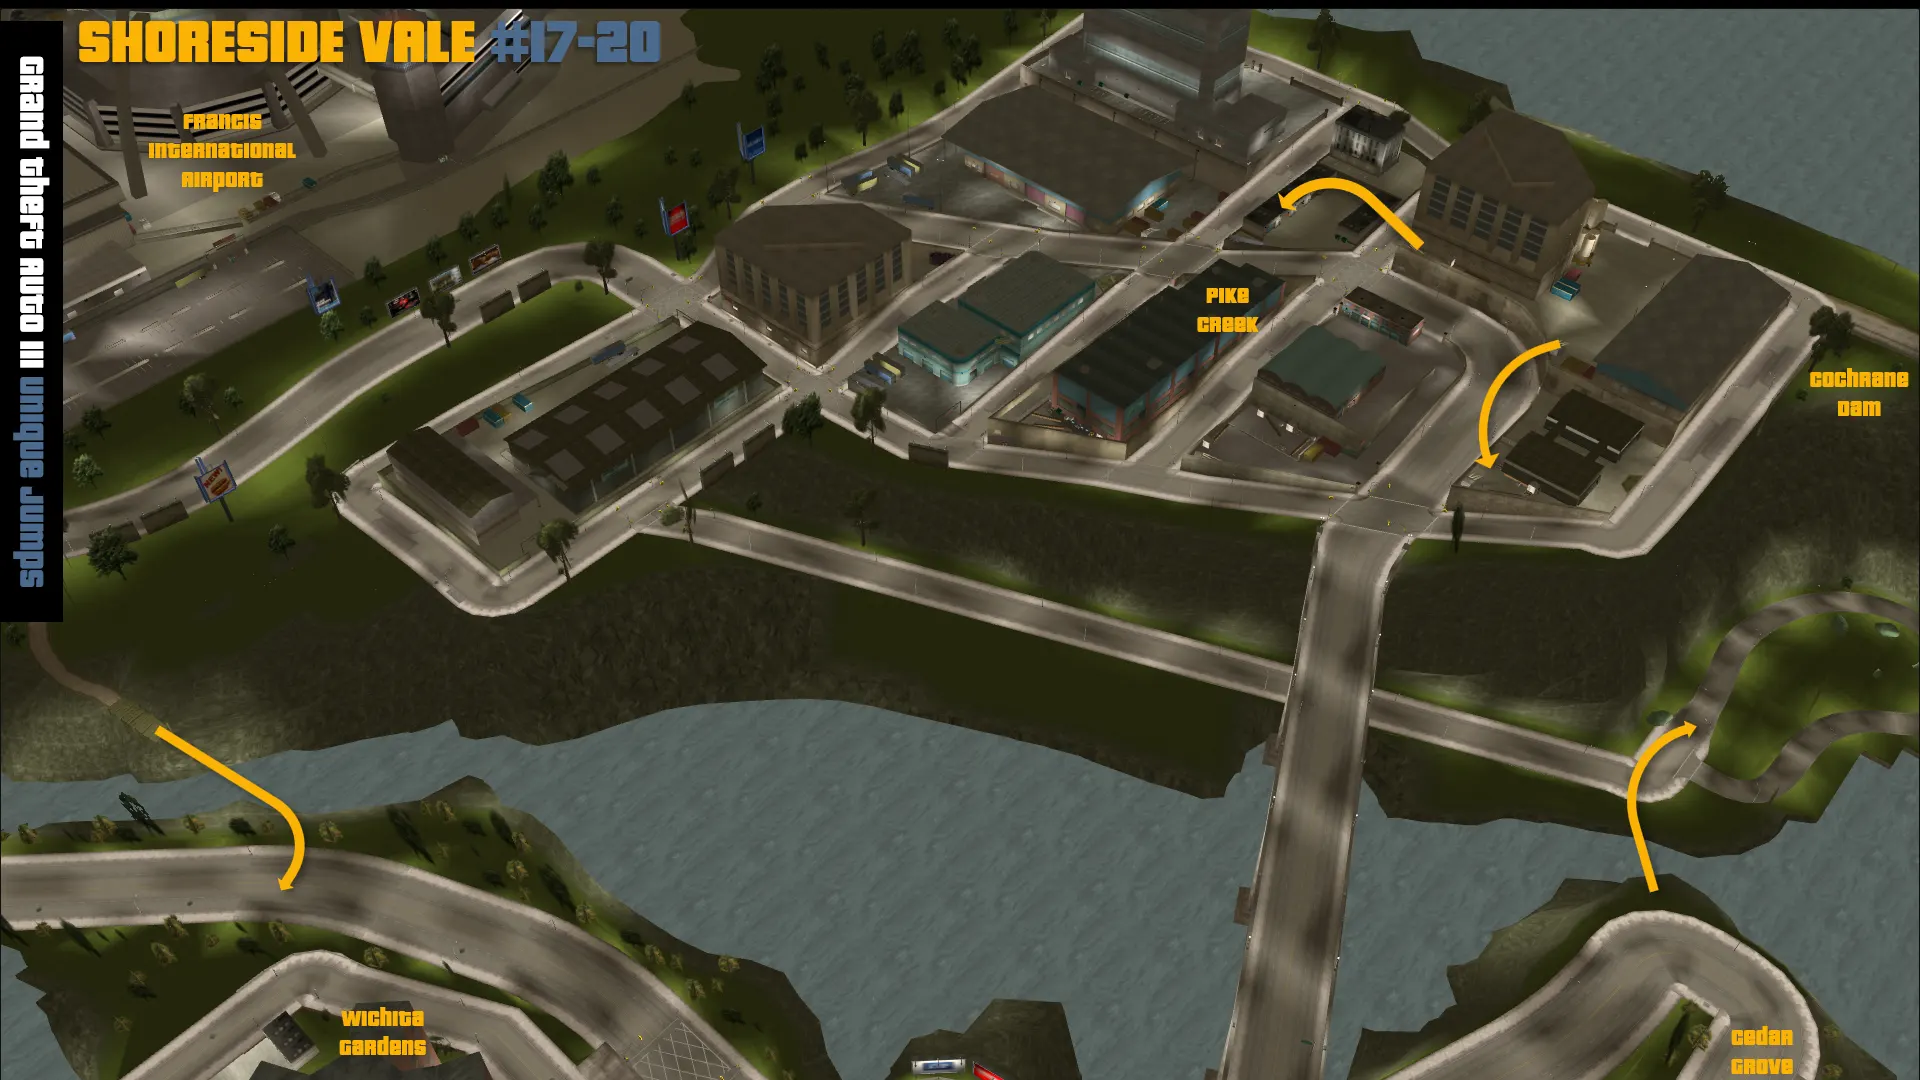
Shoreside Vale (8 jumps)
- While driving uphill to the top of the blocked-off tunnel, you may notice a large embankment. You may also notice that it is quite a huge drop. If you start at the top of the hill and build up speed, it should be no problem for you to clear the river and land safely on the other side.
- In Witchita Gardens, coming from Staunton Island, you notice a dirt path to your right leading to an aging wooden bridge. Hit the bridge and make it to the other side for a unique jump.
- At Francis International Airport, take the parking entrance in the airport, but continue past the actual parking area and crash through the warning gate. If you follow the road and then turn right, there is a boarding ramp that sets you up for a unique jump.
- Also at Francis International Airport, look further south for yellow and black warning ramps pointed in the direction of a hangar and grounded helicopters. Hit them at full speed and you should get credit, provided you end up on your wheels.
- There are two similar jumps in the Francis International Airport area. Just past where you took the first jump is a hangar with warning ramps on the other side. Hit them from the other direction and fly over the hangar to complete the jump. you need a very fast car, because you need to clear the entire hangar to be credited.
- One more hangar is waiting to be jumped in the same fashion. Find it and jump it.
- In the Cochrane Dam area, north of the hospital and police station is a wide-open building lot at the top of the hill. There are two unique jumps here. For the first, head east and bear to the left of the wooden ramp. If you manage to land in the small fenced-off area with another ramp.
- you will need to be in the same Cochrane Dam area. Look for a small alley to the south of the ramp used for the previous jump. You need to touch down on the roof of the second garage. It can be hard to build up enough speed to make it that far, but keep trying.
Miscellaneous
GTAIII is a game full of amusing things to do, with subtle touches thrown in by the developers. The following is an incomplete list of things you may want to try.
- Learn to fly a Dodo. At Francis International Airport in Shoreside Vale, there exists a small red plane known as the Dodo. you find it by the helipad, and it is notoriously difficult to fly. Handle with care.
- Find obscure vehicles. Some vehicles that only appear during missions have special properties or are simply one of a kind. If you see a vehicle you just have to have, odds are there is a way of getting it.
- Spend some time with the ladies. If you are facing a particularly difficult mission and are contemplating what might be your imminent death, you may find comfort by hiring one of Liberty City's many working girls. you know them when you see them. If your health is 100 or below, pick up a hooker (simply pull up next to one in a nice car) and head for a remote location like a forest or abandoned warehouse. You can get up to 125 health this way, which could mean the difference between life and death on a tough mission.
- Go crazy. GTAIII is an incredibly open-ended game. Explore it, test your limits, and try new approaches to old problems.