Super Smash Bros Melee - A second cross-title bash
Gameplay & Walkthroughs
Super Smash Bros Melee

- Publisher: HAL Laboratory
- Publisher: Nintendo
- Game Rating: T (for Teen) [Comic Mischief, Mild Violence]
- Published Date:December 3, 2001
- Players: 1 - 4

Introduction
On a stormy day an ominous cloud covers the land of Hyrule, filling the people with fear. Princess Zelda begins to worry that the seal placed upon the Wind Mage Vaati at the end of Four Swords is failing. She invites her childhood friend Link to accompany her while she checks upon the seal with the six Shrine Maidens.
With the help of the Maidens Princess Zelda begins to summon a portal to the Four Sword Sanctuary. Before they are able to enter the portal a dark figure that resembles Link appears. This shadowy figure seals the six maidens and Zelda inside dark crystals, before disappearing back into the portal to the Sanctuary. Left with no choice Link gives pursuit to the kidnapper.
After arriving at the Sanctuary the Shadow Link taunts Link into drawing the Four Sword, splitting Link into four different colored copies of himself. At the same time the seal on Vaati was broken, allowing the evil Wind Mage make his way back into this world. The four Links are then swept away by Vaati's magic before being able to give chase to Shadow Link.
The Links are then awoken by Kaepora Gaebora who informs them what happened and tells them what they must do. The first objective is rescue the six maidens who are locked away in different areas of Hyrule. Shadow Link has spread chaos across Hyrule, transporting villages to the Dark World and setting them on fire. To release the dark seals placed by Vaati and defeat Shadow Link the four Links must collect force gems in order to power up the Four Sword and grant it the power to repel evil.
Super Smash Bros. Melee is Nintendo's way to let its fans know that it cares about them. Although there are plenty of other franchises developer HAL could have worked on (like Kirby or EarthBound), Nintendo listened to all our screams for more Smash Bros. action and has brought back all its popular characters for a second cross-title bash.
The rules in Super Smash Bros. Melee are simple: throw your opponent off the stage and get a point for the "kill." The higher the damage percentage of any given player, the less chance of a recovery when being thrown off. But do not mistake the simple premise as meaning the game is easy to master. As a matter of fact, there is so much stuff in Super Smash Bros. Melee, it is easy to lose track of everything. That's where this guide comes in. Use the navigation at the top to check out helpful tips and info on all the different modes, characters, and stages.
Basics
Super Smash Bros. Melee is not a button-masher. Underestimate its depth and you stand as your own roadblock on your path to being a pro player. Of course, chances are if you are reading this strategy guide, you already know that. Still, it is important to get yourself out of the mindset that SSBM is a shallow fighter. It is a frantic battle that takes place at lightning speeds. To become a master smasher you will have to balance a great many things and learn to react instinctively more than calculatingly. This is something you will have to develop on your own, but the following tips and strategies should be incorporated into your style.
Controls
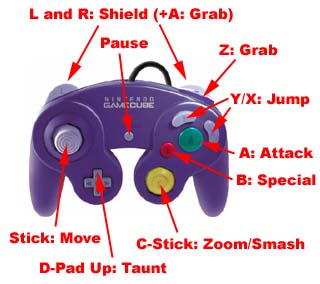 HAL, the developers behind SSB Melee, have tried to set the controller up so that N64 veterans who played the original Smash Bros. can jump right into the game. The only major change is that the grab button (Z) is not quite as accessible anymore. Of course, you will still be able to throw by pressing the R and A button in tandem.
The C-Stick is used for zooming and camera adjustment in the One-Player and Gallery Modes, as well as a "beginner's tool" in the VS Mode. Players who are having problems pulling off Smash Attacks easily, can always use the C-Stick to perform them instantly. However, do not get too comfy with it. Doing a manual Smash Move is by far more effective as you get to charge the move if you choose to do so.
Another upgrade is the ability to dodge both on the ground and in the air via the L/R triggers. Refer to the characters' moves lists for details on how to perform these maneuvers.
Basic Tips
Smashing for Dummies
You have to ask yourself, do you really understand what a smash attack is? Surprisingly, many beginner players do not understand what a smash attack is. If you do not, you are missing out on the foundation of the fighting system. Read on. Smash attacks are performed by using the A-button in combination with the analog stick.
Basically, you have to quickly smash the control stick in a particular direction — right, left, up, down — and press the A-button in sync with the moment the stick connects with the edge of the control barrier. Still confused? Here's an easy way to open your eyes. Select the one-player training mode with a character of your choice. Select a simple stage like Kirby's Fountain of Dreams. Now, zoom in on your character with the C-stick and center them on the screen. Light press and hold down on the analog stick. you will be crouching. Now, hit the A-button. Repeat the move a few times and take note of it. Now try smashing the control stick downward and tapping the A-button at the same time. You should see a completely different attack. If you are not seeing it, press Start and slow the speed down to 1/4 which doesn't require as much accuracy. Move the speed up to x1 until you can repeat the smash move. There are of course smash moves that work for pressing left/right or up on the control stick as well.
Lighten Up
you will notice that when you press horizontally your character will want to move and when you press up they'll want to jump. It is important that you become accustomed to the control stick. It has many levels of sensitivity and you will need to have a feel for them. In the case of pressing up you should practice slightly tilting the control stick upwards. It is a measurement that is probably on the order of about a millimeter or two. The point of this is that your character usually has a very important non-smash Up + A attack that should be a part of your attack regiment. You do not want to have to jump and hold up every time you want to perform this attack.
As for pressing left or right on the analog stick, you will notice that your character has varying speeds of movement. You can walk, trot, or run depending on how far you press it (slowly tilt the controller to vary your speed). During any of these speeds if you press the A-button you will perform a non-smash attack. However, there is also a dash. If you smash the control stick to the right or left you will see that your character will quickly sprint off into the desired direction. For most characters pressing the A-button will result in another different non-smash move. So, as you can see, being able to discern between the varying levels of sensitivity is important.
Jump for Life
A basic and often not understood element of Smash Bros. is how KOs happen. Every stage, as you will see, has no outer edges. you will also notice that your damage meter, a percentage, goes up and not down during fights. Both of these features are quite contrary to most fighting games. This is because the main modes of Smash Bros. require you to knock your opponent off the stage. As their percentage rises it could be considered as losing health, but what it really stands for is their ability to be knocked a certain distance. The higher the percentage, the more likely they can be smashed so far from the stage they are KOed or simply can't make it back to the stage.
This is where jumping, performed by pressing X, Y, or Up, comes into play. It is not just a vehicle for attacking, but also one that you must master to save yourself. Every character besides Yoshi and Jigglypuff have the ability to propel themselves up into the air a total of three times. The first two times is referred to as a double jump. You simply jump once and then at the height of it jump again. The third "jump" is most often an Up + B attack that pushes your character even farther upward. you will want to time this third recovery attack, or jump, perfectly. Usually it will be at the height of the second jump, but occasionally — if you are too far away — you will need to continue towards the stage after the second jump before you make your last attempt.
Try to get together with a friend and practice this with the character you plan on mastering. It is one of the most important techniques in SSBM you can master. It is also a good idea to experiment with the jumping conventions. You can press Up on the analog stick or use the X or Y buttons. In the end, it is a matter of taste. However, there are definite benefits to both. If you use Up on the analog stick, you will always have easy access to the attack buttons. However, because you cannot really press left/right while jumping, you stand to loose a little distance. In the case of using the buttons, it will draw your finger away from the attack buttons. Again, you have to find what feels most comfortable for you.
Throwdown
The conventions for throwing your opponent have changed in Super Smash Bros. Melee. Now you can throw an opponent upward or down as well as to the left or right. Simply grab them and press the analog stick in the chosen direction. There is no need to use the A-button in conjunction with the toss. Also new to the game is that once you grab your opponent you can hit them a few times by tapping the A-button before you throw them. It takes a bit more of patience, but is worth the extra damage if you can remember to do it.
Then you have to decide how you want to perfor your grab: the Z-button or L/R + A? We strongly recommend using L/R + A, as activating your shield before your throw will protect you. Also, if you master rolling and sidestepping (read below) you will find that this method is far more effective than using the Z-button.
Advanced Techniques
Eventually you will come to grips with the basic control mechanics. Or, perhaps you have been a pro smasher for years since the title debuted on the N64. In either case, you are going to find there is a whole new set of advanced controls waiting to be taken advantage of. The tips and techniques detailed in following will bring your skills to a whole new level. It is one thing to understand the rudimentary mechanics, but now it is time to see how deep the rabbit hole goes and explore the deeper control mechanics.
Charge It
Each of your smash attacks can be charged if you hold the A-button instead of releasing it. This is an extremely important feature that is useful not only for more powerful smash attacks, but also for timing. There are a lot of opportunities where a smash attack would be effective, but due to bad timing they may be weak or you may miss completely. That said, charging your smash attacks is always a wise idea if the opportunity is there. you will find that you have more accuracy and the hit is often much more powerful. The ability to charge and its timing varies from character to character, so put some time aside to practice your charge hits and devise new strategies.
Shield Yourself
One of your biggest assets is your shield. To take full advantage of it, you need to understand its more subtle abilities. Firstly, the shield is activated by the R or L trigger. Those triggers are analog (i.e. like a gas pedal), so depending on how much pressure you place on them your shield will behave differently. Lightly press R or L and your shield will be very large but lightly colored. This means it will last longer but shrinks faster to damage. As you move towards a fully depressed shield, you will notice that it is very powerful but shrinks quickly. Depending on the situation, you will need to try to adapt your shield. If someone is, for instance, shooting you repeatedly with the Super Scope it is a good idea to lightly press the trigger for a very large, slow-to-shrink shield. The smaller, more powerful shield is more convenient for blocking smash hits or item throws.
On the subject of items, you now have a better way of dealing with the ones tossed at your noggin. The shield can be used to reflect items and certain projectiles like lasers. The trick is to activate it at the very moment the projectile comes in contact with it. The risk is that if you are too slow, you are going to get nailed with it instead. Some characters such as Fox, Zelda, and Mario have more efficient built-in moves for deflecting things, but for those that do not you can use this shield method. Get together with a friend and head into the Training mode (switch the CPU to human on the menu) and practice trying to reflect something like the laser gun. When you get good enough, try playing around with the Bob-omb.
Art of the Dodge
One of the most talked about features to be added to Super Smash Bros. Melee is the dodge function. do not make the mistake of brushing it off as a "quirky feature." There are so many different ways to use it, dodging could practically be considered an art form. But, let's discuss its basic functionality before we trivialize real world art. A dodge can be performed both in the air and on the ground. In the air, you simply tap the shield trigger (R or L) and you will see your character defy the laws of gravity, stop in midair and shift to the side. You can additionally force the dodge into one of eight directions with the analog stick. For example, Up + R/L will push your character upwards, while Up-Right + R/L will push them slightly diagonally. There are many different reasons and ways to use the air dodge.
Most of which you will have to experience on your own, but we can suggest a few of the most popular uses. First and foremost the air dodge is a brilliant way to avoid getting smacked by another player in mid-air, which is often where you are most vulnerable. Just dodge right through them as they jump at you to attack. The air dodge is also very useful if you are about to land on someone's uppercut. You may even want to tease them by nearly falling onto their attack, but dodging it at the last second. If you dodge to early, they can often to easily realign their hit.
The air dodge can also be used as a sort of third jump instead of the usual Up + B recovery attack, which usually leaves you very vulnerable. If you double jump and then air dodge upward you will see that you have a bit more control over the extra height and the recovery time is slightly better. It is not recommended for getting back to the stage necessarily, but definitely if you want to jump high above the stage. It is very useful for leaping from one side of the stage to the other, and you won't be left vulnerable falling through the air so long.
Equally important is that you learn to dodge item throws. Often as you fall through the air above a character they will throw an item at you. If you can successfully dodge them most of the time, you will save a lot of damage points. Often when you are attempting to triple jump back to the stage foes will toss an object at you. If your position is right, you can easily dodge the object, thus saving your life. The ground dodge, performed by pressing Down + R while your feet are planted, can also be useful for item tosses. However, it requires incredibly precise timing. Instead we recommend sticking to blocking object throws with the shield, where you stand to deflect them or even pick them up. The ground dodge should be used in other situations, though. If your shield is running low and you can clearly see you are about to get smashed by a powerful attack, try a ground dodge. It is also very handy for hefty overhead attacks. If a character like Bowser comes smashing down on you, it may be wiser to dodge instead of blocking (especially if you are shield is low). This leaves you in perfect position for an attack. Also, it is the perfect defense against the crushingly powerful Kirby Star item. Overall, the dodge function is one of the most advanced techniques you can take advantage of. Learn it well.
Tuck and Roll
The ability to roll or sidestep around characters is yet another valuable technique that requires mastering. The use of it is quite simple. Activate your shield and press either left or right on the analog stick. Depending on your character, you will notice you can perform a few different sidesteps or rolls. Heavy use of this is recommended. There are two major benefits to it. Firstly, while you sidestep your shield will actually not wear down even though you are holding it down. It is a good way to prolong the use of your shield. On top of this, you can reposition yourself for an attack. One of the easiest strategies you could develop would be to side-step behind your opponent to attack them. It sounds simple to avoid, but it works incredibly well. This is also an easy way to position yourself for a throw. Sidestepping in general is disorienting for opponents and unpredictable. Hence, it is very useful. For some characters you will actually find their sidestep is quicker than running, and because you do not slip and slide you can change directions on a dime. do not overlook rolling and sidestepping. You can dance under the protection of your shield from one side of the stage to another without gaining a point of damage.
Itemize
Somewhat new to the side-scrolling fighter is the item. In Smash Bros. it is a major deciding factor in who wins or loses. There is a huge range of items to use and each of them has specific benefits. Be sure to browse our items section to learn more about their separate features. From a more general standpoint, you need to realize that throwing items is just as important as smash attacks. A hostile projectile is one of your best friends. You can chuck it across the screen, deal out major damage to an opponent, and not have to worry about any repercussions (assuming they do not deflect it with a shield). Tossing an item is also very handy when trying to keep an opponent off of the stage. For example, if you manage to throw, say, the Star Rod at an opponent, sending him flying off of the stage, you can usually pick the Star Rod back up and throw it at your opponent as they jump back to the stage. If you connect, chances are they're doomed to fall into the oblivion below. There's a bit of geometry and calculation involved, so practice your throws. You can actually affect the speed of the throw depending on how hard you smash the stick forward. Yes, there are smash item throws, believe it or not.
There is a solution for this, though. You can actually catch items that are thrown your way. Try playing a game of hot potato with the Bob-omb. you will likely blow yourself up many times, but it will help you work on your timing, which must be precise. In most cases, your better off not attempting to catch a lethal item, opting to dodge or reflect it instead.
One last interesting detail about items is that you can pick them up with the A-button while you are feet are planted, but if you are jumping through the air the A-button will not snatch them up. Instead, use the Z-button to grab the item. It is very useful to pass through a platform and pick up an item without stopping.
Do not Forget: Name Entry
Do not forget to enter your name and save your records on your Memory Card 59. Smash Bros. Melee keeps track of who is who in the Tournaments, win/loss records, and helps you figure out who is who in melee battles.
Hyrulean Adventure
After swimming through Lake Hylia and making their way through the Cave of No Return the four Links rescue the Green Maiden located in Hyrule Castle. The Maiden informs the Links of the four Royal Jewels which are needed to reach the Realm of the Heavens where Princess Zelda is being held. The Jewels were divided among four Knights of Hyrule who were known to have valiantly defended Hyrule. These Knights have mysteriously disappeared and the location of the Jewels is unknown.
Proceeding through Eastern Hyrule and Death Mountain the Links continue to rescue the Maidens in search of the Knights of Hyrule. While exploring The Field in the fourth level the Links come across a Big Dark Stalfos who is actually the Blue Knight of Hyrule. After saving him the Links are presented with the Blue Jewel. The Links are informed that the Knight was cursed and transported to the Dark World by Vaati and his Shadow Links.
The Links then manage to find the Green Jewel near Kakariko Village and the Red Jewel shortly after the Desert of Doubt. Inside the Pyramid it is revealed that Vaati is not the mighty foe behind all of the chaos, but rather someone is using him for their own means. They find the Mirror used to produce the Shadow Links is missing, along with a very powerful Trident. Along with information received from the Gerudo Tribe, the Links learn that a man named Ganondorf left the village and stole the Trident in an attempt to make himself the King of Darkness.
After collecting the Purple Jewel and rescuing the remaining Maidens, the Links reach the Tower of Winds and rescue Princess Zelda. Using the Tower of Winds to access the Realm of the Heavens the Links find the Dark Mirror deep inside The Dark Cloud and stop it from producing more Shadow Links. Princess Zelda then creates a bridge allowing access to Vaati's lair, the Palace of Winds.
At the top of the Palace of Winds the Links find Vaati and defeat him once and for all. Without Vaati's magic to sustain it the Palace begins to collapse and the Links along with Zelda quickly escape to the Tower of Winds. Before they escape the floor crumbles below them and they fall into a dark room. Ganon, using the power of the Trident begins the final fight with the Links. After freeing Zelda from Ganon's grasp the Links use Zelda's and the Maiden's power to defeat Ganon and seal him within the Four Sword.
In the aftermath the Links place the Four Sword back in its pedestal at the Four Sword Sanctuary, and the Maidens form a barrier around the sword so that it will never be touched again. Outside the castle celebration and peace are at hand, and the sole Link is treated as a hero.