Metroid Prime™ - Most renowned adventure franchises ever created
Gameplay & Walkthroughs
Metroid Prime™

- Developer: Retro Studios
- Publisher: Nintendo
- Game Rating: M (Mature) [Blood, Strong Language, Violence]
- Published Date:November 17, 2002
- $49.99 / $14.99: Video Library GV
- Players: 1
Introduction
By Fran “Aran” Mirabella III
Metroid is perhaps one of the most renowned adventure franchises ever created. The 2D iterations of the series Metroid (NES), Metroid II: Return of Samus (GB), and Super Metroid (SNES) featured a host of platforming and shooting, but most of all the focus of the exploits was exploring. This is what defines the style of the franchise, and Retro Studios with the help of Nintendo has created a truly captivating exploration game.
Metroid Prime for GameCube is the series' birth into 3D. Much like Legend of Zelda: The Ocarina of Time's release on the Nintendo 64, a lot of complexity has arisen out of this transition. The varied and beautiful worlds of Tallon IV — vast and intricate in size — hide many secrets, posing obstacles at every corner. With these trials in mind, we have designed this strategy guide to help you step into the world without fail.
It is an all-inclusive package: new Metroid followers will find a history of the series, beginners can learn the Basics, a detailed Walkthrough leads you to success while keeping you in tune with the secrets, and our comprehensive Log Book will give you pinpoint locations of everything you need to earn your 100% rating.
Story
 Metroid (NES): In the year 20X5, the first Metroid was discovered on the planet SR388. The Zebesian Space Pirates abducted the Metroid specimen with the intention of using it as a powerful weapon, and thus our heroin, Samus Aran, was sent to the planet Zebes to foil their evil plans and save the galaxy from the wrath of the Metroid.
 Metroid Prime (GCN): After her victory on the surface of Zebes, Samus learns of another Zebesian outpost in orbit around the planet Tallon IV. She discovers that the evil Space Pirate organization is also researching another lethal biotechnology known as "Phazon," and thus sets out to single-handedly bring down their terrorist efforts.
 Metroid II: Return of Samus (GameBoy): The Federation cannot rest until all Metroids have been exterminated, thus Samus is sent to their homeworld, SR388, to wipe them out for good. In her final battle on SR388, Samus witnessed the birth of a Metroid hatchling. As a result, the creature bonded with Samus and adopted her as its mother. Samus decided it best to return this infant — the last known Metroid in the universe— to the Federation for future research.
 Super Metroid (SNES): The last Metroid was in captivity. The galaxy was at peace, until. The Space Pirates, led by the ferocious Ridley, attacked the Metroid research facility and stole the specimen, returning it to the planet Zebes. Samus returned to Zebes in an attempt to rescue the Metroid, but in the final battle, the creature selflessly gave its life so that Samus could defeat the evil Zebesian leader, Mother Brain, once and for all. The last Metroid was lost, and the Space Pirates were defeated.
 Metroid Fusion (GBA): With the loss of all Metroid life, the planet SR388 began suffering from a severely unbalanced ecosystem. The Federation chartered the Biological Space Labs (B.S.L.) organization to oversee the reconstruction of this ecosystem on SR388, and, due to her vast experience with the planet, Samus Aran was contracted as an expert advisor on the project.
During a routine planetary expedition, Samus came into contact with an unknown organism on the surface of SR388. Although interesting, the encounter was never considered to be a threat. Later, while escorting the B.S.L. convoy in her ship, Samus lost control of her craft as her body was gripped by an intense seizure, and nearly died in the resulting crash.
B.S.L. scientists recovered Samus' jettisoned escape pod and designated the unknown parasite from SR388 that had infected her body as simply "X." The X parasite had infected Samus' central nervous system severely, and due to the integrated, biological nature of her suit, the infected parts of Samus' metal exoskeleton were surgically removed. Her prognosis for survival was slim.
A risky cure was proposed, and the team of scientists took the gamble and attempted to save Samus' life. Apparently, the Metroid is the natural predator of the X organism on SR388, thus a vaccine created from a surviving Metroid cell culture was injected to fight the remaining traces of the X parasite within her body. This predatory relationship has allowed the Metroid vaccine to both cure Samus and grant her immunity to all X parasite attacks. In fact, Samus is now able to regenerate her energy levels simply by absorbing these otherwise lethal X parasites.
The Metroid hatchling had saved her life once again. As Samus awoke from her comatose state, a distress signal was already being received from the B.S.L. space station in orbit around SR388. Samus wasted no time in boarding her ship and plotting a course to investigate.
Suit Augmentations
Power Beeam
You start the game with the Power Beam. you use this weapon as soon as you enter the planet's atmosphere. You can use the Power Beam to get rid of the lovely flora and fauna you find on Tallon IV, blast open doors, activate switches and so forth.
The Missile
Found in the Chozo Ruins, in the room called Totem Access. This gives Samus the ability to launch missiles. You can use these missiles to deal with some of the harder enemies or to open doors. some doors will only open when they are hit by one of these.
Morph ball
Found in the Chozo Ruins, in the Ruined Shrine. You must have the missile augmentation. This is Samus's exclusive move; the ability to shrink into a round sphere which allows her to gain access to rooms that have tight entrances.
Double Morph Ball Jump
This is a common move that you need to master in order to get some of the special items in the game. To do this, set a morph bomb. Then, right before you are about to jump up, set one more. As you are in the air set a third one. Then fall down and the second bomb will boost you up to the third bomb. This will then boost you up even higher to a second jump. Use it to get to certain platforms in which you can only be in morph ball mode. Here is a small little diagram to look at for easier translation.
                                                 DOUBLE JUMP! *Finish*
                                                         ^
                                                         |
                            #3, then fall to #2 |       #3
                             ^                  |        ^
                             |                 \ /       |
*START* #1, wait 2 seconds, #2                 #2--------|
        _______________________*SURFACE*_______________________

 #'s indicate when you should set a morph ball bomb.
Morph Ball Halfpipe
To get good boost on the halfpipe, use the following diagram.
  |                                                                        |
  |                                                                        |
  |                                                                        |
  | 1     4                                                       3  2     |
   \______________________________________________________________________/
- When starting, start a long boost all the way along the base of the halfpipe. Make sure you hold B down the whole time in morph ball mode.
- This is when you should release B after the first long charge up. This will boost you high on the pipe.
- Right when you hit the ground of the first charge up, hold B and charge up along the base for a second run. Becareful as you will get a lot of speed along the runway.
- This is where you let go of B again to get an even higher boost then number 2. Continue to do this in the same pattern to get to maximum heights.
Charge Shot
Found in the Chozo Ruins, in the Watery Hall. This requires a missile augmentation. This allows Samus the charge up energy with her power beam then release it for a powerful blast. Useful in clearing away ice and debris. This, if holding down A, will create a large bubble that is essentially a charge up. It is more powerful than regular shots, but can be very time consuming. When charged up, you can do special moves by pressing Y while holding it down.
Morph Ball Bomb
Found in the Chozo Ruins, in the Energy Core. This requires a Morph ball, and a missile augmentation. This is another one of Samus signature moves; she can drop bombs while she is in Morph mode. Useful in clearing away false walls, drain covers, and brick covering pipes. These are the bombs that you can set by pressing B during Morph Ball Mode. They can be used to break small doors that block certain pathways. You will be able to shoot three in a row without reloading. They can also do double jumps and so on.
Varia Suit
Found in the Chozo Ruins, after you defeat Flaaghra. This requires all previous augmentations. This suit allows Samus to venture into areas of extreme heat, ala the Magmoor Caverns, without taking damage. This suit is given to you after defeating Flaaghra. It allows you to withstand heat. Reason being, is that you will be able to enter the Magmoor Caverns without being hurt by the strong heat.
Speed Ball
Found in Phendran Drifts, in the Phendrana Canyon. This requires all previous upgrades. With this ability, Samus, while in Morph mode, can gain speed and boost for a short time on half-pipes. You hold down B to get a huge boost of speed. You should watch out for half pipes around different worlds. You can boost around them to get to high places. I would also use it to dodge enemies that are quick and really annoying. Useful item indeed.
Space Boots
Found at the Landing Site, this requires the Speed Ball. With these on Samus can use her double jump feature; this is self explanatory. It allows you to do a double jump. It really makes the game less and less frustrating. Once you get, take advantage of it as it will help you greatly throughout the game.
Wave Beam
Found in the Hall of the Elders in Phendrara Drifts after you defeat a large Sheegoth. This allows you to shoot electricity, activate power conduits, and open purple doors. It is used to shoot out multiple waves at other enemies. It is not as fast as the power beam, but is much stronger. In the long run, this weapon is probably the least of second to least weapon used. To get them, you have to kill the Sheegoth party.
Super Missile
Found at the Observatory in the Phendrana Drifts. Obviously this requires all previous upgrades. This, when used (press and hold A until your Power Beam is fully charged. Then, while holding A, press Y) delivers a powerful concussion blast. Use this to break pillars and as a weapon useful against a few bosses. Allows you to shoot a more powerful missile. It takes up five missiles per shot.
Thermal Visor
Found in the Research Core at Phendrana Drifts. This Visor allows Samus to detect heat patters normally invisible to the unaided eye. This is the visor that is similar to any regular night vision goggles. You should use this to see enemies and doors in the dark. When turned on, you will see a pink, yellow, and other warm colors to make navigation much easier. You will also be anle to see heat, though creatures with the same temperature as their surrounding will probably be hard to spot.
Spider Ball
Found in Phendrana, after you defeat Thardus in the Quarentine Caves. This allows Samus, when in Morph mode, to attach herself to Magnetic Rail Tracks. This is also a very useful item. It allows you to cling to the yellow and black like tubes. You will be faced with puzzles and interesting things. Make sure you look for these pipes, as your spider ball can get you to secret places.
Wave Buster
Found at the top of the Tower of Light in the Chozo Ruins, the Wave Buster is a combination attack; it combines with the electricity the Wave Buster normally shoots, with some Missiles for a different attack. DIFFERENT, NOT powerful. This upgrade is WORTHLESS. After about 5 seconds of using it, you probably have drained about 20 missiles and have not killed an average Space Pirate. The combo for the Wave Beam. It auto-seeks targets with electric waves. It will waist missiles for as long as you are using it.
Ice Beam
Found in the Chozo Ruins, in the room entitled Antechamber. It is attached to the Hall of the Elders. This allows you to shoot ice particles and open white doors. It's an okay weapon, with good range, but it has TERRIBLE firing rates; it takes about two seconds after a shot for it to be ready to shoot again, and in combat two seconds is too much.
Gravity Suit
Found in the Phendrana Drifts, in the Gravity Chamber. This allows you to move, jump and fight underwater just like you would on land. This is a much welcomed upgrade. This is the famous suit found underwater. The great and special thing about it, is that it allows you to move like normal underwater.
Power Bomb
Acquired in the Phazon Mines, in the Central Dynamo, after you defeat the invisible Sentry Drone and navigate the electrical maze. This allows you to destroy ALL things made of Bendezium. These bombs are received way at the end of the game. You can carry a maximum of eight power bombs, after collecting the upgrades of course. They are much more powerful than regular bombs, as they can blow up huge boulders that block your path. You will be faced with an electric maze to retrieve this item.
Grapple Beam
Found in the Phazon Mines, in the Ore Processing at the very top. Use the hologram machine to maneuver the tracks to reach the top. This restores Samus' ability to grapple to certain points on roofs and ceilings. The Grapple Beam allows you to swing on the certain grapple points through the game. It just makes it easier to get to certain places but can also be something that is required in the game. This is one of the less useful items in the game.
X-Ray Visor
In the Tallon Overworld, in the Life Grove (accessible through the Great Tree Hall). This lets you see through tranparent and invisible things. This is the visor that allows you to see dark rooms in black and white. It is best when you want to see platforms in the dark. The thermal visor makes platforms confusing, therefore this is the visor to use. The real interesting thing about this visor is that it reveals invisible things that no other visor can see.
The Phazon Suit
A suit that nulls the adverse affects of Phazon. This is acquired when the Phazon Elite Pirate in the Phazon Mines is defeated (it falls on Samus, and her Power Suit acquires this ability). This is the last suit that you can receive in the entire game. It looks really cool and has very postive effects. The function of this suit is to protect you from Phazon goop. You are able to walk in the blue Phazon deposits, not the orange ones though. You receive this suit once you have defeated the Omega Pirate.
Plasma Beam
Found in the Magmoor, in the Geothermal Core. This the most powerful weapon in the game, and it can melt ice, but it has a rediculously short range. Probably the best weapon in the entire game. It is almost as fast as the power beam and almost as strong as the ice beam. That basically puts it on top. The beam shoots out fire from molten lava to easily destroy enemies you once had to use missiles.
Ice Spreader
Found in the Magmoor, in the Shore Tunnel. Notice that the tunnel is made of cracked Bendezium. The combo for the Ice Beam. It shoots huge mounds of ice. It can freeze enemies and even entire rooms. It takes up ten missiles per shot.
Flamethrower
Found in the Phazon Mines, in the Mining Security Tunnel. Bomb the bendezium made gate blocking off the computer. Scan the computer the dissipate the force-field block your access. The combo for the Plasma Beam. It will take up missiles for as long as you are firing it. It shoots out a beam of fire. It is most useful when you are facing several enemies in one room.
Basics
Before you toss yourself into the highly immersive worlds of Metroid Prime, there are a few things you should familiarize yourself with; controls, using the HUD, navigating the map, examining downloaded Log Book data, awareness of 3D space and using the Hint system are aspects you must have a solid understanding of.
Controls
The adventure takes place from a first-person perspective, but because the focus is not on shooting, the controls do not adhere to your standard first-person shooter controls — traditionally dual analog. Instead, the developers have implemented a system closer to what was introduced in Zelda: The Ocarina of Time.
- Control Stick - Move/Turn
- L-trigger - Lock/Scan/Strafe
- R-trigger - Manual Aim
- A-button - Shoot/Bomb/Charge/Scroll Text
- B-button - Jump/Boost Ball
- Y-button - Missiles/Power Bomb
- X-button - Morph Ball
- Z-button - Map
- D-pad - Visor Modes
- C-stick - Switch Weapon Type
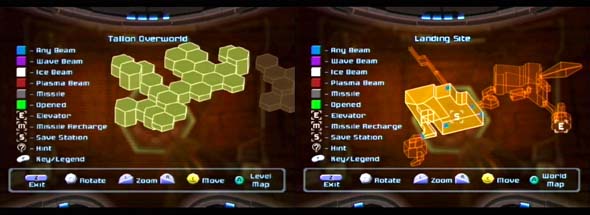
Map Controls
Control Stick
Rotate the directon of looking
C Stick
Move to a room of your choice
A Button
Changes from world map to level map
L Button
Zoom Out
R Button
Zoom In
Y Button
Hide/Display the Key and Legend
Z Button
Exit
Map Icon Key
You will notice different icons on the map during your gameplay. This is the key to what the symbols mean.
Blue Square
Can be opened with any Beam Weapon
Purple Square
Can be opened with the Wave Beam
White Square
Can be opened with the Ice Beam
Red Square
Can be opened with the Plasma Beam
Gray Square
Can be opened with a Missile
Green Square
Opened door
"E" symbol
Elevator
"M" symbol
Missile Recharge
"S" symbol
Save Station
"?" symbol
Hint
Make sure that you are always looking at the map. You should always know which room you are in. Number one, it helps you find places better and number 2, it makes this walkthrough a much easier document to use. Please make sure you do this during your gameplay.
Lock-on/Scanning
You can lock onto enemies and all important objects by holding down the L-trigger. Meanwhile, the controls allow you to circle strafe around the enemy or object and position yourself. It is the same for scanning. You can strafe and move around while you scan objects, which is imperative to avoiding damage during this process.
Sidestep
When you are locked on to something, you can tap left or right on the control stick and perform a sideward leap. It is an advanced technique used to avoid projectiles and more quickly position yourself.
Strafe
When you do not lock on to an object and hold down the L-trigger, it alters the control scheme slightly. By using it in conjunction with the control stick, you can strafe left to right, in addition to walking backwards without turning around. In both cases it is a very important function to accustom yourself with, but especially the latter can prove useful if you want to back off an enemy or object without turning your back to it.
Manual Aiming
Just hold down the R-trigger to activate this free look mode. Because you cannot perform this while you are in motion, you should make it a habit to examine every room in detail once it is clear of enemies. There are many secrets that hide along the walls and the floors. Look and ye shall receive.
Jumping
This is a painless process, and extremely forgiving. do not be shy about charging across a chasm or larger gap. Chances are it is closer than you think, and you should have little trouble reaching it. Of course, there are many areas that are too high or too far away, but you will be able to access them in time. Just have patience and search for those power-ups.
Morph Ball
Once your Morph Ball is functioning, you can change into it at anytime. Simply use the control stick to maneuver yourself around, and be sure to take advantage of the L-trigger, which will position the camera for you if you want.
Visor HUD
In Metroid Prime you have to see through lead character Samus Aran’s eyes. Because of this first-person perspective, you must learn to use the Heads Up Display (HUD) on her combat visor.
Visor Modes
Use D-pad to switch.
Weapon Type
Use C-stick to switch.
Caution Level
A height meter used to indicate how close your feet are to dangerous material such as lava.
Missile Supply
Your current available missiles. Not total.
Radar
Monitors hostile activity (orange dots) around you.
Map
This is the basic onscreen map. It is there to give you basic ideas, but press Z for the more detailed version.
Energy Supply
Your power suit needs energy to function. It is basically your health. The highest amount of energy you can have is 99. However, the small squares above are energy tanks. Fill them up for backup reserves.
Visor Switching
The D-pad is used to swap from visor to visor. You begin with only the Scan Visor, but it can and must be used frequently. It is key to unraveling the complicated story, locating secrets, and learning how to defeat enemies. Once activated, you can easily turn it off by tapping the A-button. Be sure to use the manual aiming to look around rooms frequently with this.
Choose Your Weapon
With the flick of the C-stick, you can switch between your various weapons. Eventually you will earn a total of four, but you only begin with one. As soon as you do earn a weapon, memorize the direction you must flick the C-stick to access it. Eventually, you will need to manage your arsenal in clutch moments.
Map Interface
With its huge leap from 2D to 3D, Metroid's map system has had to undergo a major transformation. Tap the Z-button to access the map, and then the everything else you need to know is right there on the screen. You can zoom and rotate with no problem. Our biggest suggestion is that you take note that each room has a name. This will become very important throughout the guide, as we'll give you two coordinates to match up. For example, the above screenshot could be read as the following: Tallon Overworld, Landing Site. Familiarize yourself with all the functions of your map. It is your best friend.
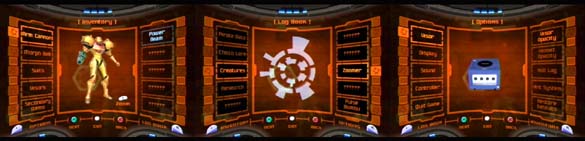
Tools and Data Tracking
By pressing the Start button you can access a sort of internal computer that logs all the information you have scanned in addition to a great many other things. Surf through the various options by scrolling pages with the L and R triggers; Inventory, Log Book, and Options will be available. You can change the opacity of the visor, stretch the screen, check out your Power Suit upgrades, and read through what will become a novel of important data in your Log Book. You can even flip on and off the Hint system.
Hint System
Metroid Prime defaults with the "Hint" system activated. do not freak out and assume that it will ruin the game for you. If anything, it is the perfect strategy guide. It merely highlights the next area you need to go to. It does not tell you how or what you need to get there. Essentially, it is a device to overcome the frustration that could ensue from exploring such a vast 3D world.
However, if you think you are good enough with the map and are hardcore about figuring things out for yourself, simply flip it off. You can turn it on again at any time. It will not bite, honest.
Levels
Power Suit Upgrades
Major Suit Upgrades
- Missile Launcher: Defeat the Hive Mecha :: Chozo Ruins, Hive Totem
- Morph Ball: Defeat the Plated Beetle :: Chozo Ruins, Ruined Shrine
- Charge Beam: Find the five runes :: Chozo Ruins, Watery Hall
- Morph Ball Bombs: Defeat the Incinerator Drone :: Chozo Ruins, Burn Dome
- Varia Suit: Defeat Flaahgra :: Chozo Ruins, Sunchamber
- Boost Ball: Activate platforms :: Phendrana Drifts, Phendrana Canyon
- Space Jump Boots: Access Alcove via Tallon Cayon :: Tallon Overworld, Alcove
- Super Missile: Restore power to holographic projector, platform to the very top :: Phendrana Drifts, Observatory
- Thermal Visor: Cut power to containment unit :: Phendrana Drifts, Research Core
- Spider Ball: Defeat Thardus in Quarantine Cave. :: Phendrana Drifts, Quarantine Cave
- Ice Beam: Drain Reflecting Pool, use as half-pipe. :: Chozo Ruins, Antechamber
- Gravity Suit: Located in deepest part of chamber :: Phendrana Drifts, Gravity Chamber
- Power Bomb: Defeat invisible drone and solve Morph Ball maze :: Phazon Mines, Central Dynamo
- Grapple Beam: Follow yellow track from Ore Processing :: Phazon Mines, Storage Depot B
- Plasma Beam: Raise the platforms in Geothermal Core, follow Spider Ball track along wall :: Magmoor Caverns, Plasma Processing
- Phazon Suit: Defeat Omega Pirate :: Phazon Mines, Elite Quarters
Secondary Weapon Upgrades
- Wavebuster: Use missiles to shatter weakened brinstone pillars; platform to top of tower :: Chozo Ruins, Tower of Light
- Ice Spreader: Set off a Power Bomb to shatter hull; located beneath bridgeway :: Magmoor Caverns, Shore Tunnel
- Flamethrower: Locate bendezium grating on top floor of Mine Security Station, set Power Bomb, and unlock force field :: Phazon Mines, Security Depot A
Energy Tanks
- Chozo Ruins, Transport Access North
- Use the West Furnace Access :: Chozo Ruins, Furnace
- High on ledge. Use Plaza Access from Vault :: Chozo Ruins, Main Plaza
- Use spinners to activate Morph Ball slot. Bomb slot to fill room with water. Located direclty across floating platforms down angled tunnel :: Phendrana Drifts, Ruined Courtyard
- Hidden in same stasis containment as Metroids. Use missile to blast glass open :: Phendrana Drifts, Research Lab Aether
- Use Thermal Visor to send power to cooling machine. Located behind purple passage (North) :: Magmoor Caverns, Magmoor Workstation
- Activate Ice Beam Morph Ball slot behind Chozo elder. Path leads underground :: Chozo Ruins, Hall of Elders
- Use bombs to propel yourself high in vertical shaft :: Tallon Overworld, Hydro Access Tunnel
- Super Bomb bendezium vent, roll through tunnel, scan to activate fans :: Phazon Mines, Ventilation Shaft
- Use half-pipe to reach Morph Ball slots, send power to elevator, and follow Spider Ball track. :: Chozo Ruins, Training Chamber
- Defeat Omega Pirate, exit second level :: Phazon Mines, Processing Center Access
- Blast wall of ice with Plasma Beam to melt :: Phendrana Drifts, Transport Access
Missile Expansions
- Behind Brinstone wall :: Chozo Ruins, Ruined Gallery
- Behind Brinstone wall :: Chozo Ruins, Watery Hall Access
- Bomb through Sandstone to reveal Morph Ball path :: Chozo Ruins, Burn Dome
- Solve the puzzle of the cage by using the double bomb jump :: Chozo Ruins, Vault
- Solve Morph Ball puzzle in wall :: Chozo Ruins, Ruined Nursery
- Use Morph Ball tunnel that loops in half-circle :: Chozo Ruins, Ruined Gallery
- Access from Triclops Pit, roll under grating :: Magmoor Caverns, Storage Cavern
- Bomb crates to reveal path. Located high up on elevated grating :: Magmoor Caverns, Fiery Shores
- Located under stone walkway; dust and steam pour out from beneath :: Tallon Overworld, Transport Tunnel B
- Behind ship in small tunnel filled with Tangle Weed :: Tallon Overworld, Landing Site
- Jump on piping, roll in Morph Ball form to access :: Phendrana Drifts, Research Lab Aether
- Use half-pipe. Located under bridge on small shelf :: Chozo Ruins, Main Plaza
- Use clean water from fountain to blast upward and connect to Spider Ball track :: Chozo Ruins, Ruined Fountain
- Blast weakened metal grating with missiles. :: Chozo Ruins, Dynamo
- Use Spider Ball track to access inlet above :: Chozo Ruins, Dynamo
- Platform to top of room. Located behind sandstone wall above East Atrium access. Jump on red lights, then double jump :: Chozo Ruins, Gathering Hall
- Activate network of pipes by shooting through cordite. Use half-pipe to activate Morph Ball slots. (4.6 MB Quicktime) :: Chozo Ruins, Crossway
- Use Super Missile to blast cordite shield on front of temple; Spider Ball track revealed :: Phendrana Drifts, Phendrana Shorelines
- Use Super Missile to blast weakened cordite pillar on top floor :: Phendrana Drifts, Research Lab Hydra
- Use Super Missile to blast weakened cordite containment door in submerged lower level :: Tallon Overworld, Biohazard Containment
- Activate crane controls with Wave Beam at power conduit, scan controls to change crane's position, and use Spider Ball track :: Phazon Mines, Main Quarry
- Use Industrual Pulse Beam gun to blast through wall with 8% integrity :: Phazon Mines, Elite Research
- Shoot explosive crate in ventilation shaft, use Thermal Visor to locate better :: Phazon Mines, Elite Control Access
- Use X-Ray visor in Great Tree Hall; door located behind tree :: Tallon Overworld, Great Tree Chamber
- Located in Morph Ball size tunnel amidst Venom Weed :: Tallon Overworld, Overgrown Cavern
- Use Grapple Beam to swing into submerged cave :: Tallon Overworld, Frigate Crash Site
- Exit Training Chamber; use ledge and grapple point to swing over to power-up :: Chozo Ruins, Main Plaza
- Tree knot can be shattered with Super Missile :: Chozo Ruins, Main Plaza
- Sandstone weakness in floor; blast with Morph Ball bomb :: Chozo Ruins, Ruined Shrine
- Boost out of half-pipe structure (Note: both sides have Morph Ball tunnels) :: Chozo Ruins, Ruined Shrine
- Use X-Ray Visor to jump to very top; look left when facing Plasma Beam door to see it located behind wall of foliage :: Chozo Ruins, Root Cave
- Stand next to the two diagonally parallel Spider Ball tracks; flip on X-Ray Visor to scan nearby rock wall; Power Bomb two walls successively; follow Spider Ball bridge and use X-Ray visor to locate last platform :: Phazon Mines, Metroid Quarantine A
- Located on the ground, beneath door to Quarantine Access B; use Thermal Visor to locate it, visible in a ring of small mushrooms; Power Bomb to uncover :: Phazon Mines, Fungal Hall B
- Weakened cordite shaft; use Super Missiles to shatter :: Phazon Mines, Metroid Quarantine B
- Weakened grating made of bendezium near entrance :: Phazon Mines, Security Access A
- Use half-pipe in Morph Ball tunnel entrance and set bomb at top :: Tallon Overworld, Life Grove
- Set Power Bomb to reveal half-pipe; boost up to Spider Ball track and follow :: Chozo Ruins, Furnace
- Plasma Door located at top of Root Cave; use X-Ray to reveal platforms :: Tallon Overworld, Arbor Chamber
- Use grapple points in Quarantine Cave :: Phendrana Drifts, Quarantine Monitor
- Located under ice-covered lake; use Glider to swing to elevated ledges and blast stalactite hanging above, sending it crashing down below :: Phendrana Drifts, Frost Cave
- Shatter large grouping of stalactites with Plasma Beam to reveal grapple point; swing to expansion located on elevated ledge :: Phendrana Drifts, Gravity Chamber
Power Bomb Expansions
- Behind Bendezium wall. Use X-Ray to reveal; blast with Power Bombs :: Chozo Ruins, Magma Pool
- Hidden under sheet of ice on rooftop in corner across from Chozo Lore; use Plasma Beam :: Phendrana Drifts, Ice Ruins West
- Use Grapple Beam to arrive at the highest point in Phendrana's Edge :: Phendrana Drifts, Security Cave.
Log Book
Research
- Map Station: Anywhere
- Save Station: Anywhere
- Small Energy (Purple): Anywhere
Large Energy (Red): Anywhere - Missile Ammo: Anywhere
- Gunship: Tallon Overworld, Landing Site
- Missile Door Lock (Blast Shield): Chozo Ruins, Main Plaza
- Morph Ball Slot: Chozo Ruins, Energy Core
- Ultra Energy (Yellow): Anywhere
- Spinner: Magmoor Caverns, Monitor Station
- Locked Door: Phendrana Drifts, Research Entrance
- Tallon IV: Phendrana Drifts, Observatory
- Zebes: Phendrana Drifts, Observatory
- Spider Ball Track: Phendrana Drifts, Quarantine Cave
- Missile Station: Chozo Ruins, Hall of Elders
- Power Bomb: Anywhere
Creatures
- **Parasite Queen: Space Station
- **Parasite: Space Station, Subventilation Shaft Section A
- Beetle: Tallon Overworld, Canyon Cavern
- Auto Turrets: Space Station
- Sap Sac: Tallon Overworld, Tallon Canyon
- Zoomer: Tallon Overworld, Tallon Canyon
- Geemer: Tallon Overworld, Tallon Canyon
- Bloodflower: Tallon Overworld, Root Tunnel
- Hive: Chozo Ruins, Main Plaza
- Scarabs: Chozo Ruins, Nursery Access
- Eyon: Chozo Ruins, Eyon Tunnel
- War Wasp: Chozo Ruins, Ruined Nursery
- Blastcap: Chozo Ruins, Ruined Gallery
- Tangle Weed: Chozo Ruins, Ruined Gallery
- Plazmite: Chozo Ruins, Totem Access
- **Hive Mecha: Chozo Ruins, Hive Totem
- **Ram War Wasp: Chozo Ruins, Hive Totem
- Plated Beetle: Chozo Ruins, Ruined Shrine
- Shriekbats: Chozo Ruins, Arebortum Acess
- **Incinerator Drone: Chozo Ruins, Burn Dome
- **Barbed War Wasp: Chozo Ruins, Burn Dome
- **Flaahgra: Chozo Ruins, Sunchamber
- **Flaahgra Tentacle: Chozo Ruins, Sunchamber
- Oculus: Chozo Ruins, Sun Tower
- Grizby: Magmoor Caverns, Burning Trail
- Burrower: Magmoor Caverns, Lake Tunnel
- Magmoor: Magmoor Caverns, Lava Lake
- Puffer: Magmoor Caverns, Lava Lake
- Triclops: Magmoor Caverns, Pit Tunnel
- Flickerbat: Phendrana Drifts, Phendrana Shorelines
- Crystallite: Phendrana Drifts, Phendrana Shorelines
- Scatter Bombu: Phendrana Drifts, Ice Ruins Access
- Baby Sheegoth: Phendrana Drifts, Ice Ruins East
- Ice Burrower: Phendrana Drifts, Plaza Walkway
- Pulse Bombu: Phendrana Drifts, Ruins Entryway
- Seedling: Tallon Overworld, Temple Hall
- Ice Parasite: Phendrana Drifts, Chozo Ice Temple
- Sheegoth: Phendrana Drifts, Chapel of Elders (boss) or Ice Ruins West
- Ice Shirekbats: Phendrana Drifts, Ice Ruins West
- Shadow Pirate: Phendrana Drifts, Research Entrance/Core
- Space Pirate: Phendrana Drifts, Research Entrance
- Flying Pirate: Phendrana Drifts, Control Tower
- Metroid: Phendrana Drifts, Research Lab Aether
- Ice Beetle: Phendrana Drifts, Frost Cave Access
- Sentry Drone: Phendrana Drifts, Research Core Access
- **Thardus: Phendrana Drifts, Quarantine Cave
- Puddle Spore: Magmoor Caverns, South Core Tunnel
- Plated Parasite: Chozo Ruins, Furnace
- Chozo Ghost: Chozo Ruins, Hall of the Elders
- Hunter Metroid: Phendrana Drifts, Hunter Cave
- Glider: Phendrana Drifts, Frost Cave
- Jelzap: Phendrana Drifts, Phendrana's Edge
- Aqua Reaper: Phendrana Drifts, Gravity Chamber
- Tallon Crab: Tallon Overworld, Main Ventilation Shaft Section A
- Aqua Pirate: Tallon Overworld, Reactor Core
- Aqua Drone: Tallon Overworld, Biohazard Containment
- Aqua Sac: Tallon Overworld, Connection Elevator to Deck Beta
- Mega Turret: Phazon Mines, Security Access A
- Wave Trooper: Phazon Mines, Mine Security Station
- Power Trooper: Phazon Mines, Elite Research
- Elite Pirate: Phazon Mines, Elite Control
- Ice Trooper: Phazon Mines, Elite Control
- Plated Puffer: Chozo Ruins, Tower of Light
- Plasma Trooper: Phazon Mines, Phazon Processing Center
- **Phazon Elite: Phazon Mines, Elite Research
- **Meta Ridley: Tallon Overworld, Artifact Site
- Lumigek: Impact Crater, Crater Tunnel A
- Fission Metroid: Impact Crater, Phazon Core
- **Metroid Prime (Shell): Impact Crater
- **Metroid Prime (Core): Impact Crater
- **Only available for scan once. Must be scanned when first seen.
Chozo Lore
- Fountain: Chozo Ruins, Ruins Entrance
- Exodus: Chozo Ruins, Ruined Nusery
- Hatchling: Chozo Ruins, Ruined Fountain
- Meteor Strike: Chozo Ruins, Watery Hall
- Contain: Chozo Ruins, Sun Tower
- Beginning: Chozo Ruins, Vault
- The Turned: Phendrana Drifts, Phendrana Canyon
- Statuary: Tallon Overworld, Artifact Temple
- Binding: Tallon Overworld, Artifact Temple
- Cipher: Phendrana Drifts, Ice Ruins West
- Cradle: Chozo Ruins, Furnace
- Infestation: Chozo Ruins, Crossway
- Hatchling's Shell: Chozo Ruins, Crossway
- Worm: Chozo Ruins, Crossway
- Hope: Chozo Ruins, Hall of Elders
Pirate Data
- Fall of Zebes: Space Pirate Frigate, Biohazard Containment
- Artifact Site: Tallon Overworld, Temple Security Station
- Mining Status: Phendrana Drifts, Research Lab Hydra
- Security Breaches: Phendrana Drifts, Research Lab Hydra
- Phazon Analysis: Phendrana Drifts, Research Lab Hydra
- Parasite Larva: Phendrana Drifts, Research Lab Hydra
- Glacial Wastes: Phendrana Drifts, Research Lab Hydra
- Phazon Program: Phendrana Drifts, Observatory
- Contact: Phendrana Drifts, Observatory
- Meta Ridley: Phendrana Drifts, Research Lab Aether
- Metroid Studies: Phendrana Drifts, Research Lab Aether
- Phazon Infusion: Phendrana Drifts, Research Lab Aether
- Elite Pirates: Phazon Mines, Elite Research
- Metroid Prime: Phazon Mines, Elite Control
- The Hunter: Phazon Mines, Elite Control
- Hunter Weapons: Phazon Mines, Elite Control
- Chozo Studies: Phazon Mines, Elite Control
- Chozo Artifacts: Phazon Mines, Elite Control
- Prime Mutations: Phazon Mines, Elite Control
- Prime Breach: Phazon Mines, Elite Control
- Chozo Ghosts: Phazon Mines, Elite Control
- Omega Pirate: Phazon Mines, Omega Research
- Special Forces: Phazon Mines, Metroid Quarantine B
Artifacts
- Truth: Tallon Overworld, Artifact Temple
- Strength: Magmoor Caverns, Warrior Shrine (Monitor Station)
- Elder: Phendrana Drifts, Control Tower
- Wild: Chozo Ruins, Sunchamber
- Lifegiver: Chozo Ruins, Tower Chamber (Sun Tower)
- Warrior: Phazon Mines, Elite Research
- Chozo: Tallon Overworld, Life Grove
- Nature: Magmoor Caverns, Lava Lake
- Sun: Phendrana Drifts, Chozo Ice Temple
- World: Chozo Ruins, Hall of the Elders
- Spirit: Phendrana Drifts, Phendrana's Edge
- Newborn: Phazon Mines, Phazon Mining Tunnel