home ➜ Nintendo® ➜ SNES - Super Nintendo® Entertainment System® ➜ Simulation ➜ Pilotwings
Pilotwings #17 Space Funky B.O.B.
Game Overview
Pilotwings #17

- Developer: Nintendo
- Publisher: Nintendo
- Release Date:August 13, 1991
- Players: 1
Introduction
Are you ready to earn your wings at the most exclusive flight school in the world? Then report immediately to the secret Pilotwings Flight Club, where your training begins. You see the ground twist beneath you as you jump from your plane and attempt a precision skydive (do not forget to pull your rip cord). You relive the early days of flying as you bring your biplane in for a pin-point landing. After you master the basics, you are called on to test an experimental rocket pack, soar in a hang glider, and pilot an advanced attack helicopter in a hazardous rescue mission.
The realism is incredible as the Super NES takes you airborne with multi-dimensional graphics, endless skylines and the freedom to fly wherever you like. Do you have what it takes to earn your wings? Then get going. You are late for your first class.
Pilotwings is a video game released for the SNES on launch day. It is a flight simulator game that requires you to drive multiple different aerial vehicles (such as the Light plane, the rocket belt, and others).
It is known as one of the first games to use the Super Nintendo's Mode 7 texture mapping graphics mode (other games include F-Zero, Super Mario Kart, multiple RPG's, the original Starfox, and more).
The stages are set up in different flight areas, where the player must undergo tests of different vehicles. The score of each test would be determined by a combination of factors to include timing, touching targets, and accuracy of landing. Failing to land properly would result in a 0 for the landing portion. The tests would be tallied cumulatively to determine if the player had the necessary points to advance to the next stage. Should the player fail, he would be made to redo the stage. Should the player succeed, he would be awarded a license, with the license number being the password to return to the next stage. The player would be guided by four instructors.
Review - Jamie O'Neill
Sun 29th Sep 2019
Now that SNES games are available on Nintendo Switch Online, we have decided to revisit each of them in a fresh review. Expect to see updated reviews for all of the titles currently available over the next few weeks.
 Upon introducing its new Super Famicom console in late 1990 it was not just critical for Nintendo to showcase technical advantages over its 16-bit competition, but it was also important to persuade gamers who were clinging on to their 8-bit systems to purchase the new hardware. Considering parents in North America in particular would need convincing to expand beyond their kids' established NES collections, Nintendo's strongest selling points for the SNES were new games showcasing its audio and graphical superiority.
The first game in the Pilotwings series was released on 21st December 1990 in Japan — exactly one month after the launch of the Super Famicom — and it used the SNES hardware's Mode 7 scaling abilities to not just dazzle with visual effects, but to present unique gameplay of soaring through the skies in a Light Plane, Rocket Belt or Hang Glider, as well as hurtling toward the ground in its Skydiving lessons.
 The importance of this visual trickery was not lost on the games media of the period. Issue 23 of Electronic Gaming Monthly from June 1991 explored this new technology in their 'The Complete Guide to 16-bit Gaming' feature, where they described Mode 7 as a breakthrough in the early 16-bit era. EGM explained that, "the true magic of the Super Famicom really shows when it operates in Graphics Mode 7. This marvel allows programmers to rotate, shrink, or enlarge graphics quickly." Pilotwings even included a DSP-1 chip inside the cartridge to assist the Mode 7 effects, which provided an early retro example of today’s common practise of developers altering their game, even after it was released.
However, it is difficult for 3D-savvy younger gamers to view Pilotwings with the same astonishment today as they plummet toward chunky pixels and sparse, flat backgrounds. Yet, from the wonderstruck eyes of gamers in 1990 – which EGM's article was reflective of at the time – the SNES's rotation and scaling of the distant ground as you spiralled through the skies in Pilotwings was akin to Arthur C. Clarke's third law that, "any sufficiently advanced technology is indistinguishable from magic."
 The idea of simulating flight was not new in early 1990s video games, of course. Sega's After Burner coin-op had on-rails Super-Scaler fighter jets in 1987, and Wings included 3D biplane dog-fights on the Commodore Amiga just two months before Pilotwings – but there was a sereneness to Nintendo’s offering, as the focus was on the tranquil freedom of flying rather than combat. Only later on in Nintendo's game does the art of destruction become involved.
 With a total of eight single-player main lessons – as well as zany, hidden Bonus Chance objectives – joining the Flight Club to train under Tony, Shirley, Lance and Big Al has its quirks, but the SNES game did not have the personality of the kooky character design in Pilotwings 64 to fall back on. The SNES's instructors frown upon bad flying, especially as a steep learning curve becomes apparent during Lesson 3, where it is disorienting to ride a thermal current in a Hang Glider to an altitude of 500ft.
The first main difficulty spike is in Lesson 4's Skydiving as you realise that there is a big difference between diving through eight rings compared to just three rings in Lesson 1, before opening your parachute and guiding yourself toward the yellow target area. The Skydiving controls can feel finicky, but it is not as frustrating as landing or refuelling in a game like Top Gun on the NES.
 Pilotwings also does not hold your hand in teaching you to apply subtler movements with the controls, and lessons will often send you skyward, or drop you from a height to leave you to work out how to land precisely. In a similar regard to if you are used to Mario Kart 8 Deluxe’s controls and then tried SNES Super Mario Kart, the controls in Pilotwings are not nearly as accessible as Pilotwings Resort on 3DS, and it may feel obtuse to newcomers initially. Nevertheless, just because the controls are challenging to master it does not mean they are bad; there is great satisfaction from passing a lesson, especially after applying perseverance and practice in equal measures.
After beating Lesson 4, the game throws a curveball with the first Secret Command rescue operation, which is one of two helicopter combat missions. This has a greater depth to its graphics, and more freedom of movement compared to the top-down sections in a shoot-'em-up like the Mega Drive's Super Thunder Blade, which admittedly was released two years before Pilotwings. The Secret Command setting also rekindles memories of Jungle Strike, but it feels unnecessary as an inclusion to satiate action shooter fans.
Once you have beaten the first Secret Command mission, you unlock the harder difficulty and stricter scoring targets needed to progress in Pilotwings Expert mode. Pilotwings Expert has an element of repetition in that it is essentially the first four lesson objectives, but they are presented in harsher weather conditions like snow and stronger winds. With Nintendo Life considering Pilotwings as being fun to complete, but lacking in replay value once it is been mastered, it achieved a respectable 13th place in our guide to The 20 SNES Games On Nintendo Switch Online.
 Extra mention goes to Soyo Oka's soundtrack — who also composed the wonderful music in Super Mario Kart — as she revels in the extra sound capabilities of the SNES, after her excellent previous compositions for 8-bit games like Vs. Excitebike. Rocket Belt sections have a jazzy jauntiness that Soyo Oka is renowned for creating, while Hang Gliding has sweeping flute sounds to replicate the wind whistling through your ears. While there is some repetition as shorter tracks loop, the select your aircraft menu screen's music still makes the SNES's S-SMP chip groove along to a tune that could easily fit with F-Zero.
If F-Zero was the game that sold gamers on Mode 7, then Pilotwings arrived in quick succession to reinforce the SNES's scaling effects as an effective sales pitch. Yet for many players, it was the originality of Pilotwings' gameplay that stood out at the time, as opposed to F-Zero’s more traditional racing. While Nintendo created a fun, arcade take on the flight simulator, it is the unique gameplay enabled by Mode 7 that makes Pilotwings soar – even if it is a fairly short flight.
Conclusion
Since gamers are accustomed to 3D visuals these days it is harder to appreciate how stunning Pilotwings was at the time of release. With eight main lessons based around mastering the Light Plane, Rocket Belt, Skydiving or Hang Glider, the first rule of Flight Club is we must talk about Mode 7, including how it enabled unique gameplay in the early 16-bit era. Soyo Oka's soundtrack sets the mood for soaring through the air, and the atmosphere is so tranquil that it may feel jarring when the gameplay switches to the Secret Command shoot-'em-up missions. Alongside the pseudo 3D effects, the controls in Pilotwings are of its time — so for newcomers it is finicky to practise precise movements in a skill like Skydiving — but it is a breath of fresh air that the game does not hold your hand.
Instructors
Four Flight Club flight instructors provide the various lessons for pilot certification. Each instructor is in charge of a separate flight area containing one or more runways and landing zones. An instructor's expression and comments at the end of each event change depending on the player's performance.
Tony
A young pilot who is one of the hottest aviators around.
Shirley
Also a young pilot, but very experienced in her trade and a patient teacher.
Lance
A mysterious man who speaks fluently in six languages. It was rumored that prior to joining the Flight Club he was an Air Force pilot.
Big Al
The most senior instructor, who peers at the world through aviator sunglasses. He looks tough. But some claim to have seen his tears.
Gameplay
After registering at the "Flight Club," players receive guidance from a number of pilot instructors who present sets of challenges corresponding to each certification grade. Players must earn a minimum number of points in each set of activities in order to progress to the next certification. Points are awarded based on a number of criteria, including accuracy, speed and number of targets reached. In addition to the primary courses, the game also contains a handful of bonus events and two special helicopter missions.
Course Activities
Pilotwings features four basic activities that make up the bulk of gameplay: light plane, skydiving, rocketbelt, and hang-gliding. The helicopter is only used in two Secret Command rescue missions.
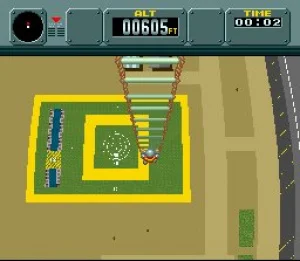
- Light Plane: A biplane is used to fly through a series of floating orbs, rings or arches before landing on the flight area's runway. In later Lessons, the biplane begins stationary on the runway, requiring players to take off before completing their objectives.
- Skydiving: The player is equipped with a steerable parachute and performs a solo jump from a helicopter after climbing to an altitude of 3,800 feet. During their descent, players must use wind resistance to maneuver themselves through a series of rings to earn points. Once the rings are passed, the player can deploy their parachute and attempt to land as close to the center of the target area as possible.
- Rocketbelt: After strapping on an advanced "rocketbelt," the player jets into the skies to locate and pass through several floating rings or straight beams before landing in the target zone. Wind typically factors heavily into each of the Rocketbelt courses.
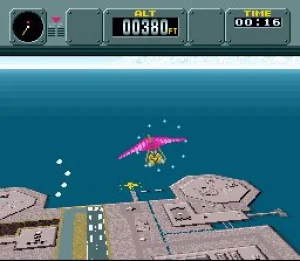
- Hangglider: The hang-glider is towed behind a biplane prior to the beginning of the course. Once released, players are required to ride upward thermal currents to reach a set altitude or pass through one or more floating rings. Landing the glider can be more difficult compared to the other vehicles.
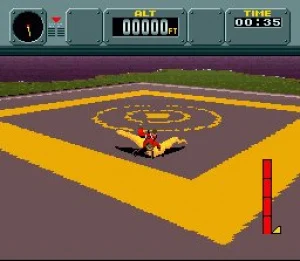
- Helicopter: Players jump into an attack helicopter during Pilotwings' two "Secret Command" missions, each of which involves assaulting a fortified enemy base to rescue one or more VIPs. Pilots must destroy several anti-aircraft gun emplacements scattered around the base before attempting a landing.
Bonus Stages
Players who manage to successfully land on certain smaller targets during the skydiving, rocket belt or hang-gliding events will automatically receive a perfect score, as well as the opportunity to play a bonus stage for extra credit points toward their next certification.
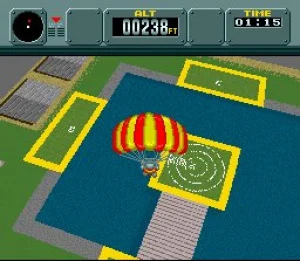
- Skydiving Bonus (High Dive): The player dons a penguin suit and attempts to perform a high dive into a large pool of water far below. Sections of the pool are marked out and assigned various point values.
- Rocketbelt Bonus (Birdman A): The first of two "birdman" events in which the player is given a special suit with artificial wings. In this stage, players must launch themselves from a trampoline in order to hit several switches from above. After the switches, one last trampoline launches the player toward a roped-off section of water with various point values.
- Hang Glider Bonus (Birdman B): In the second birdman stage, players can button-mash to gain altitude before flying toward the open sea for maximum distance and bonus points.
Heads Up Display (HUD)
 _________________________________________________________________
|   _____       _____          ALT          _____        Time     |
|  /     \  |  /  _  \  | +-----------+ |  /     \  | +---------+ |
| |   O   | | |__/_\__| | |           | | |   |   | | |__00:00__| |
| | Radar | | |  \_/  | | | 00000 ft. | | |   O   | | +---------+ |
|  \_____/  |  \_____/  | +-----------+ |  \_____/  | |_____|___| |
|_________________________________________________________________|
Radar
The little round thing in the far left is the radar. It shows where objects are that you need to complete the mission (e.g. Ring, Arches, Dotted Line, etc.), with a red stick, and shows the wind direction. When a round shaking arch appears on the top of the radar, it means that you are going in the same direction as the wind.
Angle/Rotation
The little Pokeball looking thing next to the radar is the Angle/Rotation display. When you are facing the horizon, the white line and the top of the black bar lines up. When you are facing up, the white line is above the black bar. When you are facing down, the white line is below the black bar. When you turn to the left or to the right, the white line tilts in the direction you are turning. Use this to your advantage when you are trying to land in a angle on the runway, if you have bad judgment skills.
Altitude
The box next to the Pokeball, is the Altitude display. This box tells you how high you are above the ground. The higher you are, the higher the number.
Speedometer
The circle next to the Altitude display is the speedometer. It tells you how fast you are going in the Light Plane how fast your blades are spinning in the Helicopter, and how fast your jets are going while using the Rocket Belt. It looks exactly alike a normal speedometer on a car or plane. So if you are familiar with a car's dashboard, then this should be pretty self-explanatory.
Time and Fuel bar
And finally, the bar on the far right on the top is the Time bar. It tells you how long you have been using the vehicle you are using. The bar on the bottom is the fuel bar, and only applies to the Light Plane, Rocket Belt, and Helicopter. It tells you how much fuel you have.
Controls
The controls in this game are fairly simple to learn, and not hard to remember. Each vehicle has different controls. you can look at the controls during the game by pressing (B) at the instructions screen before you start.
Light Plane
       Nose Down
          __                    _
         |  |                  (_)
      ___|  |___            _       _
Left |____   ___| Right    (_)     (A) Speed Up
         |  |                   _
         |__|                  (B) Speed Down

        Nose Up
Taking Off
In the later lessons, you have to take off of the runway. Taking off is simple. Just keep a high speed, and push down on the control pad. You should have no problem doing this.
In the Air
Controlling the Light Plane in the air should be no problem. Most of the time you have to fly through rings, or touch the floating green balls. While in the air, try not to slow down too much, or you fall down to your doom.
Landing
Landing is a bit more complicated than the rest. Land at too big of an angle, and you crash. Land when your plane is not straight, and you crash. Land too far ahead of the runway, and you cannot slow down in time, and you crash. Land when you are not facing the runway straight on, and you crash. So how do you not crash? make sure that the pixels of the plane are straight.
Make sure that you land on the runway at a nice acute angle, that is less than 45 degrees. There is no definite way of knowing what angle you are landing, so you just have to use your best judgment. Always land as close to the beginning of the runway as possible, so you have enough time to slow down, and always try to face the runway as straight as possible, so you do not end up crashing on the side. But when you are on the ground, you can also move the plane left or right, in order to avoid crashing.
Skydiving
     Lean Forward
          __                    _
         |  |                  (_)
      ___|  |___            _       _
Left |____   ___| Right    (_)     (A) Open parachute
         |  |                   _
         |__|                  (_)

   Lean Backward/Flare
In the Air
Skydiving is by far my least favorite event, along with hang gliding. While in the air, you probably have to fall through some rings. Doing this is not easy when you have little control over the wind, and where you go. My best suggestion is to flare when you fly to far off the course of rings, so you can go back onto the path and hit the rest.
Landing
Landing is also more complicated than the rest. When the instructor asks you to open your parachute (usually at about 1000 ft), do not listen to him. You can always just open it at about 600 ft or less in order to hit the target easier. Once your parachute is open, you must land on the target. If you are moving forward too far over the target, do not be afraid to make an almost complete 360 degree turn around the area, while descending slowly, in order to be both closer to the ground and closer to the target. Like the game says, do not descend too fast. So lean backward or forward a bit in order to stay balanced, so you can land close to the middle of the target.
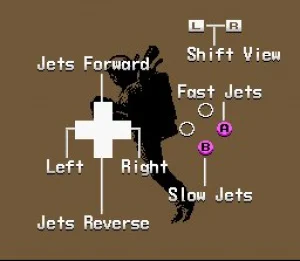
Rocket Belt
     Jets Forward
          __                    _                 _____     _____
         |  |                  (_)               |__L__| + |__R__|  Change view
      ___|  |___            _       _
Left |____   ___| Right    (_)     (A) Fast Jets
         |  |                   _
         |__|                  (B) Slow Jets

     Jets Backward
In the Air
Since you probably were able to take-off successfully, there is no need to make a separate section for it. Now that you are in the air, you either have to hit the green pillars or fly through the rings. Use the Fast Jets to go up higher, and the Slow Jets to keep a steady altitude. Turning in the air is not very easy, so when heading toward a ring or pillar, try to do it at an angle, facing the left or right of the object, in order to hit it from the side a bit. And of course, always use your best judgment on where to hit the object.
Landing
Landing with the Rocket Belt, with some practice, can be considerably easy. Once you have hit all the objects, you have to land. So press L or R to change to an over head view, making it easier to land. When you can see the target on the screen, turn on the slow jets. Then, while turning the slow jets off and on, slowly make your way down onto the target. If you miss it considerably, then quickly turn on the fast jets and try again, until you land right on the target.
Hang Glider
      Nose Down
          __                    _
         |  |                  (_)
      ___|  |___            _       _
Left |____   ___| Right    (_)     (A) Flare/Quick Turn
         |  |                   _
         |__|                  (_)

       Nose Up
In the Air
Flying in the air with the hang glider is not as easy as some of the other vehicles. Always remember that you can never go higher in altitude, unless you fly over a heat wave, or if the wind is blowing toward you. So if you want to keep a steady altitude while you fly toward something (like a ring, or the target) then keep your nose up at all times. If you need to make a quick turn, then flare (A) in order to do so.
Landing
As always, landing is trickier than flying. While trying to land on the target, you can do the same thing you with the parachute. You can fly all the way around in a circle in order to descend and line up with the target at the same time. You never want to be too high above the target when you try to land, because you will most likely overshoot it. And do not be too low to the ground as you fly toward the target, because you land too early. Instead, keep a steady altitude, and when the target is just about to go out of the camera view, flare, and you are able to steadily descend right onto the target. Landing with the hang glider takes definite practice, so do not expect to be successful on the first try.
Helicopter
      Nose Down
          __                    _                    _____     _____
         |  |                  (_)                  |__L__| + |__R__|  Missile
      ___|  |___            _       _
Left |____   ___| Right    (_)     (A) Speed Up
         |  |                   _
         |__|                  (B) Speed Down

       Nose Up
In the Air
It is not very hard to fly the helicopter correctly. You are looking at it from a top-down view, so adjust to it as such. Taking off is a cinch. Just speed up to full speed and you should make it. In order to get the helicopter moving forward, press up on the Control Pad, so the helicopter is at an angle. The steeper the angle, the faster you go. Try not to go too high in the air, or else it is a pain to land. So stay at a steady altitude of about 500 ft, and a steady speed of about 80 MPH. Shooting missiles at the guns on the ground is easy too. Just have the cursor move over the target, and when it makes a sound, press L or R. If you need to make a sharp turn, then press down the Control Pad, so you are at a flatter angle, then turn in the direction you want.
Landing
Landing itself is easy with the helicopter. The hard part is landing while you have numerous guns on the ground shooting at you with surprisingly good aim. The best way to land, is to destroy all the guns surrounding the heli-pad, and then to gradually slow down the spinning blades, and land on the pad. Always be aware of where your shadow is, too. Obviously, while landing, keep your helicopter facing straight forward, and not at an angle. Not much else to it.
Flight Lessons
Each standard Flight Lesson consists of between two and four activities presented by one of the four flight instructors. The player must meet the minimum required score across each set of activities to complete a Lesson and earn certification; they also receive a license number that acts as a password, allowing players to resume their game from that point.
- Lesson 1
- Lesson 2
- Lesson 3
- Lesson 4
- Secret Command 1
- Lesson 5
- Lesson 6
- Lesson 7
- Lesson 8
- Secret Command 2
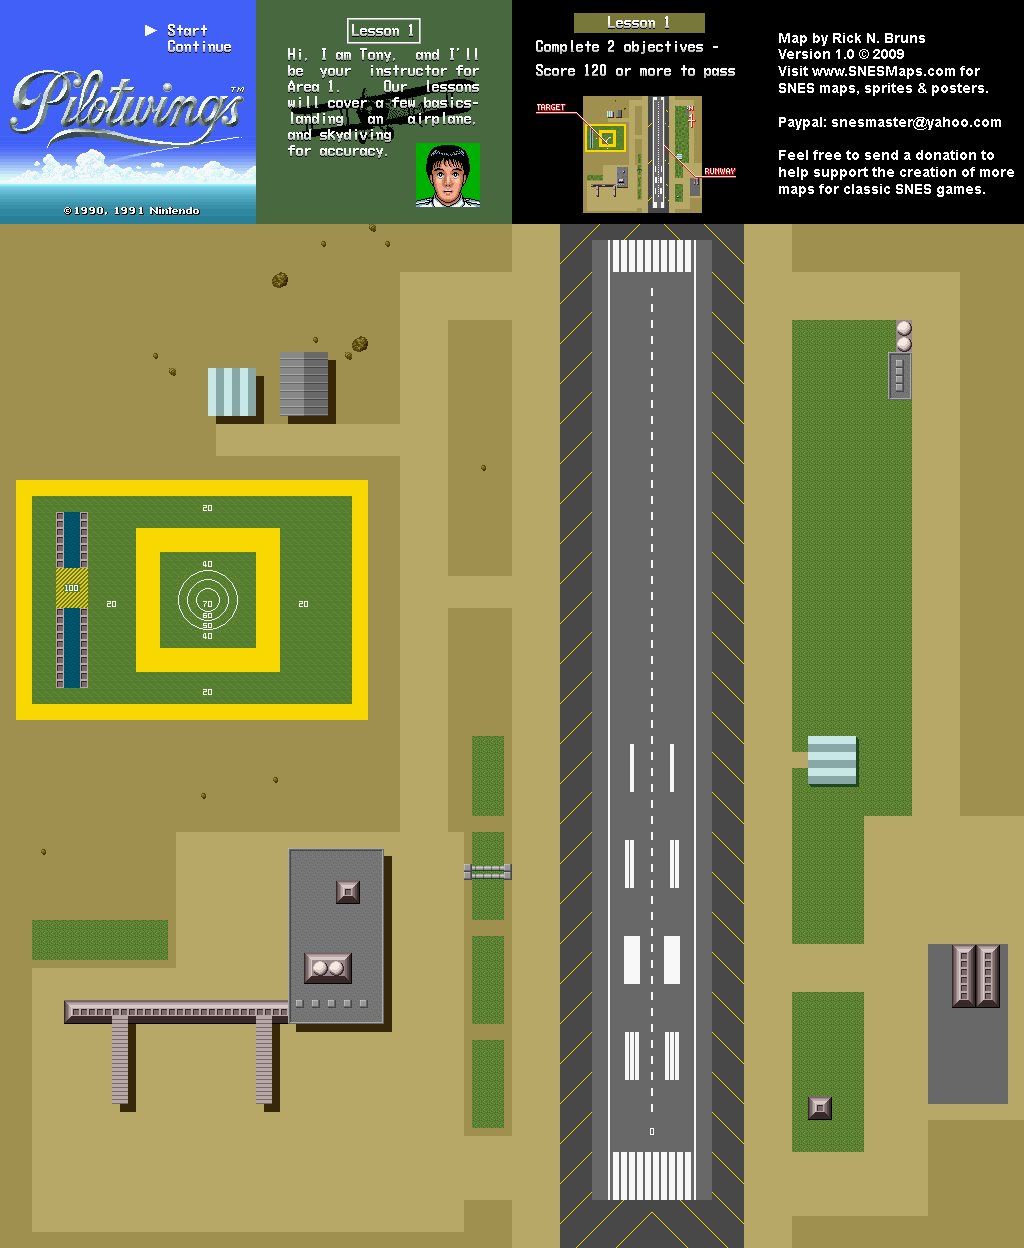
Lesson 1
Instructor: Tony
Required Score: 120 points
Activities: Light Plane, Skydiving
Weather: Sunny
Certification: "A"-Class License
License No.: 985206
Light Plane
Curriculum: Follow the green glide path, then land on the runway.
Average Score Needed: 60
Scoring
Accuracy: 50 pts
Time: 20 pts
Angle: 20 pts
Beam: 10 pts
Total: 100 pts
Complete lesson in under 0:45 for 10 points.
fly along the green dotted path, and land on the runway. Not once do you EVER have to press left or right on the control pad. So do not. You start off in the air, going at about 53 MPH. This a little slow, so you can press (A) in order to speed up to about 80-90 MPH. you need to fly, and hit every single green floating dot. Just try to line up the green dots ahead of you, and line up the pixels on the plane. Once you hit all 10 (1 point for each dot hit) dots, you have to land.
If you followed the path of dots, you should be in perfect position to land on the runway. Slow down a little bit, to about 70-80 MPH, and try to line up the pixels of the plane again. Try to be as parallel to the ground as you can, while descending, to hit the runway. Once you do, press (B) to slow down. You can still use left and right to try and keep yourself going straight down the runway, after you have landed, even though you should not have to because you should have gone straight the whole time. It is suggested that you hit the runway close to the beginning of it, so you have enough time to slow down to a complete stop. The closer you are to the middle of the runway, the more points you get.
Skydiving
Curriculum: Maneuver through the 3 rings. Land inside of the yellow target area.
Average Score Needed: 60
Scoring
Accuracy: 70 pts
Time: 20 pts
Speed: 10 pts
Total: 100 pts
Touch 1 ring for 5 points, all 3 for 20 points.
Start off holding onto a rope ladder connected to a plane, as it ascends to about 10,000 ft. You can press (A) during this little cut-scene, to skip it, or you can just watch it all the way through. Press up on the control pad, in order to make your body straighter, so you fall faster. But do not make yourself too straight, or else you can fly off course, and miss the rings. As you fall toward the ground, turn left and right to make it through the rings. If you fly off course, then flare in order to fly right back on course. If the wind is too strong, there is a chance you cannot make it back on course, and you miss the rest of the rings. If this happens, then just try to make your landing better, so you can get the necessary points in order to pass.
At about 1000 ft, the instructor asks you to open your parachute. Instead, wait until about 600-700 ft, and then open it. This makes your accuracy better. Once it is open, head toward the target. If you fly too far over it, then make a complete 360 degree turn, while descending, in order to get lower to the ground and closer to the target. When you are at a steady pace going toward the target, then press up and down in order to make your way toward it. Pressing down makes you fall faster, and pressing up you fall slower. Do a combination of the two, so you can slowly make your way down to the ground, and make more 360 degree turns in order to line yourself up better with the target. As always, it takes practice to land successfully with the parachute, so do not expect to make it the first try.
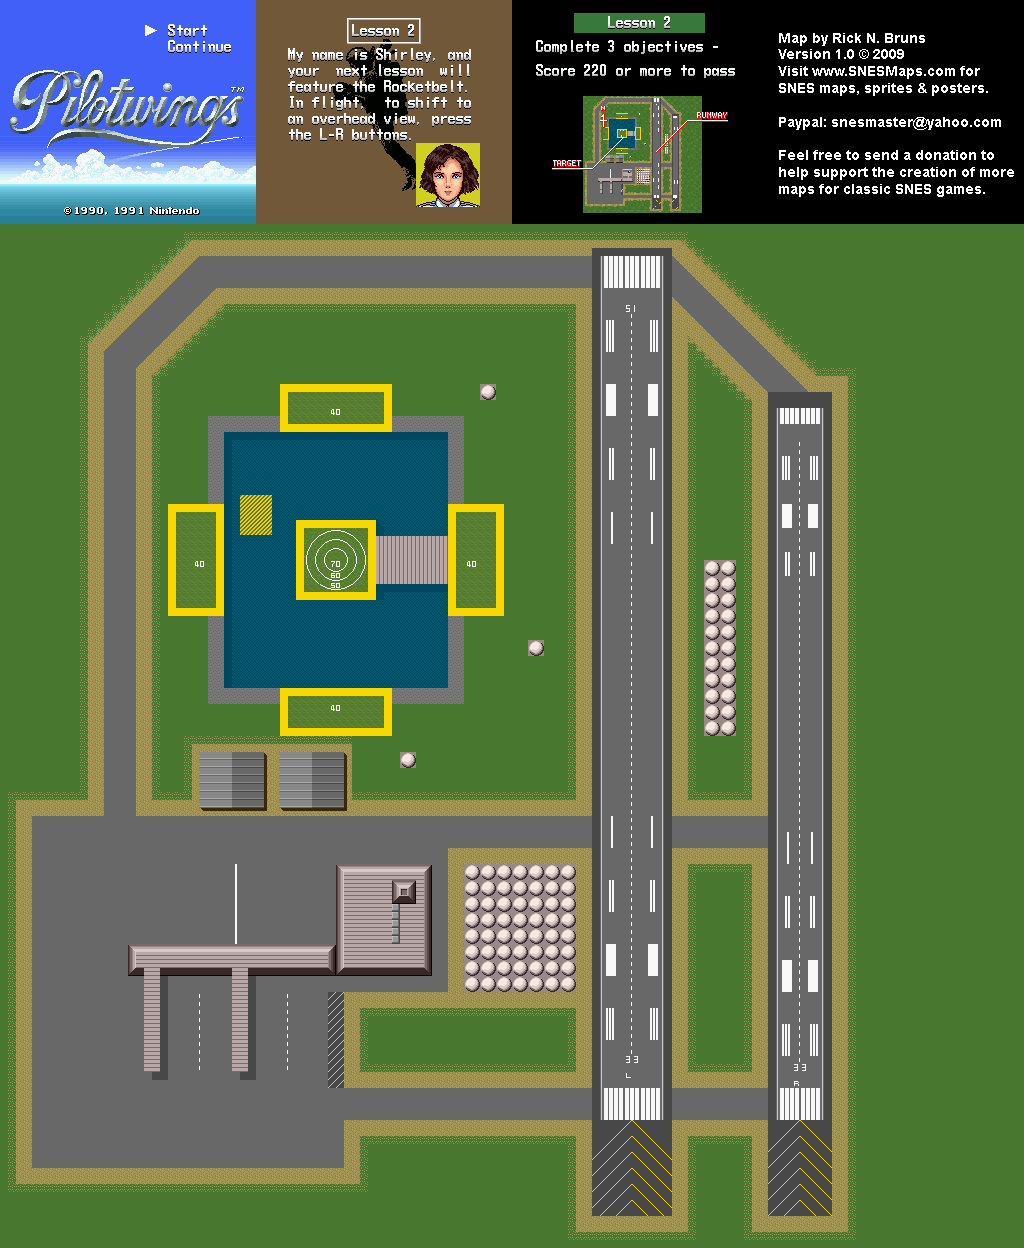
Lesson 2
Instructor: Shirley
Required Score: 220 points
Activities: Light Plane, Skydiving, Rocketbelt
Weather: Sunny
Certification: "B"-Class License
License No.: 394391
Light Plane
Curriculum: Fly through the 3 rings. Land on either the left or right runway.
Average Score Needed: 75
Scoring
Accuracy: 30 pts
Time: 20 pts
Angle: 20 pts
Ring: 30 pts
Total: 100 pts
Like the last one, you start off in the air going at about 50 MPH. Speed up to about 90 MPH. fly through the 8 rings, and land on the runway. Flying through the rings should be no problem. Just stay on course and turn when you need to. After all that, you have to land on either of the two runways.
It really does not matter which runway you land on. Slow down to about 60-70 MPH, and line yourself up with the runway, all while descending at a steady pace. Land near the beginning of the runway, and press (B) immediately in order to slow down before the end of the runway. Remember to always stay as close to the middle of the runway as possible to get more points, and never go at the runway at too much of an angle, or else you crash head first into the ground. Just use your best judgment.
Skydiving
Curriculum: Maneuver through the 5 rings. Land inside of the yellow target area.
Average Score Needed: 75
Scoring
Accuracy: 70 pts
Time: 20 pts
Speed: 10 pts
Total: 100 pts
Touch 1 ring for 3 points, all 5 for 20 points.
This objective is relatively similar to the last Skydiving objective, except now there are 5 blue rings, and the target is smaller and surrounded by water. Once you let go of the ladder, you fall. Use the Control Pad to make your body straight, so you have better accuracy. But not too straight, or else the wind blows you off course. So carefully make your down through the 5 rings. Rotate yourself in order to keep going straight, and flare if you get way off course. Once you pass the 5 rings, and the instructor tells you to open your parachute, wait until you get to about 700 ft. instead.
After your parachute is open, you must land. Depending on how close you are to the target, you must rotate in circles in order to both descend and get on course with the target. Because the target is now surrounded by water, you must be more careful when landing. at about 150 ft, you should be going straight toward the target. Always remember that you can press up to speed up your descent, and press down to slow down.
Rocket Belt
Curriculum: Fly through the 3 rings - land on target. Lose points for landing early.
Average Score Needed: 75
Scoring
Accuracy: 70 pts
Time: 20 pts
Speed: 10 pts
Total: 100 pts
Complete lesson in under 2:00 for 20 points.
Here is the new vehicle, the Rocket Belt. Quite possibly my favorite vehicle. With some practice, you can easily get 100 pts on this objective. First, you start on the moving platform, that is moving around the target in the water. Press (A) in order to get off the moving platform. Now you must fly through the 3 rings. Fly toward the closest ring using (A), and going as straight as you can. If you want to go straight, then turn off the jets, and move yourself so you are facing the ring. Then turn the jets back on, and move straight toward the ring. Fly around the area, and through the 3 rings. it is pretty simple.
Now you must land. After you go through the last ring, fly toward the target. You can press Start at any time if you need to see exactly where the target is. Once you get closer to the target, press L or R to switch to the overview. Now fly right above the middle of the target. Then use (B) to slow down your jets, and to slowly make your way down to the middle. Once your shadow is right above where you want to land, let go of your jets and you should land right where you want to. If, for some reason, you miss the middle of the target, then press (A) again, and start all over.
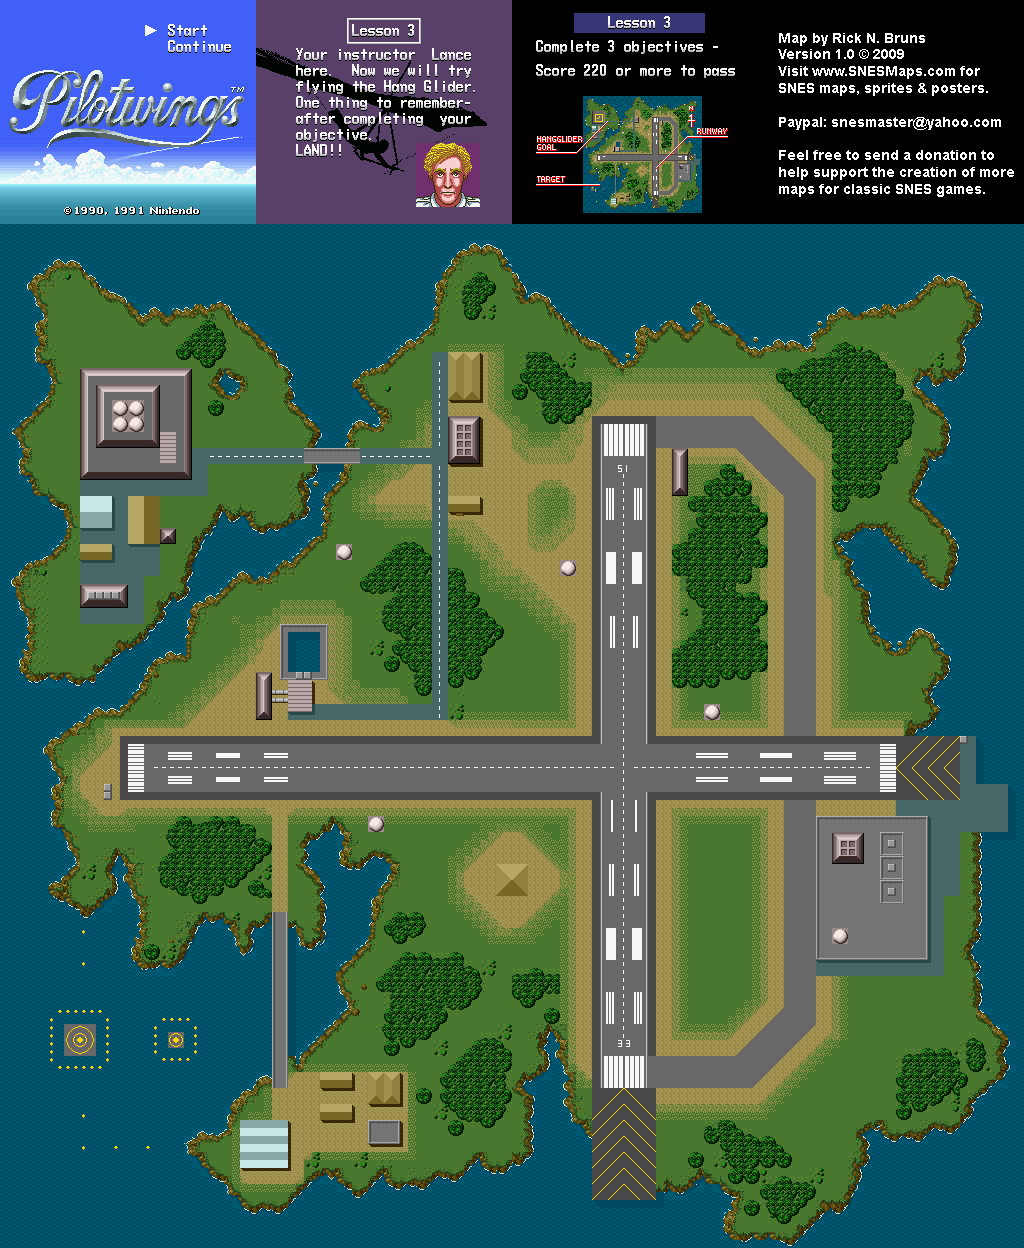
Lesson 3
Instructor: Lance
Required Score: 220 points
Activities: Light Plane, Rocketbelt, Hangglider
Weather: Sunny
Certification: "Silver" License
License No.: 520771
Light Plane
Curriculum: Take off, fly through rings over the course, then land on runway.
Average Score Needed: 75
Scoring
Accuracy: 20 pts
Time: 10 pts
Angle: 20 pts
Ring: 50 pts
Total: 100 pts
Finish in under 2:15 for 10 points. Get 3 pts./ring.
Unlike the previous 2 Light Plane objectives, you must take off of the runway. But taking off is pretty simple, so no worries. All you must do is press down on the Control Pad the whole time, and go as fast as you can (99 MPH). You should take off right before the end of the runway, with no problem. Once you are in the air, you must fly through the numerous rings that are over the ocean. Some are very high, some are pretty low, and some are right in the middle. Flying through the rings is the easy part.
Once you go through the last ring, you have to land. Because the last ring is so high up, it is very difficult to land at a flat angle successfully. So it is an option to skip the last ring, and go straight toward the runway at the altitude of the second to last ring, which is a perfect altitude. If you skip it, then you should have no problem landing at a good angle. Just slow down before you land, and do all the things you have been doing in the past Light Plane missions. If you insist on getting the last ring, then make sure you are facing the runway straight on before you go through it. Then, as soon as you pass it, slow down to about 60-70 MPH, and go down to about 100 ft. It is difficult to get very accurate on the runway when you land, but at least you are able to complete the Light Plane objective.
Rocket Belt
Curriculum: Touch the 3 green bar shaped beams. Land on the target over the water.
Average Score Needed: 75
Scoring
Accuracy: 70 pts
Time: 20 pts
Speed: 10 pts
Total: 100 pts
Complete lesson in under 1:45 for 20 points.
This objective is pretty similar to the last Rocket Belt objective. Except now you must touch 3 very thin green beams, and now the target is even smaller. Once you have taken off of the moving platform, turn right and head toward that beam. Try to go as straight as possible, using the (A) button, and the same strategy as the last Rocket Belt objective. Fly around the island, touching all 3 of the beams, and finally head toward the target.
When you get close to the target, switch to the overview mode, by pressing L or R. land on the bigger of the targets in the water. Use the same strategy that you used in the last Rocket Belt objective to land right in the middle of the target.
Hang Glider
Curriculum: Ride thermal current to altitude of 500 feet, then land on target.
Average Score Needed: 75
Scoring
Accuracy: 30 pts
Time: 50 pts
Speed: 20 pts
Total: 100 pts
Complete lesson in under 2:00 for 20 points.
The Hang Glider takes practice to get used to, like the rest of the vehicles. You have to rely mostly on the wind, and on flaring in order to complete the objective. Once your person has let go of the rope on the plane, you begin. Start by pressing up and down on the Control Pad to keep a steady altitude of about 200-300 ft, while heading toward the thermal current, the line of floating bubbles, straight ahead. You should be given a boost of altitude that exceeds 500 ft. If not, then turn around and try again. After you have gotten to 500 ft, you must land.
Turn around toward the land again, and press start to see where the target is. Once you line yourself up with the target, turn away from it, and turn back toward it again, so you do not fly over it. Once you are at about 100 feet, turn straight toward the target, go to it, and as soon as the target starts to disappear under the screen, press and hold (B) to make a nice soft landing toward the middle of the target.
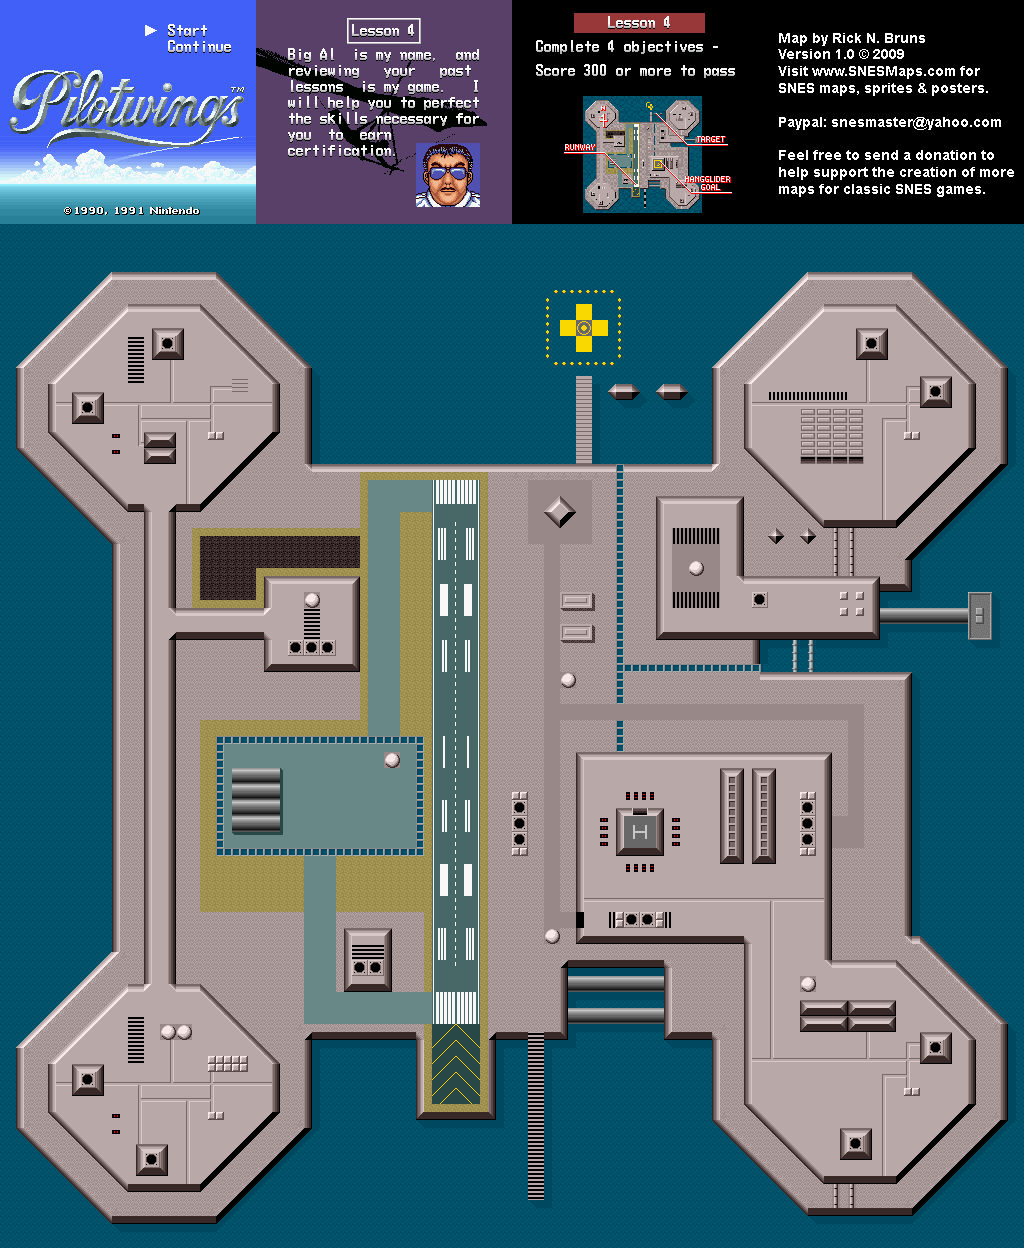
Lesson 4
Instructor: Big Al
Required Score: 300 points
Activities: Light Plane, Skydiving, Rocket belt, Hangglider
Weather: Sunny
Certification: "Gold" License
License No.: 108048
Light Plane
Curriculum: Taxi and take off. Fly plane under arch, then land on runway.
Average Score Needed: 75
Scoring
Accuracy: 30 pts
Time: 10 pts
Angle: 20 pts
Ring: 40 pts
Total: 100 pts
Finish in under 3:00 for 10 pts. Get 40 pts/arch.
This objective can be a little harder than the last Light Plane one, if you do not know what you are doing. As soon as you start, press and hold down on the Control Pad, and speed up to 99 MPH. Once you take off the runway, go forward a little bit at the same speed. When the timer reads about 00:17, then slow down gradually to about 60-70 MPH, and turn to the right, until you can see the arch on the island. You are heading toward the arch at an angle, fly low to the ground. But go at about 80 MPH while low to the ground, so you have enough power to fly back up after you pass the arch. Once you do, fly toward the line of red floating balls.
When you are flying toward the red balls, fly to the end of them. Then slow down to about 60-70 MPH, and turn sharply to the left, so you are straight on the path of floating balls. If you are not on the path when you turn, then get right back on it. The farther you went to the back of the red ball line earlier, the more time you have to set yourself up for the landing. So just fly on the red ball path, and do all the things you normally do when you land with the Light Plane. Land on the runway safely, and finish the objective.
Skydiving
Curriculum: Maneuver through the 8 rings. Land inside of the yellow target area.
Average Score Needed: 75
Scoring
Accuracy: 70 pts
Time: 20 pts
Speed: 10 pts
Total: 100 pts
Touch 1 ring for 2 points. All 8 for 20 points.
If you already pretty adjusted to Skydiving, then this objective should not really be that hard. Bt if you still do not like Skydiving, then it is difficult. After your character lets go of the rope ladder, make your body straight like you do on every Skydiving objective. Fly through the 8 rings, like you always do, and get back on course by flaring, if you go off course, like you always do. Then open the parachute at about 700 ft., regardless of what the instructor tells you.
Make a slow turn around the island, toward the target. do not go toward the target head on, since you most likely fly right over it. So make a slow turn, and make a straight turn toward the target at about 100-150 ft. You should not be very close to the target, and should have plenty of room to fly to the ground on the target. As always, use your best judgment to land where you should. If you are close to the target, but you are not going to make it in time, then just press down on the Control Pad to flare, and get a few more feet toward it.
Rocket Belt
Curriculum: Fly through the 3 moving rings, then touch down onto the target over the water.
Average Score Needed: 75
Scoring
Accuracy: 30 pts
Time: 50 pts
Speed: 20 pts
Total: 100 pts
Complete lesson in under 1:30 for 20 points.
The only things that make this Rocket Belt objective harder than the last ones, are the moving rings, and the smaller target. But other than that, it is pretty much the same deal. once you take off the moving platform, turn right and head toward the moving ring there. Fly through it, and then head toward the next ring to the left. This ring, unlike any other before it, shrinks, and grows again, then shrinks again, and so on. Making it harder to fly through. Do your best to fly through it, by just flying through the middle of it, then head toward the next one to the left. This one moves in an unpredictable pattern. It spins in all directions. There really is no definite strategy for getting the ring, so you just have to try your best.
After you fly through all the rings, you must land. Fly toward the small target over the water, and switch to the overhead view. Try to stay as steady as possible, and put your shadow over the middle of the target. Then let go of the jets, and land. do not drop from too far up, though, or else you lose points in the Speed section.
Hang Glider
Curriculum: Fly through the ring at 500 feet twice, then land on target.
Average Score Needed: 75
Scoring
Accuracy: 30 pts
Time: 50 pts
Speed: 20 pts
Total: 100 pts
Complete lesson in under 2:00 for 30 points.
This Hang Glider objective, unlike the last one, requires you to fly through a ring, twice. This is pretty simple, actually. When you start, and your character lets go of the rope connected to the plane, push up on the Control Pad to face your nose down. Keep on going at the ring, at a straight line, and pass through it. There really should be no reason for missing it. After you do so, head toward the thermal current coming out of the ground. Fly over it, and get higher in the sky. Then turn left, and look for the ring as you fly back down. Once you find it, fly toward it, and stay in a straight line again.
Once you pass the ring, you have to land. If you go through the ring at such an angle that you are facing the ocean, and not the rest of the island, then turn right, and descend at the same time. Turn toward where the target is (You can press start to get a better view of where the target is) and fly toward it. You should be at about 150 feet when you start flying toward the target. Go to it, and flare a little bit before it, and land toward the middle.
Secret Command 1
Objective
Rescue your flight instructors, Tony, Shirley, and Lance, with the helicopter.
Activities: Helicopter
Certification: Silver Pilot's Wings
License No.: 400718
Expert
After completing the first four Lessons and the initial Secret Command mission, the game's title screen changes to read "Pilotwings Expert," reflecting the increase in difficulty for the next set of Lessons.
Expert activities take place in the evening or at night and feature several new hazards for flight trainees to cope with, including higher winds and icy weather conditions.
There is no scoring in this level. Focus on finishing the mission. When you start, take off by speeding up to 99 MPH. When you pass 100 ft, turn yourself so the red dot on your radar is right ahead of you, and push up on the Control Pad to go forward. do not go all the way forward, because you want to still be a good 400-500 feet above the ground when you meet the first gun.
When you first see land, make sure the red dot on the radar is right in front of you. As soon as you see the first gun, move the cursor over it, making the beep sound when you do. Press L or R immediately to fire a missile to the ground, and destroy the gun. Do this for every gun you see. Always be looking at your radar, to make sure you are still going in the right direction.
As soon as you see the long dock over the water, past the first piece of land, be careful. there is a gun in front of you, that shoots you down quickly if you are not careful. So fly toward the side of the small island where the gun is, and kinda fly into it at a curve, so if he shoots a few bullets at you, they just barely miss you. Shoot it in the process, and move on.
You are approaching the heli-pad. When you see the land again, go forward until you see the brown dirt and a few guns around it. Then stop, and shoot out the hidden guns in the trees. In order to do this, move your cursor over where the shots are coming from, and wait for the beep sound. Then fire away. There are 4 hidden guns in that one are before the heli-pad, and you need to destroy them all. But be careful in the process, since there are a lot of guns nearby. Also note that you should reach the altitude limit of 630 ft. So slow down your blades to about 87 MPH.
After those 4 guns are history, move to the right, around the brown dirt where the heli-pad is. There are a few guns there, so destroy them all. Keep going around the dirt, until you see more guns on the far side. defeat all the ones that threaten you. Then finally move toward the dirt, and the heli-pad. There are 4 guns, two big ones next to each other, near the water, and two smaller ones on the other side. Destroy them both. Now you should be clear of any guns in the area, so you can finally land now.
When you are ready to land, slow down the blades to about 60 MPH, gradually. Slow them down too fast, and you drop too fast, and crash. So make it slow. Take your time, since there are no guns shooting at you, and since time does not matter here. Just try your best.
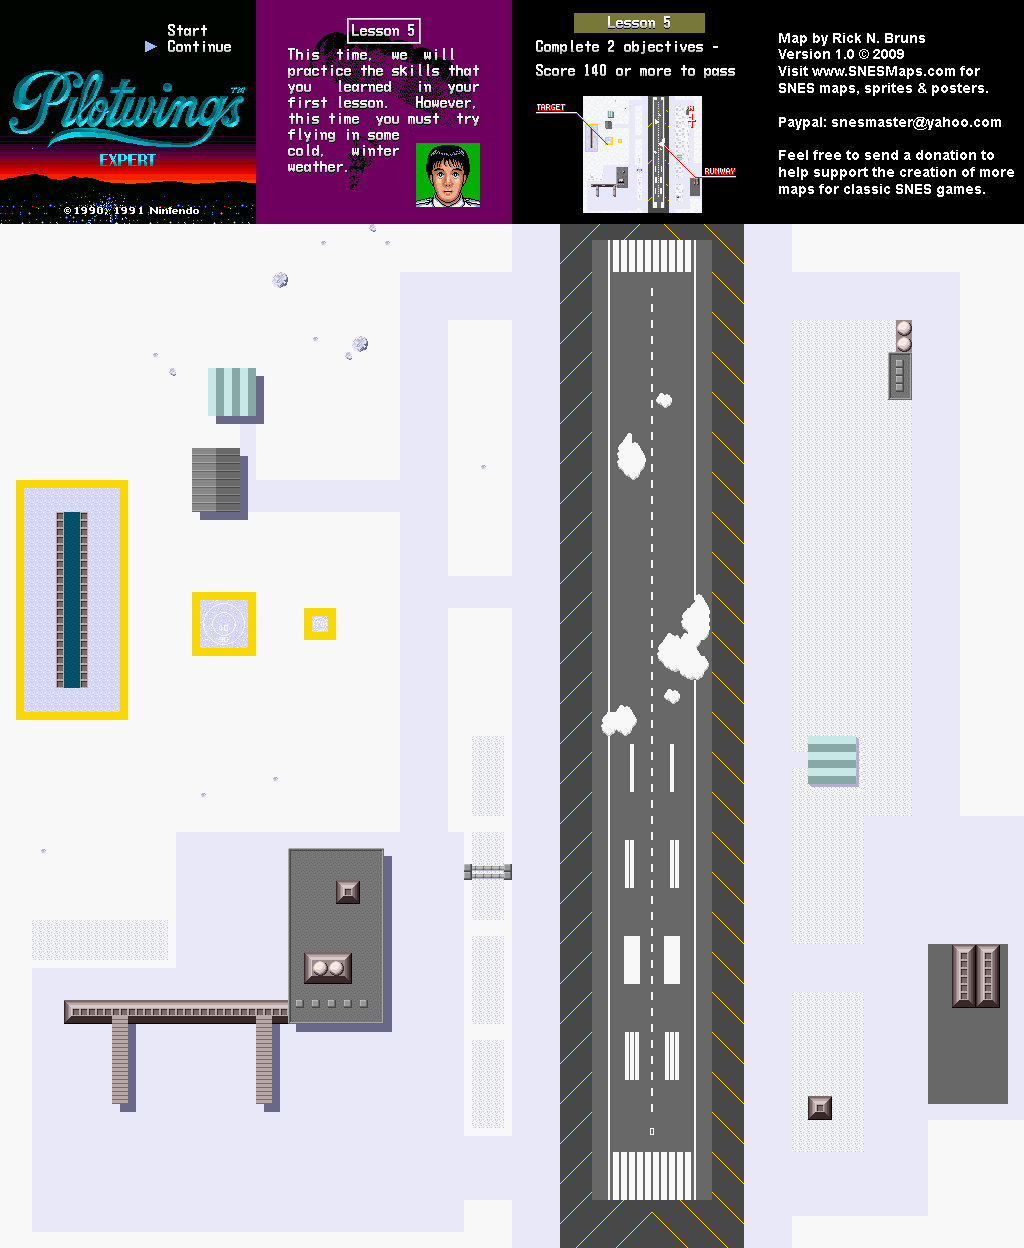
Lesson 5: Exprt
Instructor: Tony
Required Score: 140 points
Activities: Light Plane, Skydiving
Weather: Snowy, during the day
Certification: "A"-Class Expert License
License No.: 773224
This lesson is basically just Lesson 1, except now you'll be flying in harsh, cold winds, and snow.
Light Plane
Curriculum: Fly through the 2 rings. Be careful when landing, the icy runway is slick.
Average Score Needed: 70
Scoring
Accuracy: 50 pts
Time: 10 pts
Angle: 20 pts
Ring: 20 pts
Total: 100 pts
Finish in under 0:40 for 10 pts. Get 10 pts/ring.
This objective is similar to the Light Plane objective in Lesson 1, except for a few changes. fly against some pretty strong winds, and you have to pass through 2 small rings. When you start, speed up to about 95 MPH, and head for the orange ring. Pass through it, with great accuracy, then turn toward the next green ring. Pass through it, and get ready to land.
Landing is the hardest part of this objective. On the runway, are clumps of snow, that, if you go over while at a high speed is destroys your plane. After you pass the 2 rings, try to line yourself up with the runway as best you can. The accuracy part of your scoring is a lot more strict than last time. While you are lining yourself up, slow down to about 60-70 MPH, and try to get closer to the ground. Go at the same angle you have always been at while landing, and remember the most important part, land near the front of the runway, just barely past the black box with stripes near the beginning of the runway. The closer you are to the beginning of the runway, the better chance you have of completely missing the clumps of snow. And that is just what you want. Slow down as soon as you touch the runway, and finish the objective.
Skydiving
Curriculum: Maneuver through the 3 rings. Land inside of the yellow target area.
Average Score Needed: 70
Scoring
Accuracy: 70 pts
Time: 20 pts
Speed: 10 pts
Total: 100 pts
Touch 1 ring for 5 points, all 3 for 20 points.
Easily, the wind gives you the most trouble in this objective. Once you let go of the rope ladder, you have to fall through the 3 rings. Just do the same things you have always been doing, and be wary of the strong wind. Once you touch them all, open your parachute when the instructor tells you and get ready to land.
land on the moving platform and get the bonus points. While you do those things, try to keep the wind in mind at all times. If you fail to land on the moving platform, then start over. But this time, choose Skydiving first. Keep trying to land on the moving platform, starting over whenever you do not, until you do. After that, do the Light Plane mission, and almost guarantee that you finish the lesson.
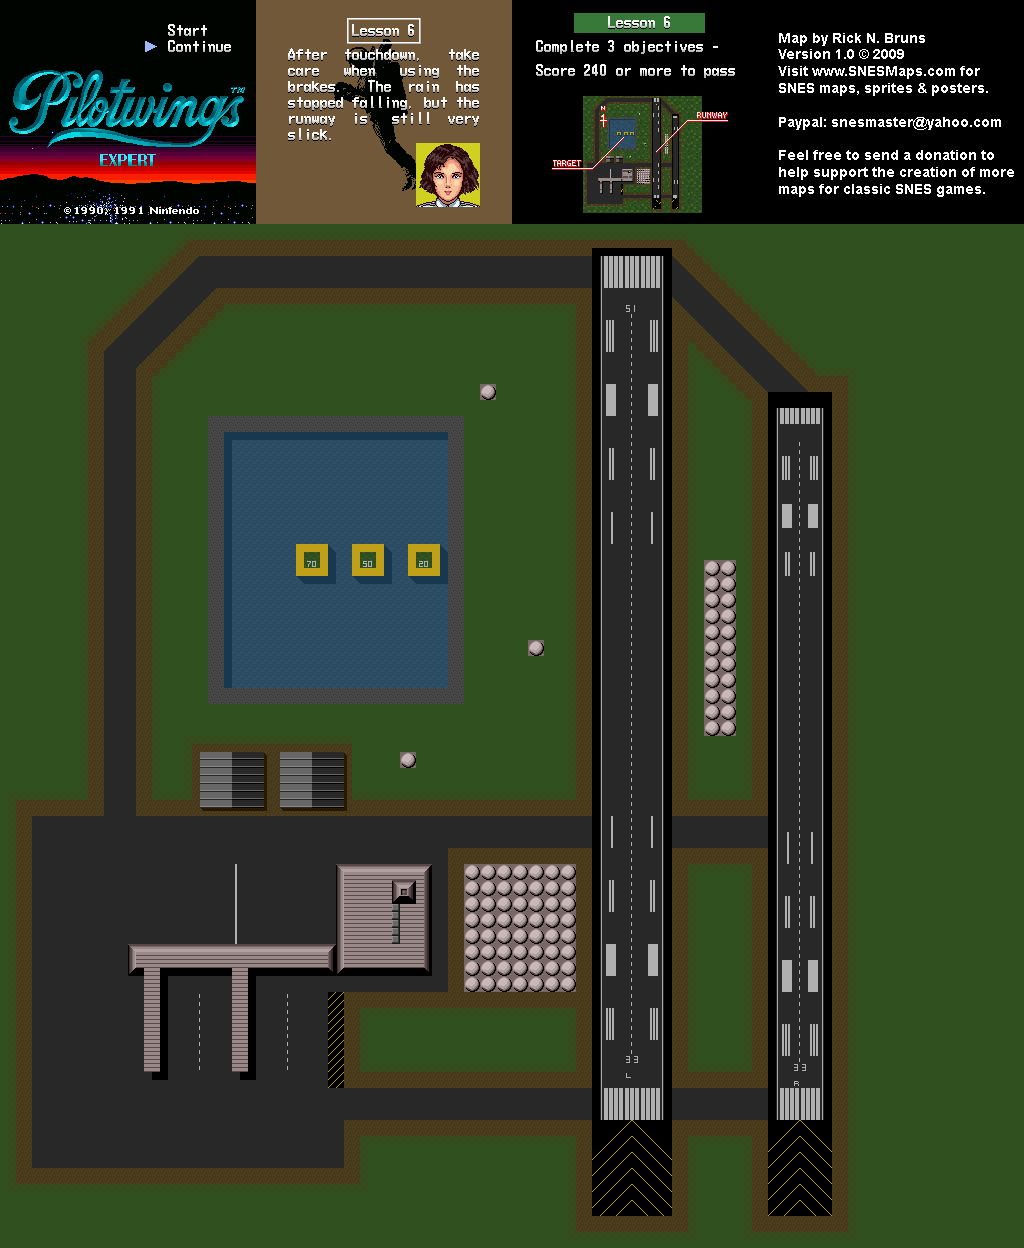
Lesson 6
Instructor: Shirley
Required Score: 240 points
Activities: Light Plane, Skydiving, Rocketbelt
Weather: Cloudy, just after a rain storm
Certification: "B"-Class License
License No.: 165411
Light Plane
Curriculum: Fly through the 3 arches. Land on either the right or left runway ahead.
Average Score Needed: 80
Scoring
Accuracy: 30 pts
Time: 20 pts
Angle: 20 pts
Arch: 30 pts
Total: 100 pts
Finish in under 0:45 for 20 points. Get 10 points/ring.
This objective is not easy. You start off in the air, going at about 60 MPH. As soon as you start, point your nose down, and head for the visible arch down and to the right of you. Get close to the ground, but not too close, of course, and pass under the arch. do not speed up too much, or else you crash. and do not go too slow, or else you cannot pull back up after heading down. So be careful. After the first arch, keep going at the same altitude, toward the other 2 arches ahead.
Once you have passed through the 3 arches, you have to land. Since the arches were so close to the ground, you do not have to go down in altitude very much. Just line yourself up with the runway like you always do, and line up the pixels of the plane like you always do, and so on. Hit the ground, and slow down as fast as you can. Then you are done. This objective can give you some trouble, so do not expect to ace it on the first try.
Skydiving
Curriculum: Maneuver through the 5 rings. Land inside of the yellow target area.
Average Score Needed: 80
Scoring
Accuracy: 70 pts
Time: 20 pts
Speed: 10 pts
Total: 100 pts
Touch 1 ring for 3 points, all 5 for 20 points.
Just like the last Skydiving objective, the wind is not your friend. When the objective starts, point your body down, and go through the 5 rings below you. Although it is difficult with the wind blowing you around, try to keep on the path, and get the rings. If you go off course, flare to get back on. And sometimes even flaring does not help you get back on course. Just do the best you can.
Landing onto one of the small floating platforms in your first try, or even your second try is not easy. open your parachute at about 700 ft, and do all the 360 degree turns and flaring you can to get on one of the platforms. Do not worry if you do not get enough points on this objective. The bonus stage you are getting in the Rocket Belt level should make up for it.
Rocket Belt
Curriculum: Fly through the 3 rings - land on target. Lose points for landing early.
Average Score Needed: 80
Scoring
Accuracy: 70 pts
Time: 20 pts
Speed: 10 pts
Total: 100 pts
Complete lesson in under 1:30 for 20 points.
Thankfully, after all the hard objectives in this lesson, the Rocket Belt is not as much trouble as the others. When you start off, head toward the flat spinning ring to your right. Fly through either the bottom or top of it. It is not easy, with the wind screwing you up, but it is possible. Once you have got the first one down, head for the other two around the course. They are not hard to find. look for the floating green ball.
After you get the other 2 rings, head toward the pool of water with the targets in it. Since you most likely need extra points to make it.
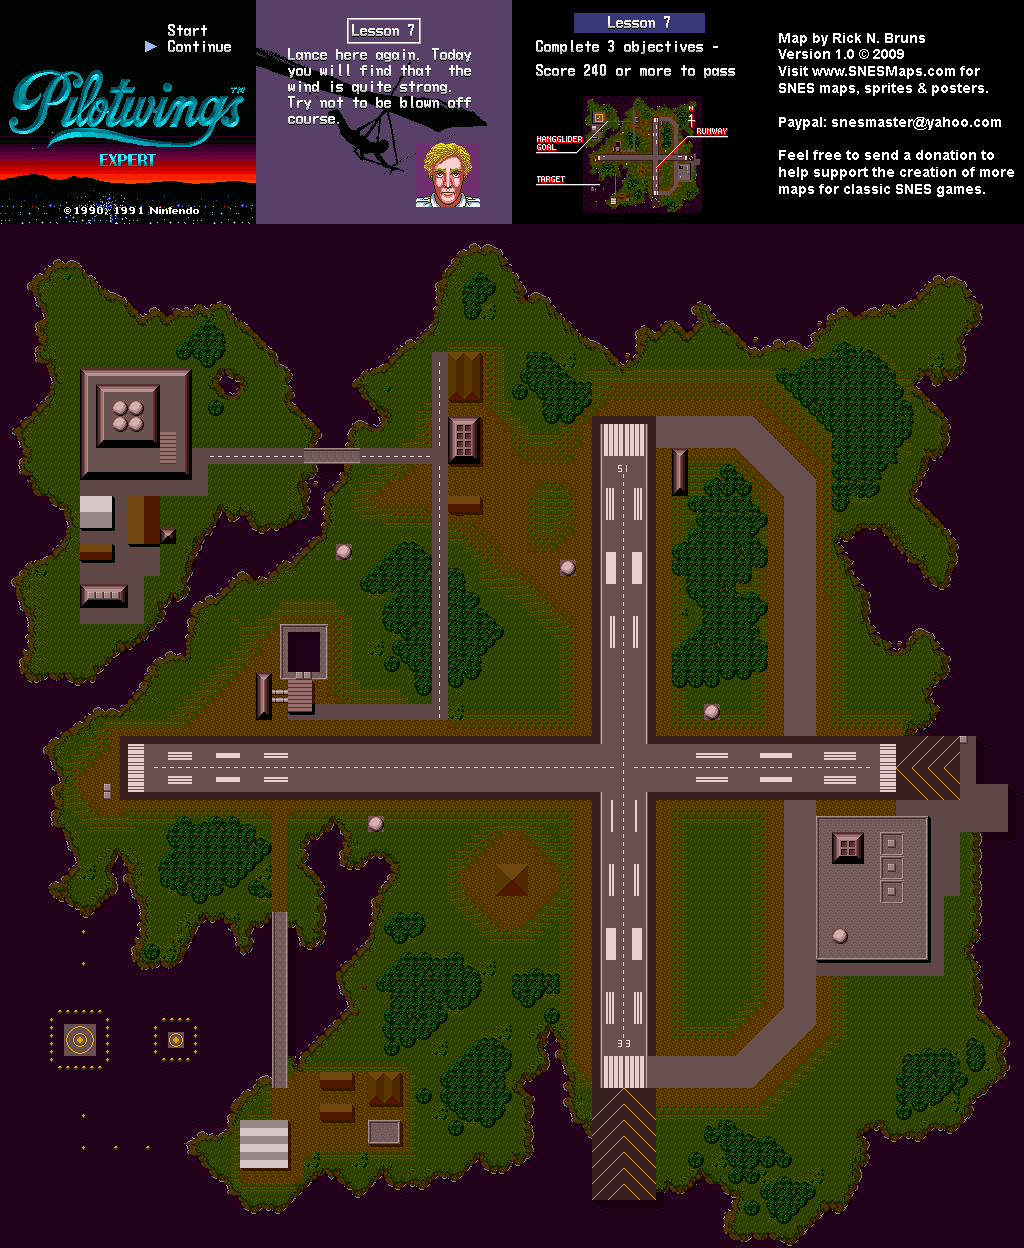
Lesson 7
Instructor: Big Al
Required Score: 240 points
Activities: Light Plane, Rocketbelt, Hangglider
Weather: Windy, during a sunset
Certification: "Silver" Expert License
License No.: 760357
Light Plane
Curriculum: Take off, fly through the rings over the course, then land on runway.
Average Score Needed: 80
Scoring
Accuracy: 20 pts
Time: 10 pts
Angle: 20 pts
Arch: 50 pts
Total: 100 pts
Finish in under 2:20 for 10 points. Get 3 points/ring.
In this objective, you are flying around the island, and going through many floating rings. When you start, speed up the plane to the full 99 MPH, and press down on the Control Pad. When you lift off from the runway, keep going 99 MPH, and fly through the first ring. Then turn toward the second ring, and so on, until you fly through all 10 rings. The wind here is especially strong, so you might have to fight against the wind in order to go through the ring, and not be blown to the right or left of it. Once you go through the final ring, then you must land.
Since the last ring was at a good angle and altitude from the runway, landing on the runway should not be hard. The wind is blowing at you from the right, so you have to push against it in order to get to the middle of the runway. As soon as you hit the last ring, you should slow down to about 60-70 MPH. Line yourself up with the runway, and touch down near the beginning of it, at the same angle you have always been landing on. As soon as you hit the ground, slow down completely, and stop. you have completed the objective.
Rocket Belt
Curriculum: Touch the green bar-shaped beams, then land on target.
Average Score Needed: 80
Scoring
Accuracy: 70 pts
Time: 20 pts
Speed: 10 pts
Total: 100 pts
Complete lesson in under 1:30 for 20 points.
When you start this objective, you the wind has a strong affect on you as you fly through the air. the green bar-shaped beams are a lot smaller now. you have to get very close to the ground in order to be able to touch them. Do your best to touch all the green beams, then get ready to land.
Just like the last Rocket Belt objective, land on the moving platform. This is not easy this time around, since the platform moves in a confusing "figure-eight" pattern. Watch it move around a little, and then memorize it is pattern. Hover above an area where you can watch it move toward you (Like a corner of the path it moves), and wait until it comes toward you. Drop down on the target, and move on to the bonus stage. You should always consult the "Bonus Stage" section if you need more help with landing on the moving platforms.
Hang Glider
Curriculum: Ride the thermal current to a 700 foot altitude. Land kite on target.
Average Score Needed: 80
Scoring
Accuracy: 30 pts
Time: 50 pts
Speed: 20 pts
Total: 100 pts
Complete lesson in under 2:30 for 30 points.
The high winds of this course, and the Hang Glider, just do not mix well. This objective is going to give you trouble. When you start off, head toward a thermal current. Go to it, while trying to stay at as high of an altitude as possible. When you hit the current, hopefully you reach the required 700 ft. If not, head for the other thermal current, diagonally from the one you just hit. If you do not make it to 700 ft from that one, go back to the other, and so on, until you reach 700 ft.
When you do, you have to land. Look down at the ground, and try to find the target. Then press up on the Control Pad, so your nose goes down. Make all the 360 degree angles you need to, in order to get closer to the target, and lower to the ground. you have landed successfully with the Hang Glider before, so this try should not be much different, with the exception of the wind. Use the wind to your advantage, and always keep your eye on the wind radar on your HUD. Remember that the line in the center represents what direction the wind is going.
Lesson 8
Instructor: Big Al
Required Score: 300 points
Activities: Light Plane, Skydiving, Rocket belt, Hangglider
Weather: Nighttime, windy
Certification: "Gold" Expert License
License No.: 882943
Light Plane
Curriculum: Take off and fly through the 2 moving arches, then land in the runway.
Average Score Needed: 75
Scoring
Accuracy: 30 pts
Time: 10 pts
Angle: 20 pts
Ring: 40 pts
Total: 100 pts
Finish in under 3:00 for 10 pts. Get 20 pts/Arch.
The wind in this level is your biggest enemy. Take off at full speed, and holding Down the whole time, until your plane leaves the runway. You should then be gaining altitude. Once you reach 130-140 ft, slow down to 75 MPH, and make a hard right turn, until you see the island again. When you do see it, and if you did it right, you should see both arches spinning in a straight line in front of you. So one arch is directly in front of you, and the other farther away, but both are on the same path.
dive down to the level of the arch, so you can get it. While diving, slow down to about 65 MPH, then pull up before you hit the ground, and speed up. Then you should be at a good line to hit the next one in front of you. Do so. If you did it right, you should be able to hit both arches within 0:45-0:50 seconds, giving you plenty of time to hit the runway in time for the 3:00 deadline.
Once you hit it, pull up so you can gain some altitude. Go forward a bit, at the same speed. Then slow down to about 70 MPH, and turn hard right, until you see the red line of floating spheres in the sky. This is the line you have to follow to hit the runway. Speed up toward it, going at full speed, and facing the very back of the line, to the left. Also make sure your at the same altitude as the line. Once you get close to the back of it, slow down to about 50 or 60 MPH, and make another hard right turn, in such a way as to be on the line when you finish the turn. If all goes well, you should be on the red line, going toward the runway at 50 or 60 MPH.
Speed up, and keep following the line. This is where the wind becomes your worst enemy, as it is blowing you off the red line. Turn into the wind, and try your best to stay on the line. Also, the faster you go, the less impact the wind has on you. When you get closer to the runway, slow down a lot, and make sure your plane's wings are parallel to the ground. Head into the runway, hit it at the same angle as the red line, then slow down all the way. Be sure to press left or right while on the runway to stop yourself from driving into the grass, and to straighten yourself out after the wind's push on you.
Skydiving
Curriculum: Maneuver through the 8 rings. Land inside of the yellow target area.
Average Score Needed: 80
Scoring
Accuracy: 70 pts
Time: 20 pts
Speed: 10 pts
Total: 100 pts
Touch 1 ring for 2 points. All 8 for 20 points.
This one can be a real toughie, since the wind is blowing you every which way. Just follow my directions, and you should come back in one piece. Once you start, move your body into a straight line, going straight down. Move up down slightly to adjust for the wind, and wherever the next ring is. If you are pretty skilled at skydiving by now, which you should be since you have been through 7 lessons worth of it, you should be able to hit at least 5-7 of them. All 8 is a challenge. it is not impossible, but it is a challenge. Especially hitting the last 2.
The very moment you get the last ring, or go past it is altitude, you should flair your body straight, so it is parallel to the ground. Now you should head toward the right side of the target. The instructor will tell you to pull your parachute, but instead wait until about 400 ft before doing so. Once you have, you should head straight for the target. Press START to see where that is exactly. you can just head toward the target, adjusting for the wind, and land right in the center of the plus sign target.
Rocket Belt
Curriculum: Touch the 3 bouncing beams. Then land on target.
Average Score Needed: 75
Scoring
Accuracy: 70 pts
Time: 20 pts
Speed: 10 pts
Total: 100 pts
Complete lesson in under 1:30 for 20 points.
This is without a doubt the easiest objective in Lesson 8. Maybe even easier than Lesson 7's Rocket Belt. Immediately after you start, press A to gain altitude. You should see a bouncing green thing in front of you. Stay at the same altitude as that. When you get right in front of it, switch to the over head mode by pressing L or R. line yourself up over the bouncing set of 4 spheres, and drop some altitude to hit the target. switch back to the other view mode, and head toward the other two bouncing beams. This is the easy part of the lesson, so do not fret. Just do the same thing as the last beam.
Once the third beam is hit, move toward the target. Press START is you need help finding it. Once you get right over it, switch to the overhead view and line yourself right over the target. You need a bulls-eye of a landing to get the full 70 points for accuracy. But since the wind does not affect you all that much in the rocket belt, this should be a piece of cake.
Hang Glider
Curriculum: Fly through the ring at 300 feet twice, then land on target.
Average Score Needed: 75
Scoring
Accuracy: 30 pts
Time: 50 pts
Speed: 20 pts
Total: 100 pts
Complete lesson in under 2:00 for 30 points.
Since the winds are not as bad as the last lesson, this should be a bit easier. once you start, you should be at a perfect angle to hit the green ring ahead of you. Adjust a bit for the wind, and hit it dead on. After that you still need to go through the ring again, so turn right, and look for the jet stream FURTHEST from the green ring you just went through. Go toward it, and let it shoot you into the air. While it does that, start turning to the left. Wait for the hang glider to start diving down. The very moment it does this, press DOWN on the control pad HARD! If you do not, it makes you dive below 300 ft, thus making it impossible to hit the ring again, and making you lose precious time. If you did not go under 300 ft, simply head toward the ring, and go through it. it is time to land.
Landing is tough. Once you hit the ring, turn toward the target (press START to find it), and start diving to lose altitude. Once you are close to the ground, and heading straight toward the target, you have to wait until just after you fly over the water before the target before flailing with the A button. Your person should be standing when he hits the ground, so you can get the best landing. It is hard, no doubt, especially with the wind.

Secret Command 2
Objective
Lately, the EVIL Syndicate has grown. The now have kidnapped a government VIP that opposes them. Our agent has penetrated their hideout and they await your rescue from the heliport tonight.
Activities: Helicopter
Certification: Golden Pilot's Wings
Once you start, immediately speed up to 99 MPH. Then move your helicopter's nose down, so it moves forward. Not all the way down, though, or you move too fast. Look at your radar at the top left part of the screen. Move toward the red dot. You should be going forward at a good speed, and heading over land. When you see your first gun, you should be at least 360 feet in the air. On the ground in front of you, there are 4 visible guns, designated by orange dots. Shoot at least 3 of them by moving the cursor over them, and pressing L or R.
Once that is done, keep going in the same direction, and you see water, and a blue line that connects to an island. On the island is a sharp-shooting gun that shoots at you the moment it appears on screen. To avoid it, do not go directly at it. Instead, move to the left a little, and shoot it at an angle, avoiding the gun's fire. Keep going after that, still following the red dot, until you see land again, and a forest.
In this forest are 5 hidden guns. You do not see them until they shoot at you, or when your cursor moves over them. So in order to combat that, you should really just keep shooting in that area, constantly. Also, you should slow down to 85 MPH or so, so it is easier to avoid the orange gun fire that comes toward you. Also, you should reach the 630 ft maximum altitude. Stay at that height.
Just beyond the forest with the hidden guns, is the heliport, and with it, comes a more guns on the ground. once you have taken down the 5 hidden guns, start shooting rapidly at the guns next to the heliport. My rule of thumb is that if it shoots at you, shoot at it. Not all the guns fire immediately, so just keep to that rule. It makes landing 100x easier if you shoot all the surrounding guns. Avoiding the gun fire is the hardest part, but should be easier if you slowed down your helicopter.
Once ALL the guns are destroyed in the area, and the air is peaceful, you can start to land on the heliport. Luckily, there is no time limit here, so take as much time as you need. But you still need to watch your fuel. Slow down steadily, but not too fast. Your first goal is to just lose your altitude. If the game tells you that you are losing altitude too fast, then speed up. Be sure to keep your helicopter directly over the H symbol while going down. And also be sure to watch the circle next to your radar on your HUD. It tells you if you are facing the horizon or not. Look at the HUD section of the FAQ for more. If you have adhered to everything so far, you should be slowly going down, while facing the horizon. Land, pick up the people, and you are done with the level and the game.
For rescuing the people, you receive the highest award you can get, the Golden Pilot's Wings. CONGRATULATIONS. you have beaten Pilotwings. Now sit back and watch the ending, and the credits.
Bonus Stages
During any of the Rocket Belt, Hang Gliding, or Skydiving lessons, there are moving platforms. If you successfully land on it with any of these vehicles, you get an automatic 100 points on the objective and taken to a Bonus Stage. Once there, you can earn bonus points to be added to your total score on the vehicle objective. This is really nice when you need some extra points in the later lessons. Here are some tips on landing on the moving platforms.
Skydiving Bonus Stage
When you start, immediately rotate 90 degrees to the right, and ignore the rings. Hold that position until about 630-640 ft, then release the parachute. As soon as you do, make a U-turn, and go forward until you are at about 225 ft. Then rotate 90 degrees right, and line yourself up with the moving platform track. When you reach the track, the platform should pass underneath you and then return underneath you (going the same direction as you). As soon as you see the platform, press down on the Control Pad, and hold.
The actual bonus stage is this: You are a penguin, and you must high-dive into a nice cold pool of water. Ropes on the water designate the point values for landing in each area. Land in the middle, and get 30 points.
Hang Glider Bonus Stage
When you start, fly over the thermal current, and wait until the Hang Glider levels out. Then push up on the Control Pad, while pushing right, and drop to about 150 feet. Then quickly pull up, and line yourself up with the target. Keep going at a steady pace, and keep flaring (push down on the Control Pad) just before the shadow hits the bottom edge of the target. During this, you should be no higher than 25 feet.
Rocket Belt Bonus Stage
Before you start, you should be able to use the slow jets to hold at 10 feet, and be able to move forward at 10 feet. Do the objective, and once you have to land, head toward the track of the moving platform. Make it so you can see the platform, by staying near the corner of the track. As soon as the edge of the platform hits your shadow, drop immediately.
The actual bonus stage is this: You are a man with wings, and you must jump on the trampolines and hit the P blocks as you bounce. Hit as many as you can, and use the Control Pad to move around while in the air, and use L and R to switch views. After you land on the second trampoline, you will have to land in the water/target. Try to bounce on the trampoline straight ahead of the second one, and then move to the middle of the large target, for an easy 30 points.
Cheats
Passwords
Lesson 2
985206
Lesson 3
394391
Lesson 4
520771
Lesson 5
400718
Lesson 6
773224
Lesson 7
165411
Lesson 8
760357
Secret Command Level 1 (after Lesson 4)
108048
Secret Command Level 2 (after Lesson 8)
882943
Bonus Levels
Bird Fly
Make a landing on the normal Skydiving/Rocketbelt platform on Hanggliding.
Birdman
Land on the platform you launched from on Rocketbelt.
Penguin Dive
Fall onto the moving platform on Skydiving.
Lights on in secret missions at night
When doing the secret missions at night, hold down the X button and the screen will light up.