home ➜ Original Xbox Game Console➜ Action ➜ Medal of Honor: Frontline
Medal of Honor: Frontline - Revisit a time when almost every nation was engulfed in a globe spanning war.
Information, Gameplay, and Walkthrough
Medal of Honor: Frontline

- Developer: 2015
- Publisher: Electronic Arts
- Game Rating: T (Teen) [Violence]
- Release Date:November 22, 2002
- $19.99 / $5.00 • July 30, 2006 • GameStop - Citrus Heights
- Players: 1 - 4
- 480p Support
In Medal of Honor: Frontline, you go behind enemy lines as Lt. Jimmy Patterson to take part in a series of challenging missions that are vital to Allied victory over the Third Reich.
Your duties range from storming Omaha Beach as a member of the heroic D-Day assault to stealing the HO-IX flying wing, an experimental Nazi jet fighter so powerful it could turn the tide of World War II.
Along the way, battle for control of Nijmegen Bridge (a strategic choke point in the Allied drive into the heart of Nazi Germany), track your Nazi nemesis aboard and atop a speeding armored train, and fight valiantly for freedom over fascism.
The Medal of Honor team continues to deliver the most authentic WW2 experience on any gaming platform.
- Embark on 20 levels of gameplay: Spread across 6 major missions, all based on real World War II events and all adding up to one complete and uninterrupted storyline.
- Enjoy a wide variety of characters: Including German, British, and American troops, as well as Dutch civilians.
- Weild 20 authentic WWII weapons: Including the Colt .45, Springfield Sniper Rifle, Panzerschreck rocket launcher, MG42 mounted machine gun, and fan favorite, theBrowning Automatic Rifle.
- Encounter an array of enemy vehicles: Including Panzer and Tiger tanks, trucks, motorcycles with sidecars, and armored railway scout cars.
- Experience a variety of vehicles: Including a player-driven, motorized rail car, a train, and amine cart.
- Enjoy an astonishing A.I.: For both the enemy andAllies.
- Encounter intense, non-combat-based scenarios: Such as a disguised, weaponless infiltration of an officer's pub, brimming with Gestapo to make contact with a Dutch Resistance operative.
- Listen to more than 70 minutes of original orchestral music: By acclaimed Medal of Honor composer Michael Giacchino.
Introduction
Supreme Headquarters
Allied Expeditionary Force
Soldiers, Sailors, and Airmen of the Allied Expeditionary Force.
You are about to embark on the Great Crusade, toward which we have striven these past few months. The eyes of the world are upon you. The hopes and prayers of liberty-loving people everywhere march with you. In company with our brave Allies and brothers-in-arms on other Fronts, you bring about the destruction of the German war machine, the elimination of Nazi tyranny over the oppressed peoples of Europe, and security for ourselves in a free world.
Your task is not be an easy one. Your enemy is well trained, well equipped and battle-hardened. He will fight savagely.
But this is the year 1944. Much has happened since the Nazi triumphs of 1940-41. The United Nations have inflicted upon the Germans great defeats, in open battle, man-to-man. Our air offensive has seriously reduced their strength in the air and their capacity to wage war on the ground. Out home fronts have given us an overwhelming superiority in weapons and munitions of war, and placed at our disposal great reserves of fighting men. The tide has turned. The free men of the world are marching together in Victory.
I have full confidence in your courage, devotion to duty and skill in combat. We will accept nothing less than full Victory.
Good luck. And let us all beseech the blessing of Almighty God upon this great and noble undertaking.
Dwight D. Eisenhower
From the distant past, Medal of Honor: Frontline revisits a time when almost every nation was engulfed in a globe spanning war. You are pulled from the bloody beachheads of Normandy to embark on one of the most harrowing and dangerous experiences of the war on the European Continent. As Lieutenant James J. Patterson, you have been selected by the Office of Strategic Service (O.S.S.) for top-secret operations behind enemy lines. The game unfolds in a series of six missions, each with a number of grouped stages, for a total of 19 in-your-face levels. The game is played through the eyes of Lieutenant Jimmy Patterson, and you get a very strong impression to what it would be like in combat. Grab your helmet (not the Jerry one, unless you aim to keep it as a souvenir) and get ready to push your face into the dirt — for this is your finest hour.
So how does Frontline compare to other well known first person shooters? Very well in terms of graphics and sounds, although Medal of Honor: Allied Assault for the PC does have an edge up on its console brother. Although Frontline does not have the innovative weapons and outlandish tactics of Rare's Perfect Dark, it still offers some provocative eye candy and game settings. Beset by the Wermacht's arsenal on the beaches of Normandy, you get the feeling that Electronic Arts held nothing back when they were working on the game. From the dark, realistic uniforms of the Schutzstaffel (S.S.) to the rosy haze of smoking city blocks, Frontline puts you straight into what was termed, The Last Just War.
The game focuses more on steady advance and marksmanship rather than good old fashioned strafe and fire. Fast reflexes are still highly regarded in Frontline (and it saves your butt in many cases), but it is something of an adjustment for some veterans of first-person-shooters. Unlike Volition's Red Faction where players can basically run up to and blast any baddie to bits and recover all their life with the next health pick-up, in Frontline, enemies can rip you up pretty fast whether the game is on easy or hard; the only saving grace is that on easy, the enemies do not have such a fine aim and you are allowed the luxury of being sloppy — but given enough of an error, and James Patterson has most of him smeared across a piece of concrete before he can go back home and marry his girl.
All in all though, Frontline is a top notch single-player game, even with its quirks. The only thing that stops it from being a fantastic game is the lack of any sort of multiplayer competitive or cooperative modes. Without the ability to fork around with the game's weapons except during the campaign game, the game loses a lot of its lustre in terms of replay, and most importantly, with firearms historians.
Basics
Professional soldiers are predictable; but the world is full of dangerous amateurs.
Medal of Honor: Frontline is a first-person-shooter. For those not familiar with the genre, it basically places the player into the eyes of the in-game character and from there, the player can interact with the game environment via your game's controller. The first step is to adjust your options and more importantly, your controls. It is highly advised that you work with a scheme that allows you to engage in a tactic that can be called, move to a spot, aim, fire. Although moving while firing is important in other games (and occasionally in Medal of Honor), it is not altogether too important unless you want to push up the daisies — and fast.
Have a set-up that allows you to move, then fine aim and fire; you also want to move and fire if you need to, but remember the focus is on accurate, long range sniping in the tradition of the American Rifleman rather than the stick-and-move of a contemporary Deathmatch. Undertake mastering the control scheme for MOH Sharpshooter&. Although similar to the Turok controls (or '1.2 Solitaire' from Goldeneye) Frontline's MOH Sharpshooter has the movement and turn/aim controls reversed, among other things.
- Invert the Y-Axis unless you are used to the standard "up is up, down is down" scheme of some games.
- Turn on the crosshair, unless you think you do not need it because you are Superman.
- Turn on Grenade Cook. it is an extra option when using grenades (use the reload button).
- Leave the vibration on. you feel the jolt of combat faster than you realize.
- Subtitles, you can leave on or off. I do not speak German, but you also do not really care what those guys are saying before you end their part in the Thousand Year Reich.
- Difficulty does not matter, you can unlock all your bonuses on any difficulty but the difficulty determines how you play the game. The guide was done on Normal, but if you are new to console f.p.s. titles or have not played the Medal of Honor series before, leave it on Easy.
Visual
Your view from Patterson's eyes has several important features on the bottom of the screen, a health bar, a compass, and his ammunition counters for the current selected weapon. The ammunition is almost self-explanatory, the clip and reserve amounts are kept separate and gives you an idea of how much bang you have left for your buck with a quick glance. The health bar is the green, yellow, or red ring around the compass' edge. If your health dips lower and lower, the colour of the health bar changes from green to yellow, then to red. Try to keep it in the green if you want that gold rating for completing your missions.
Also important is the compass. If you are taking fire from a source Jimmy can see or hear, the compass not only gives you the cardinal North, South, East, West directions, but also displays a flashing red cone from the quadrant where Jimmy percieves the fire is coming from — if you turn around, the flashing red cone does not turn with the compass, so be sure where the attack is coming from before you run off chasing ghosts.
Movement, or hauling your ass outta the fire:
Jimmy moves where you want through the combination of the two analog sticks, hopefully the Right and Left sticks. If you stick with the 'MOH Sharpshooter', the Left stick should move Jimmy forward and backward as well as from side to side; you turn with the Right stick, as well as look up and down with the right stick. It takes some getting used to, so find a spot after you hit the beach and give yourself a twirl. You can quickly center your view by pressing in the Left stick, but you will learn to keep your aim slightly below the waist to adjust for recoil. Lastly, you can adjust your speed of moving by how much you depress the joystick from its center. You should know that if you run, you can be heard by enemy soldiers further away.
Climbing, Jumping, Crouching, and other things
Jimmy can press one button to jump, and another to duck. You naturally cannot do both at once, unless you are a circus freak. Crouching is toggled by the crouch button. Once Jimmy is crouching, you no longer need to fool with the crouch button unless you want Jimmy to stand. Note that he moves slower when prone than when standing straight up. Being prone makes Jimmy harder to hit with gunfire, so when you hear the crack of a firearm, hit the deck to be safe. Some actions require Jimmy to be ducking prior to executing whatever he needs to do, like going into ventilation shafts and emptying motor oil.
Climbing is used less than jumping but is rather more complicated. Climbing is done by moving Jimmy against a ladder. It does not matter if he faces the ladder properly or not. So long as he "touches" the ladder, he can climb the whole thing butt first. He must then face up and keep moving in that direction (toward the ladder) to finish the climb. Descending involves looking down, backing up until you get the feel that Jimmy grips the ladder before you can move him forward again to go down the rungs. This is unrealistic, but makes for great manueverability in terms of gameplay; you can climb a ladder while firing your weapons. Falling from great heights incurs damage, so be sure to focus on climbing when you are really, really, really high up. In an emergency, you can disengage from a ladder by pressing jump — just make sure you have a soft spot to land on.
Jumping is not used too much, except in emergencies when you find Jimmy has stumbled into an ambush and needs to move over broken ground quickly. Since Jimmy cannot jump very high with the gear on him (a B.A.R. weighs 19 lbs. empty; now imagine carrying not just the weapon, but 200 rounds broken up into ten 20 round magazines and running across the Brooklyn Bridge firing at badguys). Given those realistic limitations, Jimmy can jump pretty darn well for a real-life soldier, but in game terms, he sucks. You can hop low obstacles and allow him to peer over fences to get a glimpse of what is on the other side before rushing in. Jumping also allows him to toss grenades a little further than possible.
Interaction is done with the action button and is used primarily to open doors and to achieve objectives. The game tells you when you can use this button, so it cannot get any easier than this. If you fail to find the object and there is a message on your screen, then you are in the vicinity of the item in question, but you probably need to walk around to find it.
Firing weapons
Firing weapons is one of the easier parts of the game. However, firing accurately is a difficult thing to master, especially when you keep getting shot at. Pressing the fire button will fire the current weapon in Jimmy's hand once. Holding down the button causees him to either fire the weapon repeatedly, or to engage fully automatic fire with the weapon. do not bother looking for secondary modes on your weapons, they are designed to do one thing and one thing only: shoot. So no threat detectors, laptop sentry mode, under-barrel grenade launchers, or fancy-schmancy high tech crap; just do what all soldiers do — shoot to kill.
You can reload most weapons (except the Garand and all other heavy ordnance) with the reload button. Keep in mind that if you have Jimmy change weapons or engage the hand-to-hand attack with the weapon before it is reloaded, the gun remains empty although no ammunition is lost. Jimmy does not automatically reload a weapon if he switches to another weapon (unlike Perfect Dark) so be sure to keep your weapons at least half-full — it can just save your life.
Grenades are thrown quite unlike any other f.p.s. out there (Perfect Dark, Goldeneye, Agent Under Fire, Aliens Versus Predator 2). You have the option to throw the grenade, adjusting the length of the toss by the amount of time you hold down the fire button, but Frontline also allows you to "cook" the grenade by releasing the pin and burning part of the time-delay fuse prior to throwing the grenade. Use the reload button to do this, but be sure to throw the grenade with the fire button. Similar to the time-delay grenades in Goldeneye, you should avoid "over-cooking" a grenade and having it explode next to you. In such cases, you have problems more serious than mere heart-burn. If you have problems aiming your grenades, switch to a weapon with a crosshair (usually the handgun), aim the cross hair, then switch back to the grenades.
Scopes can be used easily with the game's aim function. Although you can aim any weapon with this function, with sniper scopes, the aim function can also adjust the magnification of the scope allowing you to enlarge potential targets and to see if there are dangers you need to get rid of. Unlike the crouch function, aiming requires the button to be held down; use the D-pad while aiming to adjust magnification. While aiming, you can side step out slightly to see around a corner by using the Left stick; be sure to release the stick to snap back behind cover if you come under fire.
You can attempt primitive hand-to-hand combat by butting with your current weapon. it is not very strong, but it knocks back one enemy and it may allow you squeeze off that one crucial shot that determines how you go home.
Medals, Honors, and large monentary rewards
When you complete a stage, you go onto the next stage, along with any weapons you may have as well as the life you had from the last stage (unless you are playing on Easy or Normal). You should save, since there is no penalty for doing so (unless you are re-playing the stage for a better medal, failed and you also came out with less resources to start the next stage). Once all the stages in a mission are completed, you go onto the next mission with its own stages.
After completing a stage, you may earn one of three awards: a bronze, silver, or gold rating. If you merely finished the stage, you receive a bronze rating. If you managed to do exceptionally well during the stage, you may earn a gold rating. Earning all gold ratings on all stages in a mission unlocks extra behind-the-scenes goodies in the game.
You are not Superman; marines and fighter pilots take note.
Do not attempt to Rambo your way through this game. The M60E3 has not been produced and issued yet. Use your rifles to your advantage — they are designed to fire over long distances that have presented themselves in Desert Storm; even though Europe is not Iraq — the effectiveness of Russian long range sniping stopped the Germans short of completely killing everyone at Kiev — and it stops every enemy from killing you in Medal of Honor: Frontline.
If the enemy is in range, so are you.
If an enemy is shooting at you, that means they can see you and they can shoot you. This also means that they are vulnerable if you choose to fire back. Some people panic when they get shot at. do not worry, it is normal. Especially when you are new to the game of life and death. First thing to do is to find some cover. Duck down and take a look around. Soldiers are human too, and they need spots to stand on to snipe at you, usually high ground. Conversely, if you cannot see a soldier, you cannot shoot him, nor can he shoot you. Sometimes it is not the case (the stage 'A Chance Meeting' comes to mind) but this is a gross rule of thumb.
Tracers work both ways.
Take a look at where the bullets are coming from by the flash of the muzzle. Modern flash suppresors have not been in widespread use so you always are able to find the location of a sniper by virtue of the flash of his gun muzzle when he fires. Look for them when you come under fire, trace it to the point of origination and zoom in.
When in doubt, empty your magazine.
Electronic Arts did a superb job covering all the animations of a dead and dying human being. So realistic are the animations, that as a gamer, you sometimes cannot really tell whether an enemy soldier is dead or not. Since the item that an enemy may drop is different from the weapon he used on you, you can be sure a soldier is dead when a brightly coloured item pops out near the freshly killed corpse. On the down side, many enemies, especially the respawned "reinforcements" from an alarm, do not drop items. Sometimes you are taking fire from a guy you thought was dead. Although you can tell if a soldier is still alive by attempting to walk over him (live soldiers that have not been killed cannot be passed through), during a heated battle, you may simply want to fire off five or six rounds at an enemy soldier to make sure he is not going to get back up.
A sucking chest wound is God's way of telling you to slow down.
Hit locations matter. You shoot somebody in the head, and they most likely drop. Still, a soldier is hard to hit while moving, so you should try to aim for the dead center of mass — the body. Two shots from most weapons kill most soldiers. Head shots should be done primarily during sniping. Hits to other locations provides interesting entertainment — leg hits cause soldiers to stumble to the ground, but they are off running once they get back up. Arm hits cause them to stagger, but they do not die very fast from these flesh wounds. If a soldier is struggling on the ground, do not hesitate to execute him quickly, or you will regret it for the rest of your short life. One last thing, if an enemy soldier hides behind a wall and takes pot shots at you, you can try shooting for parts of him that are exposed. Usually, a leg shot causes him to stagger, and thus revealing more of his person from cover.
The only thing more accurate than incoming enemy fire, is incoming friendly fire.
Friendly fire is not lethal to your buddies or any civilians you encounter (except perhaps the Dutch agent, Gerritt in the stage Operation Repunzel). Blaze away, but do know that if you stagger your chums, enemy fire can hit them and they die from it eventually. This does not mean that your buddies cannot hurt you with their small arms fire. You should learn to stay away from any grenades that are tossed, as well as staying out of the way fo your buddies when they open up — still, they have better accuracy than most people, so unless you are directly in the way of an allied buddy, you almost never get hit by your allies. But in combat, stay conservative or stay dead. Get the heck out of the way, and do not be too concerned about the lives of others — just your own. Just be aware that some damage effects, notably heavy machinegun fire and explosions, ignore the no friendly fire rule and kill your allies if applied.
If it is stupid but it works, it is not stupid.
You can ridicule the enemy behavior as being remarkedly unintelligent, but this is not reality per se. The computer is not letting you walk over it without a fight. Exploit the enemy artificial idiocy by running away. Either enemies lose sight of Jimmy and they begin to look around aimlessly, or they attempt to follow him. Either way, you can use it to your advantage. If you back up around a corner, you can turn around and drill the sucker when he rounds the bend. This usually happens once you realize most enemies do not bother trying to find you once they lose track of you.
If enemies lose sight of you, you can zoom in with the rifle and drill them easily from the distance, disappear again and return to pick off another soldier. The Wehrmacht may be unstoppable, but they have to run out of men some time. At the same time, you can also exploit the enemy reluctance to run from their post (the first general order: 'I will not abandon my post, I will stay at my post until properly relieved.') by running back a bit and seeing if you can come at the guy from another way. Usually this works in some stages that feature winding stage structure like the streets of Arnhem or the last part of Nijmegen Bridge, but you can use it anywhere where you can find you have a spot to snipe at enemies from where they do not expect you. But all in all, fire from ladders, toss grenades, shoot explosive drums, do anything you can to kill the enemy without incurring too much injury. That is your one primary goal above all else.
Anything you do can get you shot — including nothing.
Whether you strafe, dodge, or duck to the best of your ability, you get shot eventually. that is just the brutal truth. The only way to delay this unfortunate eventuality is to get a ticket home, or get rid of everybody who has a gun and an itch to use it on big, fat American G.I.s. When you are fired on, duck. Run for cover, do anything to avoid getting shot. Ration your health items by getting them only when your health is low, or using the appropriate health item when offered the chance. For example, a Field Surgeon Kit restores about half your lifebar, while a Medicinal Drink only gives back a tiny bit (about an eighth of your absolute total). You can also avoid attracting enemy attention by using silenced weapons and preventing lone soldiers on patrol from firing their own weapons.
Grunt math: walking point = sniper bait.
If you do have to take a stroll down Sniper Alley, then be smart and stick to the sides, or to a spot where if you are attacked, you are attacked from as few angles as possible.
Try to look unimportant, the enemy may be low on ammo.
When you are offered a disguise, try not to blow it until the very end. At the same time, hit the deck (crouch) when you hear the distinctive crack of a firearm. Not only are you a more difficult target, if you are near cover or on a cat-walk, you may be completely or partially concealed by hard cover (a good thing) and be protected from enemy fire. Although you move slower than if you were standing, it is better to determine where you are receiving fire from, finding some better cover, then making a break for the better cover when you know who to get rid of. On a similar note, you should make it a habit to count the number of shots that an enemy soldier takes at you. The German Mausers these guys use normally have five rounds in them (Mauser Kar 98k, in later stages most infantry use the ten round Gewehr 43 or the 32 round MP40). Once you hear that last round go, pop out, drill the goose-stepping bastard, then head back behind cover and reload.
One enemy is never enough; two is far too many.
When you are fighting one soldier, you can be assured of your own safety since all your attention is focused on him. When you face two or more foes, you need to rethink your approach entirely. Unless you have at least something that has more than ten rounds in it, and can fire relatively fast, you are probably going to get hit by the guy you are not shooting at. Back away, preferably around a corner so they have to come at you one by one. Fighting one soldier twenty times is very different from fighting twenty enemy soldiers all at once.
When you have secured the area, do not forget to tell the enemy.
Sometimes, enemies keep respawning — this is especially the case in the stage of Arnhem Knights, but it applies to any spot where you have buddies fighting with you and are facing insurmountable odds. Once you have fought up to a certain point, like a machinegun nest, you do not want to give back ground to the enemy by running off trying to grab goodies and loot stolen Nazi art. If you run off, enemies will rush to the now unoccupied machinegun and waste you and your buddies. Wait for the fighting to die down, and for all your buddies to secure the area (by swarming the whole place, and hopefully man the machine gun so you do not have to). Once the place is secure, you can run off and do what ever, but until then you should stay at your post and aid the friend, deny the enemy. Enemy respawns have a limit. It may be a large limit, but the number of enemies you meet are limited in this game.
The important things are always simple; the simple things, always hard.
Keep cool and above all, do not lose your head. Get into the rythym of moving, scouting, taking cover, aiming, shooting, reloading, and repeat until you come out of it alive. Sometimes even the most basic things are forgotten when you are taking fire. Panic and you die. Hesitate about what to do, you die (On the plains of hesitation lie those who stopped to wait, and waiting, died). Never forget that you want to find cover, so always be ready to make a run for it, and shoot for the center of the body — head shots do more damage, but when you have a hundred rounds of rifle ammo, you can afford to land multiple torso shots and expect to win the day.
Sometimes items and goodies are dropped by enemy soldiers. These items do not disappear until you pick them up, so feel free to leave them where they drop until you really need them. That said, if you happen to find yourself surrounded by hordes of nasty Nazis you cannot stop — you should retreat to a spot (preferably a long hallway where they can only run toward you) and drill them dead. Then head back to the earlier parts of the stage and pick up the healing items near where you started, and work your way forward. This way, as you progress further into the stage, the "supply train" does not stretch too far back when you are near the end of the stage. Be selective in what you pick up — some stages are very stingy in what they carry and you quickly find you have nothing to help you at all if you squander all your goodies foolishly.
Proceed slowly and methodically secure the area. Pick off the easy-to-see soldiers; scan the rooftops and high places for enemy snipers; use explosives to clear out rooms and enclosed spaces before moving in with guns blazing. Done properly, most enemies are dead long before you come charging in. There is no time limit in the game, and objectives can almost never be failed. The only time you need to hurry are past points where enemies keep respawning. However, once you know where they are, you should be relatively safe so long as you do not go bumbling back to the enemies-come-out-here-spot. You only need to linger at a respawn spot if you are going for the gold rating in each stage. Your first job is to survive the battlefield and complete your objectives (to end the mission with as much life intact). that is your number one priority. There are no heroes in a war, just the living and the dead.
Goodies
do not forget, your weapon was made by the lowest bidder.
There are a variety of items or 'goodies' that James Patterson encounters in the heart of the Third Reich. They helped him to accomplish his missions for the O.S.S., but some are more helpful than others. Medal of Honor's goodies can be separated into three categories: health pick-ups, weapon pick-ups, and objective items. All are encountered in each stage of the game, and some are more useful in some situations than in others.
Health Items
Health Items are found in wooden boxes, littered around stages, and occasionally dropped by enemies. They are common enough to give you a break if you play well, but there is never enough to fully recover your health if you run up to every enemy carelessly.
Medicinal Canteen
The small white canteens you see littering the ground on the beach will fast become your best aides in health restoration. They restore a tiny sliver of your health bar, but they do add up. They are dropped with alarming frequency by enemy soldiers, but do not expect to see to many on harder difficulty levels.
Medicinal Bottle
The larger yellow medicine bottle is more uncommon and is never dropped by enemies. They restore comparatively more health than their whitey, brightey cousins, but they are often harder to come by. In fact, they do not show up at all in the final few stages of the game.
Medical Kit
The ubiquitous, but hard to see, green medical kit restores about a quarter of your life. Several can heal even the most debilitating wounds to your person. Unfortunately, they are fairly hard to come by and they are often in spots that are heavily guarded or off the beaten path.
Field Surgeon Kit
The top-rated of all the health items is the Field Surgeon Kit. It looks like a small Medicinal Canteen from a distance, but there are straps and other details on it that sets it apart. Try not to make the mistake of mis-identifying one since it can restore half your maximum health.
Bread
Loaves of fresh bread are occasionally found in some stages. They function like medicinal canteens, but they are often overlooked when you are looking for a health restore item. Soldiers favour fresh food to their rations, and the best small unit commanders made sure their troops were getting real food and not the A, C, or K-rations issued by regimental quartermasters.
Weapons
Weapons are issued to Patterson when he starts a stage. If you still have that weapon from a previous stage (within the same mission) you still retain what ever amount of ammuniton you had — all the more reason to conserve your ammo. Some weapons are not carried over from stage to stage for various reasons.
Allied Hardware & Axis Hardware
Colt .45 M1911
Caliber - .45 A.C.P.
Action - Recoil (semiautomatic)
Magazine - Seven round box
Max Reserve Capacity - 250 rounds
Effective Range - Medium
Classification - Sidearm (Handgun)
The Colt .45 has been the U.S. Army's standard issue sidearm from the beginning of the 20th Century up to the 1980s, when the Army began looking for a suitable replacement, they settled for the Beretta, a handgun model first made in 1935.
The Colt is a robust weapon with a powerful cartridge — for a sidearm. Gamewise, the Colt cannot compare with the stopping power of your rifles and should only be used when you are expecting to encounter one or two enemies at short rane. You can also use your sidearm to snipe at far off enemies; align your sniper scope on a distant foe, then switch back to your sidearm. It does not work in real life, but in the game, you do this to conserve your more powerful rifle ammuniton.
Walther P38
Caliber - 9 mm Parabellum
Action - Blowback (semiautomatic)
Magazine - Eight round box
Max Reserve Capacity - 250 rounds
Effective Range - Short / Medium
Classification - Sidearm (Handgun)
The Walther P38 is a classic blowback handgun. Chambered for the less powerful, but smaller 9 mm Parabellum round, the Walther offered a more controlled grip when firing. Gamewise, this is negligable. Jimmy's hands are big and strong enough to handle the recoil of most weapons (something Ms. Page would appreciate, huhuhuhu). The Walther is comparable to the Colt in the game, and should then be your last choice in weaponary in any fight. Still, the extra round it carries gives it an advantage over the Colt. Realistically, if you are using something at this range (point blank) you might as well go with a Beretta with 13 rounds, or one of the more modern high-capacity Glocks or SiGs.
M1 Garand
Caliber - .30 ' 06
Action - Gas (semiautomatic)
Magazine - Five or eight round box
Max Reserve Capacity - 270+ rounds
Effective Range - Long
Classification - Longarm (Rifle)
The M1 Garand, designed by John Garand, was the United States Army's first government issued self loading repeating rifle. While individual soldiers have used many types of self loaders since their availability, up until the 1930s, the stuff issued by the Army is basically what most people can own today. The Garand was robust, heavy, and carried too little ammo by contemporary standards. It carried too little ammo back then, and many soldiers, infantry and marine alike, found better substitutes in the form of submachineguns, enemy arms, and the M1 series of Carbines (which are not featured in the game). The Garand is your primary weapon when you hit the beach head at Normandy. It is only with you for the Normandy missions, and then you ditch it for better weapons. You cannot manually reload this weapon, and instead must fire off the remaining rounds to eject the stripper clip before you can insert a fresh one. The round it fires is powerful and can stop a soldier with one or two rounds to the chest.
Mauser Kar 98K (not playable)
Caliber - 7.92 mm x 57 Mauser
Action - Bolt
Magazine - Five round box
Max Reserve Capacity - Not applicable
Effective Range - Long
Classification - Longarm (Rifle)
The Mauser is a long standing arms manufacturer in the Deutschland. They have been around since the days of Bismark, so they know what they are doing. The Mauser is in every way similar to what you have been training with, except that Jerry is still cranking the bolt to get the round in each time. After five shots, they have got to reload, so that is your best chance of drilling them a new one. Most of the goose-stepping goons you face in the early parts of the game are equipped with this weapon, putting them at a disadvantage when you face them down with a Tommy Gun or something equivalent.
Springfield '03
Caliber - .30 ' 06
Action - Bolt
Magazine - Five round box
Max Reserve Capacity - 100 rounds
Effective Range - Long
Classification - Longarm (Rifle)
For those who were in JROTC, you may or may not have come across non-firing versions of this firearm when you were doing your rifle drills. If you want an idea of how this baby works, Private Jackson, in Saving Private Ryan, uses this weapon to great effect in the church tower, right before he is blasted by the Panzer. You should do the same, but stay away from tanks. Its five round box makes it not so great when it comes to taking out multiple people, but it is the only weapon capable of long ranged sniping until you get your hands on the German Gewehr.
Gewehr 41/43
Caliber - 7.92 mm x 57
Gas (semiautomatic)
Magazine - Ten round box
Max Reserve Capacity - 150 rounds
Effective Range - Long
Classification - Longarm (Rifle)
The G43 was the 1943 variant of the G41 rifle. A testament to German efficiency, the G43 is a tightly bound, robust firearm designed for the 7.92 mm x 57 round. The addition of the sniper scope was prompted after the Wehrmacht suffered considerable losses from Soviet snipers on the Eastern Front; this allowed Germany's finest to engage in some sniping of their own (Enemy at the Gates). In the game, the G43 is your best ally even after you find better equipment. The ten round box allows you to kill several soldiers before you need to reload; its only detriment is the lack of the on screen cross hair.
Thompson Gun
Caliber - .45 A.C.P.
Action - Recoil most likely (fully automatic)
Magazine - 20 round box
Max Reserve Capacity - 400 rounds
Effective Range - Medium / Long
Classification - Submachinegun
The Tommy Gun is often associated with Dick Tracy, gangsters, and the Roaring Twenties. The Thompson was indeed a submachinegun manufactured with a level of craftsmanship not found in today's polymer stocked, machine pressed designs, but the Tommy Gun can stand with these contemporary designs and still come out equal. In the game, the Tommy Gun comes with the earlier 20 round box (there were 30 round boxes and 50 round drums available) and you find that it runs dry fast. Fire in short, controlled bursts to maintain accuracy and to conserve bullets. It fires the same ammo as the Colt, but the game differentiates between Colt ammo and Thompson ammo.
MP40
Caliber - 9 mm Parabellum
Action - Blowback (fully automatic)
Magazine - 32 round box
Max Reserve Capacity - 400 rounds
Effective Range - Medium / Long
Classification - Submachinegun
The German MP40 is a precursor to the modern day MP5. The MP40 was made from stamped or pressed parts to cheapen production costs and to shorten manufacture time. It sprays rounds everywhere when kicked into full auto, and is not overly helpful for sniping. The dozen rounds it carries over its competitor gives the MP40 a tremendous advantage — provided you again use short, controlled bursts.
Browning Automatic Rifle (B.A.R.)
Caliber - .30 ' 06
Action - Gas (fully automatic)
Magazine - 20 round box
Max Reserve Capacity - 260 rounds
Effective Range - Medium / Long
Classification - Light Machine Gun
The Browning is the U.S. Army's first Squad Support Weapon (or S.S.W.). It received its baptism by fire during the Second World War, but being overly heavy (it weighs 19 pounds empty) and without the ability to receive belt feeds, the B.A.R. fell out of use soon after hostilities with Korea ended. The B.A.R. uses the same ammo as the Garand and Springfield, but could deliver the slug farther and with more accuracy due to its longer barrel. The 20 round box you empties quite fast, and the muzzle flash generated by the repeated firing of a .30 ' 06 catridge is untolerable. But for sheer stopping power, you cannot beat the B.A.R. Private Reiben was the BAR-man in Private Ryan.
STG-44
Caliber - 7.92 mm x 39 Kurz
Action - Gas (fully automatic)
Magazine - 30 round box
Max Reserve Capacity - 240 roundsbr />Effective Range - Medium / Long
Classification - Assault Rifle
Called the world's first assault rifle, the STG-44 was manufactured under several designations since Hitler did not approve of its design. Once the smart bunch of Hitler's Inner Circle circumvented der Fuhrer's wishes, they managed to prove to him that the weapon was effective and brutally so — only then did Hitler authorize full production but by then (as most of Hitler-opposed Reich projects) it was too late. The Soviets copied this weapon and made it into the 7.62 mm x 39 monster known as the AK-47, but the STG-44 remains the first of a new breed of small arms. The STG-44 will fast be your favourite weapon, provided the game gives you access to one. Its 30 round box and sheer power make it a favourite of any soldier, regardelss of nationality, and provided they are not on the receiving end of the gun's rat-a-tat-tat.
Bazooka
Load - One rocket
Max Reserve Capacity - 10 rockets
Effective Range - Long
Classification - Heavy Ordnance
The rocket launcher of the game, the sight on the Bazooka has a bought-down Norden sight on it to deliver its payload at longer ranges. It reloads slowly, and the splash damage can kill you. If used properly, it can blast soldiers around the corner by force of impact, and can wipe out whole squads of men if they are packed close together. You should also try to use it on enemy armor, even though historically, the bazooka was ineffective against German Panthers and Tigers.
Panzershrek
Load - One rocket
Max Reserve Capacity - 10 rockets
Effective Range - Long
Classification - Heavy Ordnance
The Panzereshrek is a tube launched high explosive. The Panzershrek is a crude but effective weapon. The metal notch sight is roughly where the rocket strikes. The Panzershrek is a weapon you resort to when you fight the second tank in the stage, Arnhem Knights. Just do not expect to kill anything else effectively with it.
Browning Medium Machinegun
Caliber - .30 ' 06, and others
Action - Recoil or Gas
Cooling Method - Air
Cyclic R.P.M. - approx. 500 rounds per minute
Magazine - Belt (infinite for game purposes)
Max Reserve Capacity - Not applicable
Effective Range - Long
Classification - Medium Machinegun
Derived from models used during World War I, Browning manufactured many types of machineguns, the most famous — the .50 Caliber monster M2 — not being featured in the game. Browning's lighter .30 Caliber models appear several times while you are helping out your allies early in the game. The Browning behaves just like the German equivalent.
MG42/43/44
Caliber - 7.92 mm x 57
Action - Recoil
Cooling Method - Air
Cyclic R.P.M. - 1500 rounds per minute
Magazine - Belt (infinite for game purposes)
Max Reserve Capacity - Not applicable
Effective Range - Long
Classification - General Purpose Machinegun
This is the workhorse of the Wehrmacht and with its astoundingly high rate of fire, it has a distinctive sound, “like that of ripping cloth.” you will learn to hit the deck as soon as you hear this weapon go off, or you will be dead before you know it. The MG42 technically cannot keep up this rate of fire (the barrel would simply melt) but for the purpose of this game, it can — urning it into a lethal piece of hardware. The German Bundeswehr still uses an updated version of this gun, designated the MG-3. The fictional Cerebos Panzer Units from the animated movie Jin-Roh makes this thing look unstoppable when used in large groups.
Webley Silenced Pistol
Caliber - .22 Long Rifle
Action - Blowback (semiautomatic)
Magazine - Seven round box
Max Reserve Capacity - 250 rounds
Effective Range - Short / Medium
Classification - Sidearm (Handgun)
This is a specialist firearm designed for covert operations. It does not have tremendous power, nor range, but it relatively quiet compared to non-silenced weapons. The .22 subsonic load should make it sound like a cough in quiet situations and cannot be heard at all in noisy situations or at distances over 50 feet. You should use it only when you think you encounter one enemy at a time in a small room, and if you have the drop on him. This case hardly comes up throughout the game, so you are forced to use this gun regardless if you like it or not.
No equivalent
Rest assured, the eight German agents sent to the United States during Operation Pastorius were probably equipped — or would have been equipped — with something quite similar.
Remington Shotgun
Caliber - 10, 12, or 20 Gauge
Action - Pump
Magazine - Eight round tube
Max Reserve Capacity - Unknown
Effective Range - Short / Medium
Classification - Auxiliary Ordnance
Remington is a famous purveyor of shotguns, and their line of arms that fire non-rifled ordnance is among the world's best. Marines use shotguns for ship board security due to the tight confines of a ship's hallway. You should take and use the same view when you engage soldiers in the confines of a house or pillbox. The spread of the shell does little damage, but the fragments as a whole will kill even the most stalwart individual. Aim for the chest and turn the enemy into liberty steak (or as it is known now, hamburger).
No equivalent
Note that the Germans were fond of the forest, and could be counted on to pick up a rifle and hunt game. Air Minister Goering imported New World raccoons to start a raccoon farm-slash-hunting ground and Europe is still plagued by raccoons. It has something to do with their deep-rooted mysticism that has descended from their Gothic roots.
Mark II Fragmentation Grenade
Max Reserve Capacity - 21 grenades
Effective Range - Variable
Classification - Hand Thrown Explosive
The U.S. Army's primary defensive grenade was an improvement over the British Mill's Bomb. Learn to "cook" the grenade before throwing it where you want. Once you get proficient at this technique, you are unstoppable in trench and urban warfare.
Steilhandgrenate (Steil Grenate)
Max Reserve Capacity - 21 grenades
Effective Range - Variable
Classification - Hand Thrown Explosive
The Steil Grenate is the same thing as the American Hand Grenade in this game. Realistically, the Potato Smasher had better leverage due to its long handle and could be thrown farther. Like the American grenade, the Steilhandgreante explodes upon impact with objects that can be destroyed by explosions which includes enemies, tanks, and barrels.
Objective Items:
Objective items are items that have no other use in the game except to allow you to complete objectives. Some objective objects can be carried, while others are fixed, emplaced weapons or other things you need to do, but nothing as complicated as required during the covert-op in Peenemunde in the original Medal of Honor.
Smoke Grenade
You use these in the second stage in Normandy to mark the Gun Decks so Allied cruisers can blow the hell out of 'em.
Demolition Charges
Similar to the Smoke Grenades in use, but they actually explode, so you should get out of the way before they do. You have an unlimited number of demo-charges.
Spy Camera
Something you need once you get inside the base in Gotha. You need to photograph some sensitive information — and the most secure way to get these documents is to store them in a camera until they are ready to be developed.
Mechanics' Tools
Used to sabotage the local S.S. motor pool so Patterson can plan on a quick get-a-way. Not having these on hand denies him the ability of dishing out some American michief on German motors.
I.D. Papers
If your papers are not in order, you get shot. that is curfew for you, so be sure that does not happen in your country. Show these papers when asked, and there should be few, if any, problems.
Enemy Uniform
Used to fool guards and soldiers behind enemy lines. Sooner or later, you get found out, so be ready to run and gun when you hear the alarm.
Briefcase, Plans, Blueprints, Documents
These are vital things you need to pick up for the Allied War Effort. Not picking these up denies Patterson access to the end of the stage he is on. The object(s) if any, are varied through each mission, so stay awake during the briefing to find out what you need to do. Fall asleep in traffic school or in the missus, but never, ever do that in a mission briefing.
Enemies
Enemies come in all shapes and sizes. Most are human, but with different uniforms. What really matters is what kind of armament are they using on you, Patterson. You should use your scope whenever you can to see what an enemy soldier is holding. If it is a choice between killing a soldier with a machinegun and a soldier with a bolt action Mauser, aim for the maschinepistol toting kraut first. Similarily, a Panzershrek wielding Jerry should be the first target on your priority list. Tanks and other dangerous objects, like train mounted artillery, should be eliminated the first chance you get. here is a brief description of enemy uniforms you will find in Medal of Honor: Frontline as well as some general rules of thumb. Remember, look for their weapons first, because that is all that matters.
- Enemies become harder to kill (requiring more bullets unless you aim for the head) and become more accurate as the difficulty is adjusted upwards.
- Enemies, regardless of difficulty, die with one solid head shot.
- Enemies cannot aim when the vertical difference is greater than the horizontal difference. This means you can be right above or below a soldier and not get hit.
- Enemies drop ammo and health items, but not always. The frequency of the item drops begins to narrow as the difficulty goes up.
- Enemies rightfully react to your grenades, but only if they see it. Sleeping sentries ignore grenades, as waking soldiers do to grenades that land behind them.
- Enemies will toss grenades of their own — not just the ones you throw at them. you are given no warning of this, so listen for any sounds that a grenade has landed.
- Enemies do not climb ladders — they also do not open doors unless they are scripted to do so.
- Enemies have a predictable behaviour; for example, they will make for the nearest heavy machinegun if it is vacant.
- Enemies react to your footsteps and silhouette, so walk if you are sneaking, crouch if you are behind cover or far away, and run only if gunfire breaks out.
- Enemies have a limited range of vision. This holds true in massive outdoor stages. This is what the sniper scopes and rifles are built for.
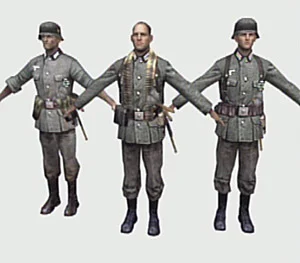
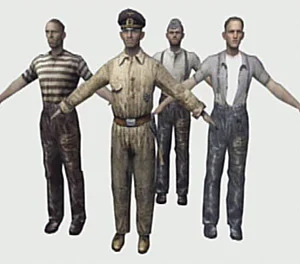
Stormtrooper (Gray Uniform)
 The standard stormtrooper wears a uniform grey that tends to blend with dark backgrounds and the hazy dusks and dawns you will be fighting in most of the time. Given that fact, they are quite hard to see until you catch them moving or firing at the corner of your eye. The S.S. insignia is boldly emblazoned on some uniforms, as are the traditional black Iron Cross of Germany, and the the occasional swastika. Some of these fellas start carrying Panzershreks from the stage Arnhem Knights.
Stormtrooper (Brown Uniform)
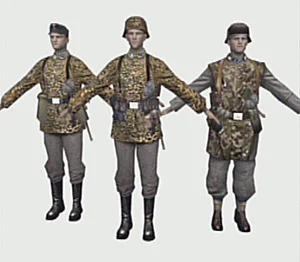 The alternate uniform (most likely developed as an alternative to woodland or desert camouflage) incorporates a light toned brown netting atop their uniforms. Occasionally, it makes them easier or harder to see depending on the type of terrain you are fighting in. The brown stormtrooper will neither be harder or easier than their gray contemporaries. Some of these fellas start carrying Panzershreks from the stage Arnhem Knights.
S.S. Officer (Black Uniform)
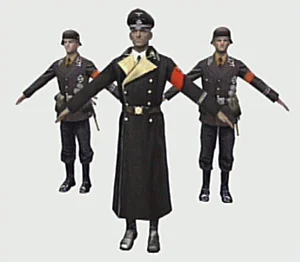 The black uniform of the S.S. inspires fear where they tread, but of course Himmler never required men's love, only their fear. They tend to stand out in stages where there is bright daylight, but aboard submarines or other dark areas, they can become nearly invisible until they fire. The only brightly colored thing on their person is the red swastika armband they wear.
Scientist (White Lab Coat)
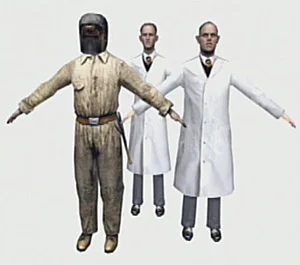 The scientists of the Reich wear white lab coats and carry more than just mere sidearms. These eggheads know how to handle their firearms and will attack Patterson on sight. The best thing about them are their bright white lab coats are a dead giveaway of where they are.
Factory or Shipyard Worker
 German civilians hardened by the realities of a world war come to their doorstep, the German workers at the factories are quick to anger and lethal with any number of small arms. Their civilian clothing makes them blend with friendlies, but where Patterson is going, there are no friendly factory workers, so blaze away at anything you see.
Angry Chef (Red Chef Apron)
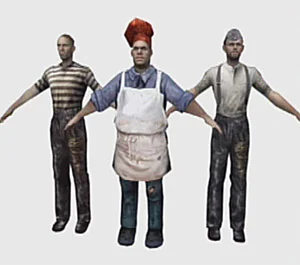 While most civilian-looking enemies are cut-outs from their Wehrmacht counterparts, the chef is a distinctly challenging goon since his knives do more damage than regular German bullets. He is also accurate with his shots.
Kriegsmarine Sailor (Sailor Uniform, like in Japan — but they have guns, not like in Japan)
These non-coms behave like any other enemy you find, but they are only found in the second series of stages involving the U-Boat Yards. They bleed just like everybody else.
Kriegsmarine Officer (Dark Blue Uniform)
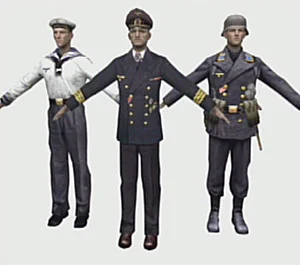 The officers of the Kriegsmarine may prove a little harder to see if they hide in the shadows. They are difficult to spot from a distance unless you know you are looking for one, so again, your hearing and observation skills are put to the test if you find yourself under fire, but cannot determine who or where the shots are coming from.
Luftwaffe Pilot (Tan Uniform)
 Found in the last stage, Stealing the Show, there some pilots who are readying their Messerschmidt Me.262s to repel the Allied bombers, but you can cut short their flight before they even get in the cockpit. One little known fact about the jet fighters — they had the Allied High Command scared schnitless when these jets could hit and run faster than the bombers' gun turrets could traverse. Remember Han Solo and Puke Skywalker in the Milennium Falcon blasting TIE fighters? Now imagine the TIE fighters moving five times as fast and the laser bolts on the Falcon moving half as fast. Scary, no? Ground these guys permanently with a bullet in the spine.
General von Sturmgeist
The main target of James Patterson after Allied High Command learns of a secret project in Gotha. Sturmgeist (Storm Ghost) is the military head of the project, and your job is to find him and kill him!
Panzer IV Tank
Herr von Sturmgeist may be your toughest foe, but the tanks are unstoppable unless you have some heavy firepower at your diposal. A Corporal Barnes will help you destroy tanks in one stage, but when Patterson is alone, you will need to resort to grenades, bazookas, or a heavy machinegun to vape one. This game tidbit is complete and utter bee-ess; realistically you would need something heavier than a GPMG to level a tank, like a MILAN or HEAT / HESH ordnance. The Panzer is also unique in that it has two weapons: a 360 degree tank gun and a pair of forward firing machineguns. The tank gun does not fire if you are touching the tank, but the machineguns always fire if you get in front of the tank. Try to keep that in mind; it will keep you from getting killed.
Alarm
Just as annoying and dangerous as real alarms. You can stop the flow of reinforcements by shooting this device or with a well-placed grenade that can eliminate the sentry and the alarm with one blow. If you do not want to waste ammo, you can shut it off yourself by pressing action on it.
Missions
Secrets
Hidden Packages
- Unlock All Cheats: On the Enigma machine enter "ENCHILADA" to unlock all cheats.
- Invincibility: Xbox has key tap codes that activates cheat modes. All are entered when the game is paused. If entered correctly, the last key tap of the cheat causes the game to unpause. Pause and press X, L, B, R, BACK, Y, X
- Enigma Machine (the thing that looks like a typewriter) cheats. Green lights confirm correct entry.
- Bullet Shield: NOHITSFORU
- Unlock Mission 2: BASS
- Unlock Mission 3: STURGEON
- Unlock Mission 4: PIKE
- Unlock Mission 5: TROUT
- Unlock Mission 6: CATFISH
- Earn Gold Star: SALMON
- Paintball FMV: COTOBREATH
- Animation reel: FLIPBOOK
- All Weapons: The following commands must be input during gameplay and within the span of one second: Hold the white and black buttons and press right, right, down, up, left, left